Spinach Artichoke Dip Stuffed Bread Delightful Snack

Are you ready to take your snacking game to the next level? This Spinach Artichoke Dip Stuffed Bread is the perfect blend of creamy, cheesy goodness housed within warm, crusty bread. I’ve gathered simple ingredients and easy steps to help you create a delight that’s not just tasty but also a showstopper at any gathering. Let’s dive into this mouthwatering recipe and impress your friends and family!
Why I Love This Recipe
- Delicious Combination: The blend of creamy cheese, spinach, and artichokes creates a flavor explosion that is both savory and satisfying.
- Perfect for Sharing: This stuffed bread is ideal for gatherings, making it easy to serve and enjoy with friends and family.
- Customizable: Feel free to add your favorite ingredients, like sun-dried tomatoes or different cheeses, to make it your own.
- Visual Appeal: The presentation of a whole stuffed loaf is impressive and adds a touch of elegance to any meal or party.
Ingredients
Main Ingredients List
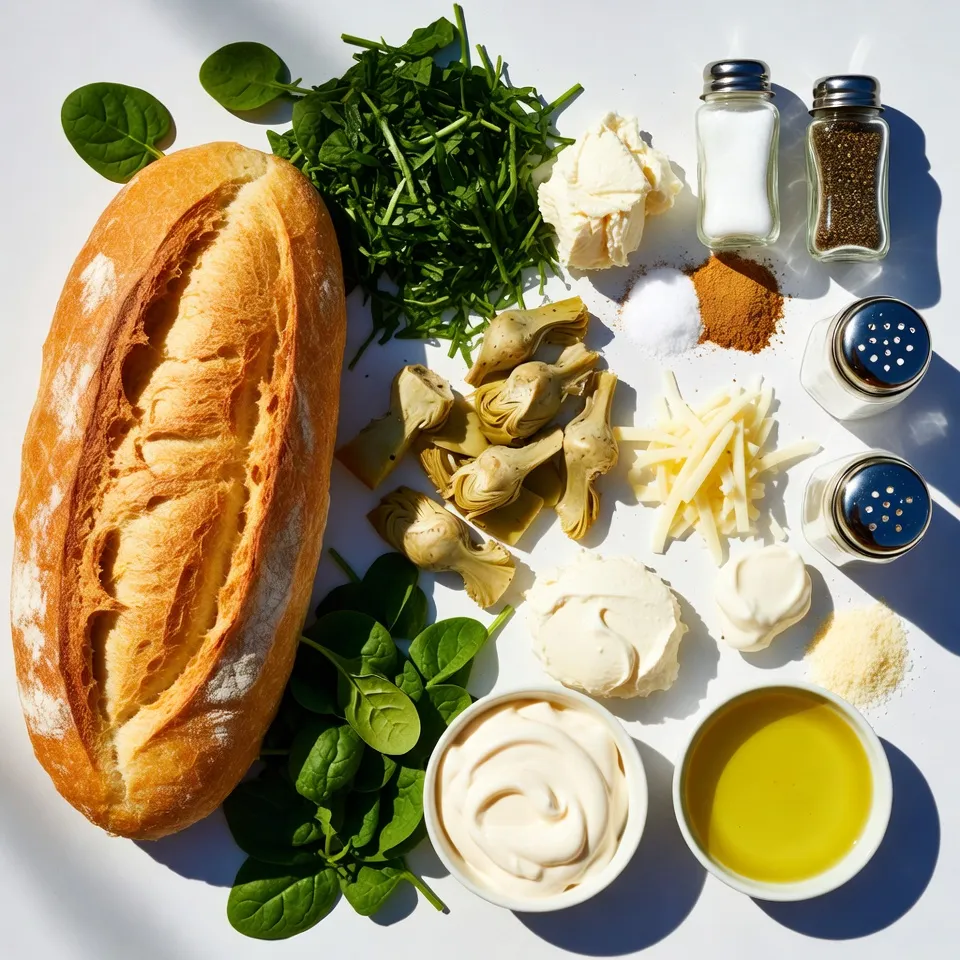
– 1 large loaf of crusty bread (sourdough or ciabatta)
– 1 cup fresh spinach, finely chopped
– 1 cup canned artichoke hearts, drained and coarsely chopped
– 1 cup cream cheese, softened to room temperature
– ½ cup sour cream
– ½ cup mayonnaise
– 1 cup shredded mozzarella cheese
– 1 teaspoon garlic powder
– ½ teaspoon onion powder
– Salt and black pepper, to taste
– 2 tablespoons extra virgin olive oil
– ¼ cup grated Parmesan cheese
To make this tasty dish, you need a few key ingredients. Start with a loaf of crusty bread. Sourdough or ciabatta works great. You want a bread that holds its shape when stuffed.
Then, gather fresh spinach and canned artichoke hearts. The spinach adds a nice color and flavor. The artichokes bring a unique taste and texture.
Next, for the creamy base, you will use cream cheese, sour cream, and mayonnaise. These ingredients make the dip rich and smooth.
You also need some seasonings and cheese. Garlic powder and onion powder add depth. Salt and black pepper enhance all the flavors. Lastly, mozzarella and Parmesan cheese create a gooey, cheesy filling that everyone loves.
With these ingredients ready, you can create a delightful snack that is perfect for any occasion.

Step-by-Step Instructions
Preparation Overview
1. Preheat the Oven: Start by setting your oven to 375°F (190°C). This helps the bread cook evenly and get that nice golden crust.
2. Prepare the Bread: Take your large loaf of crusty bread, like sourdough or ciabatta. Carefully cut off the top to create a lid. Set the lid aside. Hollow out the inside, leaving about an inch of bread intact. Save the removed bread for dipping later.
3. Make the Creamy Filling: In a big mixing bowl, combine 1 cup of softened cream cheese, ½ cup of sour cream, and ½ cup of mayonnaise. Mix them well until smooth and creamy.
Assembling the Dish
1. Add Flavor and Texture: To your creamy mix, add 1 cup of finely chopped fresh spinach, 1 cup of coarsely chopped canned artichoke hearts, and 1 cup of shredded mozzarella cheese. Then, sprinkle in 1 teaspoon of garlic powder, ½ teaspoon of onion powder, and some salt and black pepper. Stir until everything is blended.
2. Stuff the Bread: Spoon the spinach and artichoke mix into the hollowed loaf. Pack it lightly to fit all the filling. Use a spatula to level it off at the top.
3. Seal and Prepare for Baking: Place the bread lid back on top of the stuffed loaf. Brush the outside lightly with 2 tablespoons of extra virgin olive oil. Sprinkle ¼ cup of grated Parmesan cheese on top for a tasty finish.
Baking Instructions
1. Wrap and Bake: Wrap the stuffed bread in aluminum foil and place it on a baking sheet. Bake it in your preheated oven for 25-30 minutes.
2. Brown the Top: In the last 5 minutes, carefully unwrap the foil. This allows the top to brown and get crispy. Keep an eye on it to stop any burning!
3. Serve: After baking, let the bread cool for a few minutes. Slice it into portions and serve warm. Don’t forget the reserved bread pieces for dipping in that creamy goodness!
Tips & Tricks
Perfecting the Recipe
To keep the bread from getting soggy, pay attention to moisture. First, use a thick bread like sourdough or ciabatta. These types hold up well to the creamy filling. Second, avoid overfilling the bread. Too much dip can seep into the bread and make it soggy.
For the best results, bake at 375°F (190°C). This temperature ensures the bread gets crispy while the filling warms through. If you want a crispy crust, add a few extra minutes at the end without the foil. This step gives a nice brown top.
Serving Suggestions
Pair your stuffed bread with crunchy veggies or chips. Carrot sticks and cucumber slices add a fresh touch. You can also serve it with a light salad for a balanced meal.
For a gathering, make the dish look great. Slice the stuffed bread into thick pieces. Arrange it on a wooden board. Add a sprinkle of fresh parsley or basil for color. This not only makes it pretty but also enhances the flavor!
Pro Tips
- Choose the Right Bread: Opt for a sturdy loaf like sourdough or ciabatta to hold the creamy filling without getting soggy.
- Customize Your Fillings: Feel free to add other ingredients such as cooked bacon, sun-dried tomatoes, or different cheese varieties for extra flavor.
- Serve Fresh: For the best experience, serve the stuffed bread warm and fresh out of the oven to enjoy the gooey cheese and flavorful dip.
- Make Ahead: You can prepare the filling in advance and stuff the bread right before baking to save time on busy days.

Variations
Ingredient Swaps
You can change the flavors in your spinach artichoke dip stuffed bread. Here are some fun swaps:
– Cheeses: Instead of mozzarella, try cheddar or gouda. They add a rich taste.
– Spreads: Swap mayonnaise for Greek yogurt for a lighter feel.
– Veggies: Add chopped bell peppers or sun-dried tomatoes for extra color and flavor.
– Herbs: Fresh herbs like basil or dill can brighten the dish.
Dietary Modifications
You can make this dish fit different diets easily. Here’s how:
– Vegetarian: This recipe is already vegetarian. Just ensure all your products are plant-based.
– Gluten-Free: Use gluten-free bread. Check labels for safe ingredients.
– Lighter Options: Use low-fat cream cheese and mayonnaise. This cuts calories without losing flavor.
Feel free to mix and match these ideas. You can create a unique version that fits your taste and needs!
Storage Info
How to Store Leftovers
To keep your spinach artichoke dip stuffed bread fresh, follow these tips:
– Refrigerate: Place any leftover stuffed bread in an airtight container. It will stay good for about 3-4 days in the fridge.
– Freeze: If you want to save it longer, wrap the stuffed bread tightly in plastic wrap, then foil. It can freeze for up to 3 months. Just remember to label it with the date.
Avoid letting it sit out at room temperature for too long to prevent spoilage.
Reheating Instructions
To enjoy your leftovers, reheating them correctly is key:
– Oven Method: Preheat your oven to 350°F (175°C). Wrap the stuffed bread in foil and heat for about 15-20 minutes. This keeps the bread crusty and the filling warm.
– Microwave Method: If you’re in a hurry, place a slice on a microwave-safe plate. Heat for about 30 seconds to 1 minute. This method is quick but may make the bread a bit soggy.
Choose the method that fits your time. Enjoying this creamy, cheesy delight again is always a treat!
FAQs
Can I use frozen spinach instead of fresh?
Yes, you can use frozen spinach. Just thaw it first and drain the excess water. This prevents a soggy dip. Frozen spinach works well, but fresh gives a better flavor.
How long does the stuffed bread last in the fridge?
The stuffed bread lasts about 3 days in the fridge. Make sure to wrap it tightly to keep it fresh. If you want to enjoy it longer, consider freezing it.
Is there a vegan version of spinach artichoke dip I can use?
Yes, you can make a vegan version. Use vegan cream cheese, vegan sour cream, and swap regular cheese for a dairy-free option. This way, you can still enjoy the rich flavors.
Can I prepare the dip ahead of time?
Absolutely! You can mix the dip a day in advance. Just store it in the fridge. When you’re ready, stuff the bread and bake it fresh for serving.
This blog post covered how to make a tasty stuffed bread with spinach and artichokes. You learned about key ingredients, step-by-step prep, tips for perfecting the dish, and storage advice. Remember, using fresh ingredients makes a big difference. You can even mix in different cheeses or vegetables. This recipe is fun for gatherings or cozy nights at home. Enjoy your cooking and the smiles it brings to your table. Your stuffed bread will be a hi

Spinach Artichoke Dip Stuffed Bread
Ingredients
- 1 large loaf crusty bread (sourdough or ciabatta recommended)
- 1 cup fresh spinach, finely chopped
- 1 cup canned artichoke hearts, drained and coarsely chopped
- 1 cup cream cheese, softened to room temperature
- ½ cup sour cream
- ½ cup mayonnaise
- 1 cup shredded mozzarella cheese
- 1 teaspoon garlic powder
- ½ teaspoon onion powder
- to taste salt and black pepper
- 2 tablespoons extra virgin olive oil
- ¼ cup grated Parmesan cheese
Instructions
- Preheat the oven to 375°F (190°C).
- Carefully slice off the top portion of the bread loaf to create a lid. Hollow out the inside of the loaf, leaving about an inch of bread intact on all sides.
- In a large mixing bowl, combine the softened cream cheese, sour cream, and mayonnaise. Mix until smooth and creamy.
- Add the finely chopped spinach, coarsely chopped artichoke hearts, shredded mozzarella cheese, garlic powder, onion powder, and a sprinkle of salt and black pepper. Stir well until fully combined.
- Gently spoon the mixture into the hollowed-out loaf, packing it lightly. Level the filling at the top.
- Place the bread lid back onto the stuffed loaf. Lightly brush the exterior with olive oil and sprinkle grated Parmesan cheese on top.
- Wrap the stuffed bread in aluminum foil and place it on a baking sheet. Bake for 25-30 minutes.
- For the final 5 minutes, unwrap the foil to allow the top to brown. Watch closely to prevent over-browning.
- Remove from the oven and let cool for a few minutes. Slice into portions and serve warm with reserved bread pieces for dipping.


![- 1 block (14 oz) firm tofu, pressed and drained - 1/2 cup cornstarch - 3 tablespoons vegetable oil - 1/4 cup honey - 2 tablespoons soy sauce - 4 cloves garlic, minced - 1 teaspoon fresh ginger, grated - 1 tablespoon sesame seeds, toasted - 2 green onions, sliced - Salt and pepper to taste To make crispy honey garlic tofu, you need simple ingredients that pack big flavor. Start with firm tofu. It holds its shape well and crisps up nicely. Press and drain it to get rid of excess water. This step is key for crispy tofu. Next, grab some cornstarch. It’s your secret weapon for that crunchy coating. It sticks to the tofu and gets crispy in the hot oil. Vegetable oil helps fry the tofu evenly. Use a good amount, but don’t drown the tofu. For the sauce, honey adds sweetness. Soy sauce brings saltiness, and garlic and ginger give it a warm kick. These flavors blend perfectly. You can adjust the honey and soy sauce to fit your taste. Finally, sesame seeds and sliced green onions are for garnishing. They add a nice crunch and color to your dish. This crispy honey garlic tofu is not just tasty; it's visually appealing too. For the full recipe, check out the detailed steps. - Cut the tofu into 1-inch cubes. - Toss tofu cubes in cornstarch with salt and pepper. Start by cutting your block of firm tofu into 1-inch cubes. Make sure the pieces are even for cooking. Next, take a shallow dish and add cornstarch. Sprinkle in some salt and pepper. Toss those tofu cubes in the cornstarch mixture, coating each piece well. Shake off any extra cornstarch to keep them light and crispy. - Heat vegetable oil in a skillet over medium-high. - Sauté tofu until golden brown and crispy. Now, heat 3 tablespoons of vegetable oil in a skillet over medium-high heat. Wait until the oil is hot. Carefully place the tofu cubes in the skillet in a single layer. Sauté them for about 5 to 7 minutes. Turn the pieces so they cook evenly. You want them to turn golden brown and get nice and crispy. Once done, transfer the tofu to a paper towel-lined plate to absorb excess oil. - Sauté garlic and ginger in the skillet. - Combine honey and soy sauce, allowing to thicken. In the same skillet, lower the heat to medium. Add 4 minced garlic cloves and 1 teaspoon of grated ginger. Sauté these for about 1 minute. You'll know they're ready when they smell great and turn golden. Now, pour in 1/4 cup of honey and 2 tablespoons of soy sauce. Stir well and let it cook for 2 to 3 minutes until it thickens a bit. - Coat crispy tofu in the honey garlic sauce. - Serve with garnishes. Gently place the crispy tofu back into the skillet. Toss it in the honey garlic sauce until every piece is coated. Remove from heat and sprinkle 1 tablespoon of toasted sesame seeds and 2 sliced green onions over the dish. This adds flavor and makes it look nice. For the full recipe, check the details above! - Use firm tofu for best results: Firm tofu holds its shape and crisps up nicely. - Ensure the tofu is properly pressed and drained: Pressing removes excess water. This helps the tofu absorb flavors and get crispy. - Adjust honey and soy sauce ratios to taste: You can make it sweeter or saltier by changing these amounts. - Experiment with adding red pepper flakes for heat: A little spice can really elevate the dish. Add to your liking. - Consider using an air fryer for an even crispier finish: Air frying gives a great crunch without extra oil. - Double-fry method for ultimate crunch: Fry the tofu once, let it rest, and fry again. This makes it super crispy. For more details, check the Full Recipe. {{image_4}} You can switch tofu for other proteins. Tempeh is a great choice. It has a nutty flavor and a firmer texture. Just cut it into cubes like tofu. Cook it the same way for a tasty dish. Seitan is another option. It mimics meat well and offers a chewy texture. It absorbs flavors easily. Use seitan if you're looking for a heartier bite. Want a kick? Add sriracha to the sauce. This gives a spicy twist to the sweet honey. You can also try orange juice or maple syrup. These swaps change the flavor profile. Orange adds a fresh zest, while maple syrup gives a rich taste. Both can make your dish stand out. Crispy honey garlic tofu shines when paired with sides. Steamed vegetables bring color and nutrition. A fresh salad can add crunch. You can also use this tofu in wraps or tacos. Just fill them with your favorite veggies and tofu. It makes for a fun and easy meal. For the full recipe, follow the steps and enjoy your cooking journey! You can keep crispy honey garlic tofu in the fridge. Place it in an airtight container. It will stay fresh for up to 3 days. This way, you can enjoy it later without losing flavor. To reheat your tofu, use the oven or a skillet. This keeps it crispy and tasty. Avoid using the microwave. It makes the tofu soggy, which we want to prevent. You can also freeze cooked tofu. It will last for up to 2 months in the freezer. When you want to eat it, simply thaw it out. After thawing, re-crisp it in a skillet or oven before serving. This method helps regain its crunchy texture. Typically, crispy honey garlic tofu lasts up to 3 days when stored properly. To keep it fresh, place it in an airtight container. Ensure the tofu is cool before sealing. This helps maintain its flavor and texture. Yes, you can make this recipe vegan. Simply replace honey with agave or maple syrup. Both options add sweetness without using animal products. This change keeps the dish plant-based and equally delicious! Crispy honey garlic tofu pairs well with rice, noodles, or a fresh vegetable stir-fry. You can serve it over steamed jasmine rice for a classic combo. Noodles coated in a light sauce also work great. Adding a side of colorful stir-fried veggies brings extra nutrition and flavor. Firm or extra-firm tofu works best for a crispy texture. These types hold their shape and don’t crumble. For the best results, make sure you press and drain the tofu well before cooking. This removes excess moisture, allowing for a delightful crunch. For the full recipe, check out the [Full Recipe]. In this post, we covered how to make crispy honey garlic tofu. You learned about the key ingredients, from firm tofu to the sweet and savory sauce. I shared step-by-step cooking tips and tricks for the perfect texture and flavor. Remember, you can customize the recipe with different proteins or sauces. Store leftovers correctly to enjoy this dish later. Overall, this recipe is fun, flexible, and delicious. Give it a try, and you’ll impress your friends or family!](https://joymealplan.com/wp-content/uploads/2025/07/a62a8118-0118-41a9-8dcd-10793e5e2e73-768x768.webp)


![To make delicious Rainbow Veggie Wraps, gather these fresh ingredients: - 4 large whole wheat tortillas - 1 cup of your favorite hummus - 1 cup shredded carrots - 1 cup red bell pepper, thinly sliced - 1 cup cucumbers, julienned - 1 cup purple cabbage, shredded - 1 ripe avocado, sliced - 1 cup fresh spinach leaves - 2 tablespoons sesame seeds (optional) - Salt and pepper to taste - Fresh herbs like cilantro or basil for garnish (optional) Each ingredient brings unique flavors and colors to your wraps. Whole wheat tortillas provide a healthy base. Hummus adds creaminess and taste. Shredded carrots offer crunch and sweetness. Red bell pepper adds vibrant color and a mild flavor. Cucumbers bring a refreshing crunch, while purple cabbage adds a nice texture. Avocado gives a creamy richness. Fresh spinach leaves add nutrition and color. You can sprinkle sesame seeds for extra crunch. Optional toppings like fresh herbs enhance the taste and look of your wraps. A pinch of salt and pepper brings all the flavors together. For the full recipe, check out the entire section. Start by washing all your vegetables. This keeps them fresh and clean. First, rinse the cucumbers, carrots, red bell pepper, purple cabbage, and spinach under cold water. Pat them dry with a clean towel. Next, slice the cucumbers into thin sticks. Shred the carrots and purple cabbage using a grater. For the red bell pepper, cut it into thin slices. Lastly, slice the ripe avocado carefully to avoid any bruising. When you are ready to spread the hummus, take a large spoonful. Place it in the center of each tortilla. Use the back of the spoon to spread it evenly. Leave about an inch of space from the edges. This helps to fill the wrap without making a mess. Now it's time to build your wrap. Start by laying a handful of fresh spinach leaves in the center of each tortilla. Next, add a layer of shredded carrots, followed by the red bell pepper slices. Then, place the cucumber sticks, shredded cabbage, and avocado slices on top. Lightly sprinkle salt and pepper over the veggies to boost their flavor. If you like, add some sesame seeds for a crunchy texture. To roll your wrap, begin at one end. Tuck the filling tightly as you roll towards the other end. Be sure to fold in the sides as you go. This helps keep all the tasty fillings secure. Once you have rolled all the wraps, grab a sharp knife. Cut each wrap in half diagonally. This shows off the bright, colorful layers inside. Now, arrange your cut wraps on a serving platter. If you want, sprinkle some fresh herbs like cilantro or basil on top for a lovely touch. Try this full recipe to enjoy a fresh and flavorful meal! You can swap or add veggies based on what you have. Here are some ideas: - Use zucchini or yellow squash for a different taste. - Try radishes for a crunchy bite. - Sweet potato adds natural sweetness when roasted. - Bell pepper colors can change based on what’s fresh. For spreads, think outside the box: - Guacamole gives a creamy touch. - Tzatziki adds a fresh, tangy flavor. - Try a spicy hummus for a kick. Make your wraps look great for any gathering. Cut them into smaller pieces for easy sharing. Arrange them on a colorful plate. You can also use a large platter and create a rainbow effect with the veggies. Add fresh herbs on top for a pop of color. Pair your wraps with tasty dips: - A simple yogurt sauce works well. - Try a spicy salsa for heat. - Peanut sauce can add a nice twist. For a fun touch, serve the wraps with toothpicks. This makes them easier to grab and enjoy. For the full recipe, check out the Rainbow Veggie Wraps section. {{image_4}} You can make these rainbow veggie wraps even more exciting. Adding protein boosts flavor and fills you up. Grilled chicken, shrimp, or tofu works great. Just slice them thin and layer them in the wrap. You can also mix in herbs and spices. Fresh cilantro or basil adds a tasty kick. Want a bit of heat? Add sliced jalapeños or a dash of hot sauce. For a zesty touch, try a sprinkle of lemon juice or a bit of garlic powder. These small changes can turn a simple wrap into a flavor explosion. These wraps are easy to adjust for different diets. If you need gluten-free options, use gluten-free tortillas. Many brands offer great taste without gluten. For a vegan version, skip the chicken or shrimp. The fresh veggies and hummus keep it tasty and filling. If you want lower calories or low-carb options, swap the tortilla for lettuce leaves. This keeps the wraps light and fresh. You can also reduce the hummus or use a low-calorie spread. These tweaks help you enjoy the wraps while sticking to your goals. For the complete recipe, check out the [Full Recipe]. To keep your Rainbow Veggie Wraps fresh, store them in a sealed container. Wrap each one in parchment paper or plastic wrap. This helps prevent them from drying out. If you make wraps in advance, place a paper towel in the container. This will absorb excess moisture and keep them crisp. If you want to meal-prep, assemble the ingredients without rolling them. Store the veggies and hummus separately. When ready to eat, just spread the hummus and roll. This keeps everything fresh and tasty. You can keep your wraps in the fridge for about three days. After that, they may start to lose their crunch and flavor. Check for any signs of spoilage like a sour smell or slimy texture. If you see these signs, it's best to throw them away. Enjoy your wraps while they are still fresh for the best taste! To make your Rainbow Veggie Wraps more filling, you can add proteins or grains. Here are some suggestions: - Grilled chicken for a meaty option - Tofu or tempeh for a plant-based choice - Quinoa or brown rice for hearty grains - Chickpeas or black beans for extra fiber These ingredients not only add bulk but also enhance the flavor and nutrition. Yes! You can prepare Rainbow Veggie Wraps ahead of time. Here are some tips to make it easy: - Prep all your veggies a day before. Store them in airtight containers to keep them fresh. - Spread hummus on the tortillas and stack them in the fridge. Just add the veggies when you’re ready to eat. - Roll the wraps tightly and wrap them in plastic for easy storage. This way, you can enjoy your wraps without much hassle. Rainbow Veggie Wraps pair well with various sides and drinks. Here are some ideas: - Fresh fruit salad for a sweet touch - Crispy sweet potato fries for a fun crunch - A light soup, like tomato or vegetable, to warm up your meal - Sparkling water or herbal tea for a refreshing drink These options complement the flavors of the wraps and make for a balanced meal. These rainbow veggie wraps are easy and fun to make. We covered the key ingredients, their preparation, and how to assemble each wrap. I shared tips on ingredient swaps and how to make your wraps look great. You can also try different flavors and adapt the recipe for various diets. When stored correctly, these wraps stay fresh and tasty. Now, get creative and enjoy making these vibrant, healthy meals!](https://joymealplan.com/wp-content/uploads/2025/07/35a6ca00-0a2a-4347-b538-1c234b42866c-768x768.webp)

