Spinach Artichoke Stuffed Mushrooms Flavorful Treat

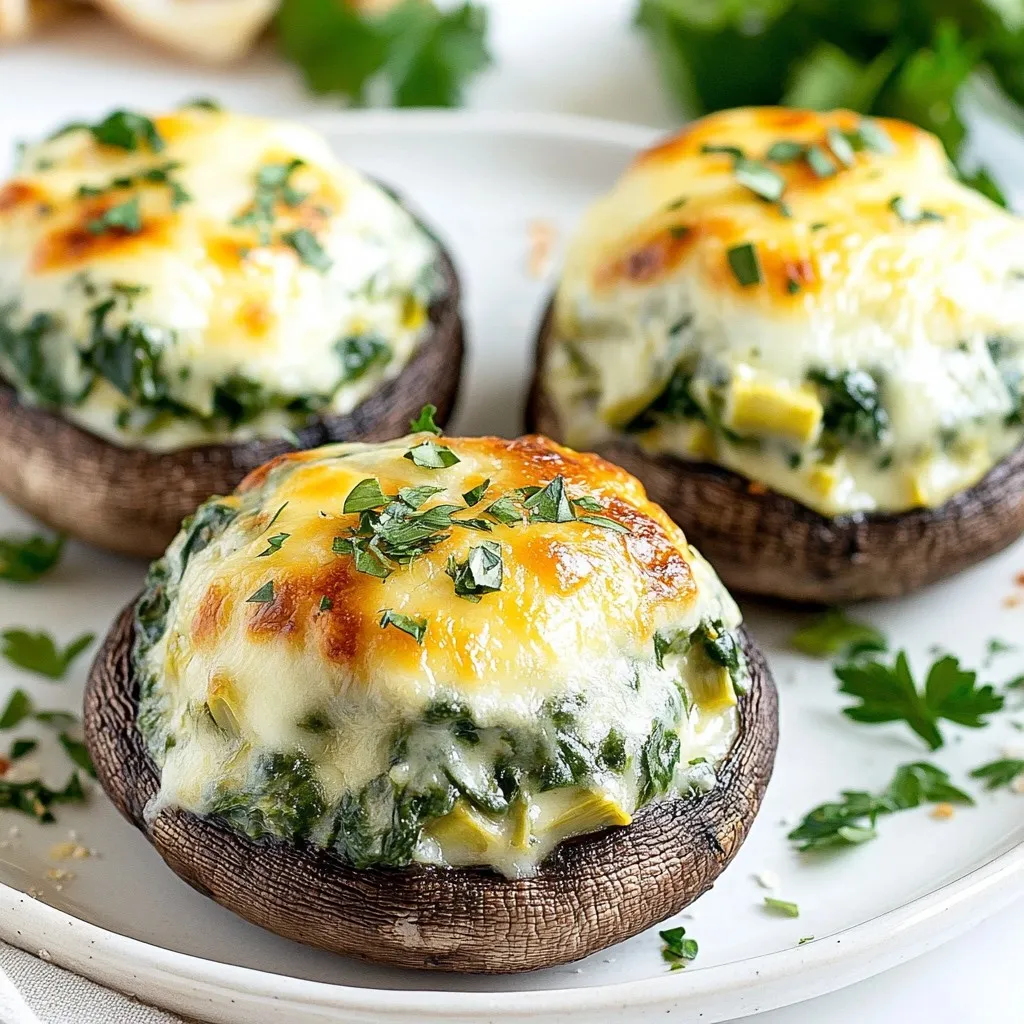
Looking for a savory snack that impresses? Spinach Artichoke Stuffed Mushrooms deliver bold flavors in every bite. With creamy cheeses and fresh veggies, these tasty bites are perfect for any occasion. I’ll guide you step-by-step in making this crowd-pleaser, ensuring you nail the flavors. Let’s dive into the deliciousness of this dish and get ready to wow your guests.
Why I Love This Recipe
- Irresistible Flavor: The combination of creamy cheeses and savory artichokes, along with fresh spinach, creates a rich and delicious filling that elevates the mushrooms to a whole new level.
- Simple Preparation: This recipe is straightforward and easy to follow, making it perfect for both novice cooks and experienced chefs looking for a quick appetizer.
- Perfect for Any Occasion: Whether it’s a festive gathering or a casual family dinner, these stuffed mushrooms are a crowd-pleaser that adds a touch of elegance to any meal.
- Healthier Indulgence: With the inclusion of fresh spinach and artichokes, this dish offers a nutritious twist on a classic appetizer, making it a guilt-free indulgence.
Ingredients
Main Ingredients
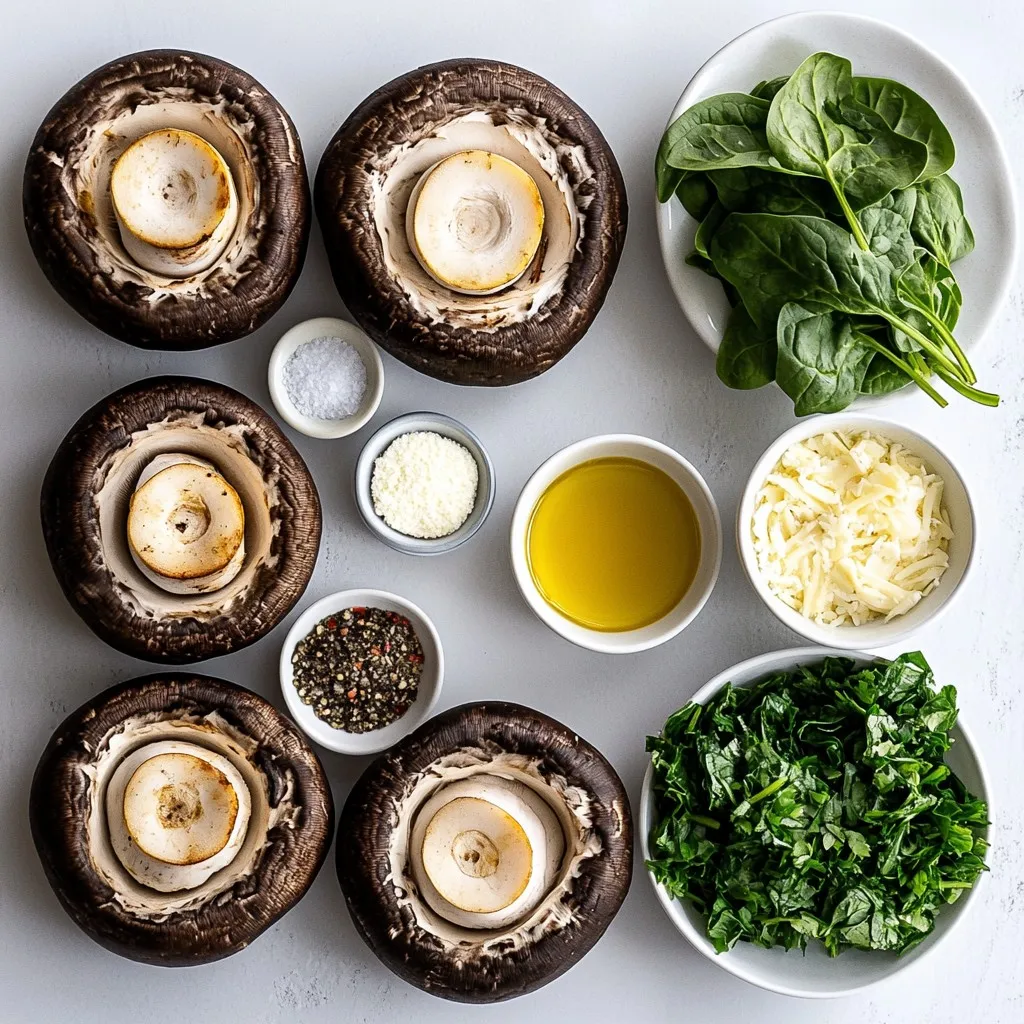
– 12 large portobello mushrooms
– 1 cup fresh spinach, finely chopped
– 1 cup canned artichoke hearts, thoroughly drained and coarsely chopped
Cheese and Flavorings
– 1 cup cream cheese, softened
– 1/2 cup grated Parmesan cheese
– 1/2 cup shredded mozzarella cheese
– 2 cloves garlic, minced
– 1 tablespoon fresh lemon juice
– 1/4 teaspoon red pepper flakes (optional)
Seasoning and Preparation
– Salt and freshly ground black pepper, to taste
– 2 tablespoons extra virgin olive oil
– Fresh parsley, chopped, for garnishing
When making spinach artichoke stuffed mushrooms, choose fresh and high-quality ingredients. The portobello mushrooms serve as a great base. Their large size holds the filling well. Fresh spinach adds a nice green color and nutrients. Use canned artichoke hearts for convenience. They blend perfectly with the cheese.
For the cheese, cream cheese is key. It gives a rich and creamy texture. Parmesan adds a sharp flavor, while mozzarella makes it gooey. Minced garlic gives aroma and depth. A squeeze of fresh lemon juice brightens the dish. If you like heat, add red pepper flakes.
Don’t forget seasoning. Salt and pepper enhance all the flavors. Olive oil helps sauté the filling and adds richness. Fresh parsley not only looks nice but also adds a fresh taste. Enjoy gathering these ingredients. They will combine to create a delightful treat!

Step-by-Step Instructions
Preheat and Prepare
– Preheat the oven to 375°F (190°C).
– Clean the portobello mushrooms with a damp cloth. Remove the stems and scoop out the dark gills inside.
Sautéing the Filling
– Heat olive oil in a skillet over medium heat.
– Add minced garlic and sauté for about 1 minute until fragrant.
– Toss in the chopped spinach and artichokes. Cook for 2-3 minutes until the spinach wilts.
Combining Ingredients
– In a large bowl, mix the softened cream cheese, grated Parmesan, and shredded mozzarella.
– Add lemon juice and optional red pepper flakes. Season with salt and black pepper. Mix until smooth.
– Fold in the sautéed spinach and artichoke mixture.
Stuffing the Mushrooms
– Generously fill each mushroom cap with the cheese and veggie mixture. Press it down lightly.
– Arrange the stuffed mushrooms on a baking tray lined with parchment paper.
Baking the Mushrooms
– Place the tray in the oven and bake for 25-30 minutes. Look for tender mushrooms and golden tops.
– Once baked, let them cool for a few minutes. Garnish with fresh parsley before serving.
Tips & Tricks
Perfecting the Stuffing
To make the best stuffing, mix the cheeses and veggies well. I like to use cream cheese, Parmesan, and mozzarella. This blend gives a rich and creamy texture. Don’t forget the spinach and artichokes! They add flavor and color. Make sure you chop everything finely. This helps the filling fit well in the mushroom caps.
Baking Tips
To keep your mushrooms from getting soggy, first, dry them off. Use a damp cloth for cleaning. Next, scoop out the gills carefully. This creates space for the stuffing and helps them cook better. Place the stuffed mushrooms on parchment paper. This prevents sticking and makes cleanup easy. Bake them at 375°F for 25-30 minutes. This time helps them cook evenly and get nice and golden on top.
Presentation Ideas
For a beautiful display, serve the stuffed mushrooms on a rustic platter. Neatly arrange them and sprinkle extra parsley for color. Pair them with a light salad or some crusty bread. This makes a great meal. You can also serve them with a simple dipping sauce. A tangy sauce can add a nice contrast to the rich filling.
Pro Tips
- Choose the Right Mushrooms: Opt for large portobello mushrooms as they can hold more stuffing and provide a hearty base for your dish.
- Fresh Ingredients Matter: Using fresh spinach and high-quality cheeses will enhance the flavor and texture of your stuffed mushrooms.
- Don’t Overstuff: While it’s tempting to pile on the filling, overstuffing can cause the mushrooms to overflow and become messy during baking.
- Let Them Rest: Allow the mushrooms to cool for a few minutes after baking. This helps the filling set slightly and makes them easier to serve.

Variations
Different Cheese Options
You can swap out cream cheese and mozzarella for other cheeses. Try ricotta for a lighter feel. Goat cheese adds a tangy taste. For a bolder flavor, use cheddar or gouda. Each cheese gives a unique twist to the dish.
Adding Protein
To make these stuffed mushrooms heartier, add cooked chicken or sausage. Chop them finely and mix them into the cheese filling. This adds flavor and texture. For a savory kick, try spicy sausage. It balances well with the creamy cheese.
Vegan Alternatives
If you want a vegan version, use plant-based cream cheese. Nutritional yeast can replace Parmesan for a cheesy flavor. Also, try using cashew cream for a rich texture. These swaps keep the dish tasty without animal products.
Storage Info
Storing Leftovers
To keep your stuffed mushrooms fresh, place them in an airtight container. You want to refrigerate them within two hours of cooking. This helps prevent any food safety issues. Store them in the fridge for up to three days. Make sure to separate layers with parchment paper if stacking. This helps avoid squishing the mushrooms.
Reheating Tips
When you want to enjoy your leftovers, preheat your oven to 350°F (175°C). Place the stuffed mushrooms on a baking tray. Cover them with foil to keep moisture in. Heat for about 15-20 minutes. This method helps maintain the texture and flavor. Avoid reheating in the microwave. It can make the mushrooms soggy and less tasty.
Freezing Instructions
If you want to save stuffed mushrooms for later, freezing is a great option. First, let them cool completely. Then, place each mushroom in a single layer on a baking sheet. Freeze them for about two hours until firm. After that, transfer them to a freezer-safe bag or container. They can last for up to three months. When ready to eat, thaw them in the fridge overnight before reheating. This ensures they stay flavorful and delicious.
FAQs
How long do stuffed mushrooms last in the fridge?
Stuffed mushrooms last about 3 to 4 days in the fridge. Store them in an airtight container. This keeps them fresh and tasty. If they smell off or look strange, toss them.
Can I make stuffed mushrooms ahead of time?
Yes! You can prepare stuffed mushrooms a day ahead. Just fill the mushrooms and cover them. Store in the fridge until you are ready to bake. This saves time and makes hosting easier.
What can I serve with spinach artichoke stuffed mushrooms?
These mushrooms pair well with many dishes. You can serve them with a crisp salad. A light pasta dish also works nicely. For drinks, try a chilled white wine or sparkling water.
This recipe for stuffed mushrooms combines fresh ingredients, flavorful cheeses, and simple steps. You learned how to prepare, bake, and best store these treats. Plus, I shared tips for perfecting and customizing your dish.
Now, you can easily impress guests with delicious stuffed mushrooms. With the right choices, you can adjust the recipe to fit your taste. Enjoy creating this meal and sharing it with friends and famil

Cheesy Spinach Artichoke Stuffed Mushrooms
Ingredients
- 12 large portobello mushrooms
- 1 cup fresh spinach, finely chopped
- 1 cup canned artichoke hearts, thoroughly drained and coarsely chopped
- 1 cup cream cheese, softened to room temperature
- 1/2 cup grated Parmesan cheese
- 1/2 cup mozzarella cheese, shredded
- 2 cloves garlic, minced
- 1 tablespoon fresh lemon juice
- 1/4 teaspoon red pepper flakes (optional, for a hint of spice)
- to taste Salt and freshly ground black pepper
- 2 tablespoons extra virgin olive oil
- to taste Fresh parsley, chopped, for garnishing
Instructions
- Preheat the oven to 375°F (190°C) to ensure it's hot enough for baking the mushrooms.
- Prepare the mushrooms: Use a damp cloth to gently clean the portobello mushrooms. Carefully remove the stems and, using a small spoon, gently scoop out the dark gills inside to create enough space for the stuffing.
- Sauté the filling: In a medium skillet, pour in the olive oil and heat over medium heat. Once the oil is shimmering, add the minced garlic. Sauté for about 1 minute, or until the garlic becomes fragrant and starts to turn golden.
- Add spinach and artichokes: Toss the chopped spinach into the skillet and cook for about 2-3 minutes, stirring occasionally, until the spinach is wilted. Next, add the chopped artichoke hearts, cooking them for an additional 2 minutes. Once done, remove the skillet from the heat and allow the mixture to cool slightly.
- Combine the cheeses: In a large mixing bowl, add the softened cream cheese, grated Parmesan cheese, shredded mozzarella cheese, lemon juice, and the optional red pepper flakes for a touch of heat. Season with salt and freshly cracked pepper. Mix everything thoroughly until smooth and well-combined.
- Incorporate the vegetables: Gently fold the sautéed spinach and artichoke mixture into the cheese mixture, ensuring everything is evenly distributed.
- Stuff the mushrooms: Generously fill each portobello mushroom cap with the creamy cheese and veggie filling, pressing down lightly to pack it in securely.
- Arrange for baking: Place the stuffed mushrooms on a baking tray lined with parchment paper to prevent sticking and for easy cleanup.
- Bake: Put the tray in the oven and bake for 25-30 minutes, or until the mushrooms are tender and the tops are beautifully golden brown and bubbly.
- Finishing touches: Once baked, remove from the oven and let the stuffed mushrooms cool for a few minutes on the tray. Before serving, garnish with freshly chopped parsley for a burst of color and flavor.


![This Mediterranean chickpea salad is fresh and easy. You can make it in just 15 minutes. It’s perfect for a quick lunch or a side dish. You can find the full recipe at the bottom. Here are the ingredients you will need: - 1 can (15 oz) chickpeas, drained and rinsed - 1 cup cherry tomatoes, halved - 1 cucumber, diced into bite-sized pieces - 1/2 red onion, finely chopped - 1/3 cup Kalamata olives, pitted and sliced - 1/4 cup feta cheese, crumbled - 2 tablespoons fresh parsley, chopped - 2 tablespoons extra virgin olive oil - 2 tablespoons fresh lemon juice - 1 teaspoon dried oregano - Salt and freshly ground black pepper to taste When you pick your ingredients, look for bright colors and firm textures. For tomatoes, choose ones that feel heavy for their size. A ripe cucumber should be smooth and firm. When selecting red onion, avoid any that have soft spots. For olives, pick a jar that looks full and well-sealed. Fresh herbs should smell fragrant and look vibrant. Always choose extra virgin olive oil for the best flavor. Finally, opt for feta that is creamy and not too dry. First, grab a large mixing bowl. Add the drained and rinsed chickpeas to the bowl. Next, toss in the halved cherry tomatoes and diced cucumber. Chop the red onion finely and add that too. Finally, include the sliced Kalamata olives. Gently mix everything to blend well. Now, it’s time for cheese and herbs. Sprinkle the crumbled feta cheese over the chickpea mix. Then, add the chopped fresh parsley. This will give the salad a nice pop of color and flavor. In a small bowl, whisk together the extra virgin olive oil and fresh lemon juice. Add the dried oregano, salt, and freshly ground black pepper. Mix until everything is well combined. This dressing will bring the salad to life. Pour the dressing over the chickpea mixture. Use a spatula or large spoon to toss gently. Make sure all the ingredients are well coated with the dressing. This step helps every bite taste amazing. Take a moment to taste your salad. If it needs more flavor, add more salt, pepper, or lemon juice. Adjust the seasoning until it suits your taste. This is your salad, so make it yours! Cover the bowl with plastic wrap or a lid. Place the salad in the fridge for at least 30 minutes. Chilling allows the flavors to meld beautifully. This step is key for a refreshing salad. Once chilled, it’s time to serve. You can serve it straight from the fridge or at room temperature. For a special touch, garnish with more crumbled feta and parsley. This adds a nice finish and makes it look inviting. For the full recipe, check out the [Full Recipe] section. When making Mediterranean Chickpea Salad, always use fresh ingredients. Fresh herbs and ripe tomatoes make a big difference. Rinse your chickpeas well to remove any canning liquid. This helps improve flavor and texture. Cut your vegetables into similar sizes for even bites. It makes the salad look nice and taste better. You can prepare this salad a day in advance. Just follow the recipe and chill it in the fridge. The flavors will blend well overnight. If you make it ahead, wait to add the feta and parsley until right before serving. This keeps them fresh and tasty. Serve this salad as a light lunch or as a side dish. It pairs nicely with grilled chicken or fish. You can also serve it with pita bread or hummus for a fun twist. For extra crunch, add some toasted nuts or seeds on top. Feel free to experiment with your favorite ingredients! Check out the Full Recipe for more ideas. {{image_4}} You can change some ingredients if you want. For example, swap feta cheese for avocado. This adds creaminess and healthy fats. If you don’t like olives, try capers instead. They bring a nice tangy flavor. You can also use any fresh herbs you like, such as mint or cilantro. This salad fits many diets. It’s already vegan if you skip the feta cheese. For low-carb eaters, reduce chickpeas and add more veggies. You can make it gluten-free by using only safe ingredients. This salad is hearty, making it perfect for those on a plant-based diet. You can change the salad with the seasons. In spring, add fresh peas or asparagus. In summer, include bell peppers or zucchini. In fall, roasted squash adds warmth. In winter, use kale for a hearty twist. You can mix and match as you like for a fresh vibe each time. Using the Full Recipe, you can create a delightful dish that fits any season or diet. Store any leftover Mediterranean Chickpea Salad in an airtight container. This keeps it fresh. Place the container in the fridge. The cold air helps maintain flavor and texture. While I don’t recommend freezing this salad, you can freeze the chickpeas. Drain and rinse them first. Place them in a freezer-safe bag. Squeeze out the air before sealing. They can last up to three months in the freezer. The salad lasts about three days in the fridge. After that, the veggies may get soggy. To keep it fresh longer, store the dressing separately. Combine it right before serving. This keeps all the flavors bright and tasty. For more details on preparing the dish, refer to the Full Recipe. Yes, you can use dried chickpeas. Just soak them overnight. Cook them until tender. This method takes longer but adds great flavor. This salad pairs well with grilled chicken or fish. You can also serve it with pita bread or quinoa. It makes a tasty side dish or a light main meal. The salad can stay fresh in the fridge for about three days. Keep it in a sealed container. The flavors will deepen as it sits. Absolutely! Just skip the feta cheese. You can replace it with vegan cheese or leave it out. The salad still tastes great without it. Yes, this Mediterranean Chickpea Salad is gluten-free. All the ingredients are safe for a gluten-free diet. Enjoy it without worry! This blog post covers how to make a delicious Mediterranean Chickpea Salad. We started with key ingredients and then went through step-by-step instructions. You learned valuable tips for prep and how to store leftovers. Variations allow for personal taste and dietary needs. In conclusion, with simple steps and fresh ingredients, you can create a tasty dish. Enjoying this salad can be fun and healthy. Experiment with it to make it your own!](https://joymealplan.com/wp-content/uploads/2025/05/7c349552-9bfa-4234-aaf2-b24410fd6834-768x768.webp)


