Spinach Mushroom Gnocchi Creamy and Savory Delight

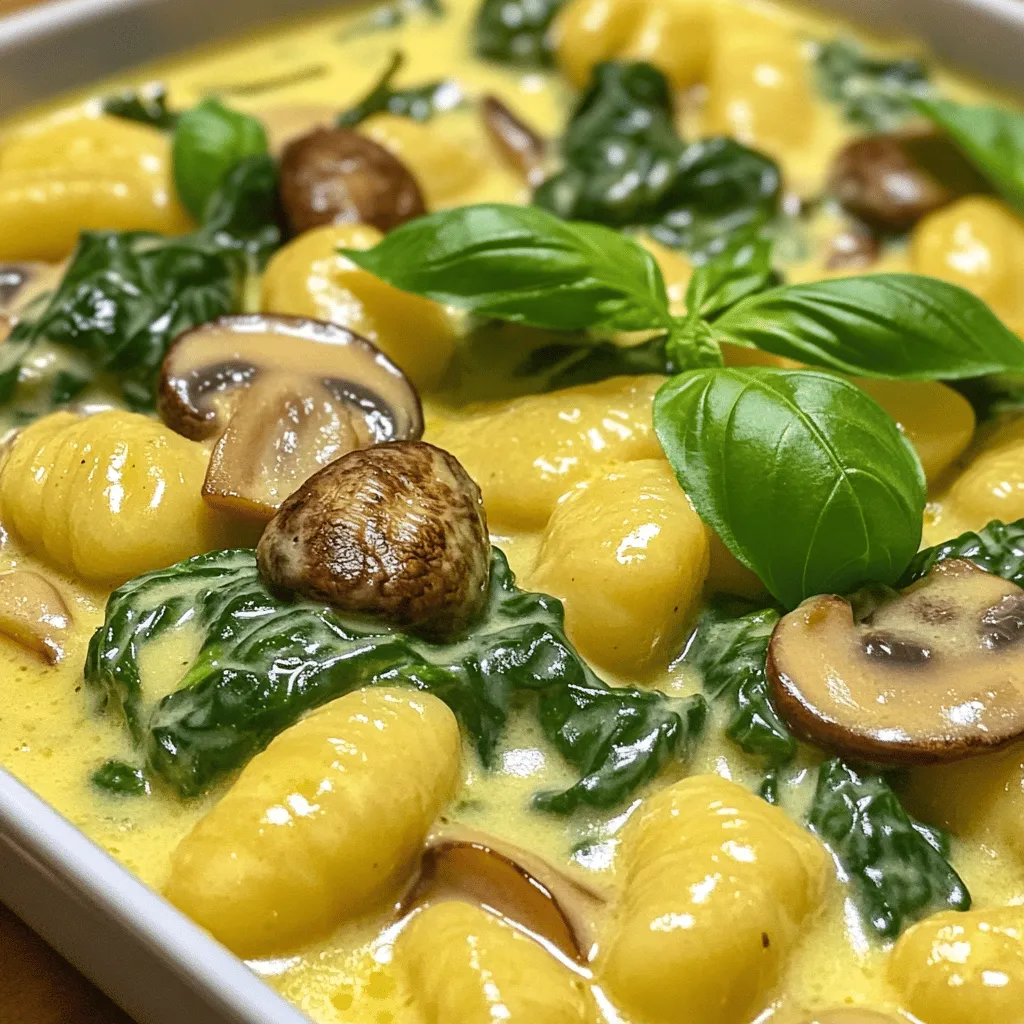
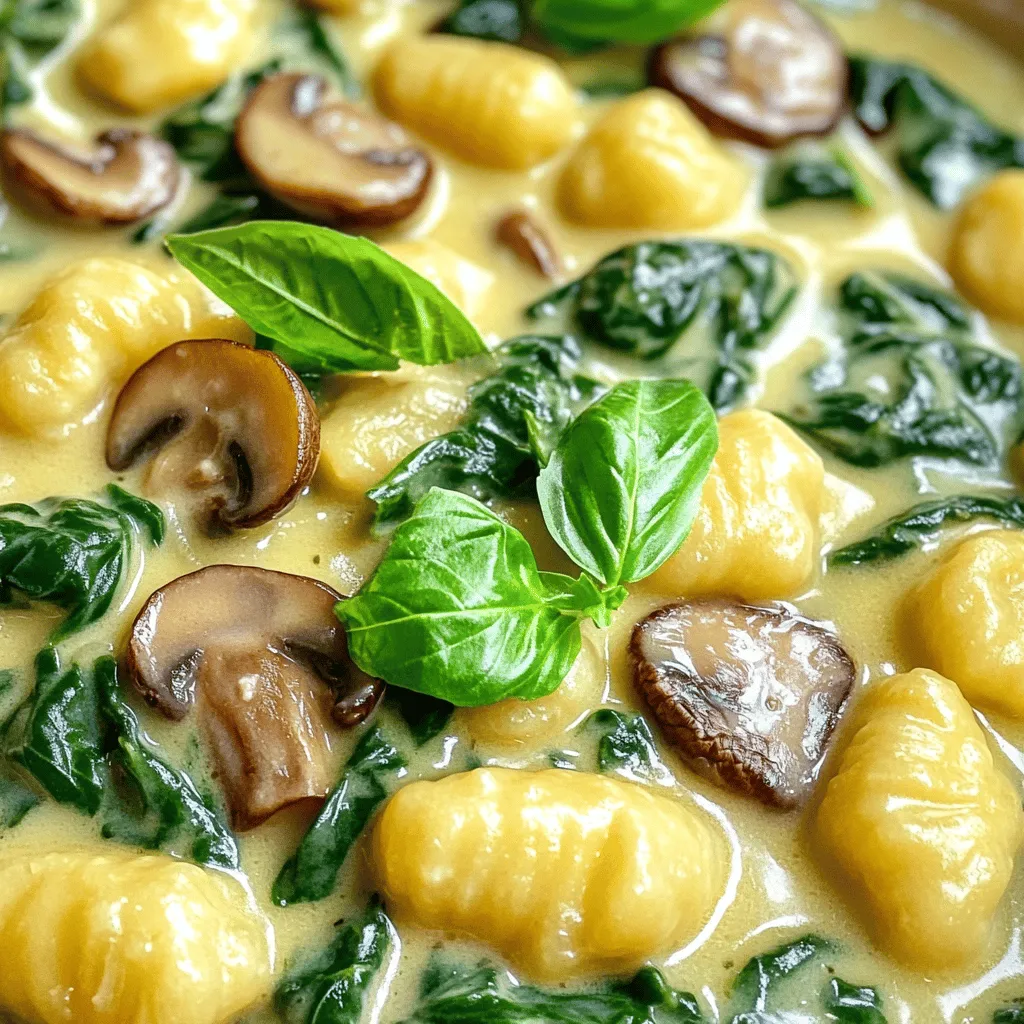
Are you ready to indulge in a creamy and savory delight? This Spinach Mushroom Gnocchi recipe combines the rich flavors of sautéed mushrooms and fresh spinach with soft potato gnocchi. In just a few easy steps, you’ll create a cozy dish that warms your soul. Whether for a weeknight meal or a special occasion, this recipe will impress everyone at your table. Let’s dive into the deliciousness!
Ingredients
Main Ingredients
– 1 lb potato gnocchi (store-bought or homemade)
– 2 cups fresh spinach, roughly chopped
– 1 cup mushrooms, sliced (cremini or button variety)
Additional Ingredients
– 2 cloves garlic, finely minced
– 1/2 cup heavy cream
– 1/4 cup freshly grated Parmesan cheese
Seasoning and Garnish
– 2 tablespoons extra virgin olive oil
– Salt and freshly ground black pepper to taste
– 1/4 teaspoon freshly grated nutmeg (optional)
– Fresh basil leaves for garnish
In this recipe, I use potato gnocchi which has a soft, pillowy texture. You can use store-bought or make your own. Fresh spinach adds a bright green color and a mild taste. I prefer cremini mushrooms for their rich flavor, but button mushrooms work well too.
Garlic adds depth to the dish. Heavy cream creates a rich sauce that coats the gnocchi. Parmesan cheese brings a savory kick. The extra virgin olive oil adds richness and helps cook the garlic and mushrooms.
Seasoning is key. Salt and pepper enhance all the flavors. Nutmeg adds a hint of warmth, but it’s optional. Fresh basil leaves give a fresh finish. This combination makes a creamy and savory delight that is sure to please your taste buds!
Step-by-Step Instructions
Cooking the Gnocchi
First, I bring a large pot of salted water to a boil. I use about 6 cups of water for this. Once the water is bubbling, I gently add 1 pound of potato gnocchi. I watch closely as they cook. In about 2 to 3 minutes, they float to the top. This is how I know they are done. I carefully use a slotted spoon to remove them and set them aside in a bowl.
Sautéing the Vegetables
Next, I heat 2 tablespoons of olive oil in a large skillet over medium heat. I add 2 cloves of finely minced garlic and sauté for about 30 seconds. I stir often to keep it from burning. Then, I add 1 cup of sliced mushrooms. I let them cook for about 5 to 7 minutes until they turn tender and golden brown. After that, I add 2 cups of roughly chopped spinach. I keep stirring until the spinach wilts down.
Preparing the Cream Sauce
Now it’s time for the sauce. I slowly pour in 1/2 cup of heavy cream while stirring. I let this mixture simmer gently for a couple of minutes. As I stir, I watch for it to thicken slightly. I want it to coat the vegetables nicely.
Combining the Gnocchi and Sauce
Once the cream sauce is ready, I add the reserved gnocchi to the skillet. I gently toss everything together. My goal is to ensure each gnocchi is well coated in the creamy sauce and warmed through.
Final Touches
For the final touches, I fold in 1/4 cup of freshly grated Parmesan cheese. I make sure it melts into the sauce. Then, I season with salt, pepper, and 1/4 teaspoon of nutmeg if I want that extra flavor. I mix it all until the flavors meld beautifully. For serving, I transfer the vibrant gnocchi dish to plates. I garnish with fresh basil leaves for a lovely aroma and a pop of color.
Tips & Tricks
Perfecting Your Gnocchi
– Selecting the best potato gnocchi: Look for gnocchi that feels firm but soft. Fresh gnocchi has a light texture. If you use store-bought, check the package for quality. Homemade gnocchi can be fun and rewarding.
– Adjusting cooking times for homemade gnocchi: Homemade gnocchi cooks faster than store-bought. Boil them for about 2 minutes. They are done when they float to the top of the water.
Customizing the Recipe
– Vegetable substitutions: You can swap spinach with kale or Swiss chard. For mushrooms, try using zucchini or bell peppers. This keeps the dish fresh and exciting.
– Adding proteins like chicken or shrimp: To make it heartier, add cooked chicken or shrimp. Toss them in with the gnocchi and sauce. This adds texture and flavor that many will enjoy.
Enhancing Flavor
– Tips on using fresh herbs or spices: Fresh basil or parsley can lift the dish. Add them just before serving for a burst of flavor. Experiment with spices like thyme or oregano for a twist. A pinch of red pepper flakes can add heat too.

Variations
Vegan Spinach Mushroom Gnocchi
To make this dish vegan, you can swap the heavy cream for a plant-based alternative. Coconut cream or cashew cream works well. They add a rich texture without dairy. For cheese, use nutritional yeast or a store-bought vegan cheese. These give a cheesy flavor without using animal products.
When it comes to plant-based ingredients, you can add more veggies. Try sun-dried tomatoes for a tangy kick or bell peppers for crunch. They will enhance the taste and add color to the plate.
Different Sauces
You can explore different sauces for your gnocchi. A classic tomato sauce adds a bright, fresh flavor. It pairs well with the earthy taste of mushrooms. For a cream sauce, you can use the original recipe or try a vegan version.
Pesto is also a fantastic choice. You can make it from basil, spinach, or even arugula. Mixing in nuts like pine nuts or walnuts adds a delightful crunch. Each sauce brings its own unique twist to the dish.
Gluten-Free Options
If you need a gluten-free option, look for gluten-free gnocchi. Many brands offer this now, and it tastes great too. You can also use cauliflower gnocchi, which is lower in carbs and very tasty.
Additionally, check the other ingredients. Ensure that your cream and cheese alternatives are gluten-free as well. With these tweaks, you can enjoy a delicious meal without gluten.
Storage Info
Storing Leftovers
To keep your spinach mushroom gnocchi fresh, place it in the fridge. Use an airtight container to prevent drying. Cool the dish to room temperature first. This keeps the texture nice. You can store leftovers for up to three days.
Reheating Tips
When reheating, you have two options: microwave or stovetop. The microwave is quick but may make gnocchi soft. For stovetop, heat a skillet on low. Add a splash of cream or broth. Stir gently until warmed. This method keeps the texture and flavor better.
Freezing Instructions
To freeze your gnocchi, let it cool completely first. Then, place it in a freezer-safe bag. Remove any excess air to avoid freezer burn. It can last for up to three months. When ready to eat, thaw overnight in the fridge. Cook it in boiling water for a few minutes to heat through. Enjoy a quick meal with great flavor!
FAQs
Can I use frozen gnocchi for this recipe?
Yes, you can use frozen gnocchi. Frozen gnocchi cooks just as well as fresh. Just follow the package instructions for cooking time. I recommend adding them directly to boiling water. This saves you time and effort.
How do I know when the gnocchi is cooked?
Watch for gnocchi to float. This means they are ready. It usually takes about 2-3 minutes. If they stay at the bottom, give them more time. You want them soft but not mushy.
What to serve with spinach mushroom gnocchi?
Pair your gnocchi with a light salad. A simple arugula salad with lemon dressing works great. You might also enjoy garlic bread on the side. For a heartier meal, serve with grilled chicken or shrimp.
Can I make this dish in advance?
Yes, you can prepare this dish ahead of time. Cook the gnocchi and sauce separately. Store in airtight containers in the fridge. When you’re ready to eat, reheat gently on the stove. Add a splash of cream if needed.
This blog showed you how to make spinach mushroom gnocchi. We covered key ingredients like potato gnocchi, spinach, and mushrooms. You learned to cook, sauté, and combine flavors into a creamy sauce. Tips for customizing the recipe help you make it your own. We also discussed storing and reheating leftovers for next time.
Try this dish for a tasty meal that everyone will enjoy!


![When making easy chicken fajitas, you need fresh and simple ingredients to bring out the best flavors. Here’s the detailed list: - 2 boneless, skinless chicken breasts, thinly sliced into strips - 1 red bell pepper, sliced into thin strips - 1 green bell pepper, sliced into thin strips - 1 medium onion, sliced into thin rings - 3 cloves garlic, minced - 2 tablespoons olive oil - 1 teaspoon chili powder - 1 teaspoon ground cumin - 1 teaspoon smoked paprika - Salt and freshly ground black pepper, to taste - Juice of 1 fresh lime - Flour tortillas, for serving - Fresh cilantro, chopped, for garnish - Sour cream and salsa, for serving (optional) - You can swap chicken for shrimp or beef if you prefer. - Use corn tortillas if you want a gluten-free option. - Lemon juice can replace lime juice for a different zing. - Look for high-quality chili powder and smoked paprika for a rich taste. - I trust McCormick and Penzeys for spices that boost flavor. - Fresh herbs like cilantro add a nice touch, so always use fresh when possible. For more details on how to prepare your ingredients and cook this dish, check the Full Recipe. To start, prepare your chicken and veggies. Take the two boneless, skinless chicken breasts. Slice them into thin strips. Next, grab one red bell pepper, one green bell pepper, and one medium onion. Slice these into thin strips and rings, respectively. Now, let’s marinate the chicken. In a large bowl, mix the sliced chicken with minced garlic, olive oil, chili powder, cumin, smoked paprika, lime juice, salt, and pepper. Toss everything well. Make sure the chicken is coated evenly with the spices. Let the chicken marinate for at least 15 minutes. You can refrigerate it for up to 2 hours for more flavor. When you are ready to cook, heat a large skillet on medium-high heat. Add the marinated chicken to the skillet. Cook it for about 5 to 7 minutes. Stir occasionally until it reaches an internal temperature of 165°F (75°C). After the chicken is cooked, add the sliced peppers and onion to the skillet. Sauté the mixture for another 5 to 7 minutes. Cook until the veggies are tender but still crunchy. Taste and adjust the seasoning with salt and pepper if needed. Now, let's assemble the fajitas. Start with warm flour tortillas. Place a generous portion of the chicken and vegetable mix in the center of each tortilla. For a lovely presentation, serve the fajitas on a bright platter. Stack the tortillas neatly on the side. Arrange toppings like sour cream and salsa in small bowls. This makes it colorful and inviting. When serving, don’t forget the garnishes. Sprinkle freshly chopped cilantro on top. This adds a fresh touch and enhances the flavor. Enjoy your easy chicken fajitas! For the full recipe, check out [Full Recipe]. To make your chicken fajitas burst with flavor, try these cooking tips: - Use a cast-iron skillet. This tool holds heat well and gives a nice sear to the chicken. - Preheat your pan. A hot pan helps to cook the chicken fast and keeps it juicy. - Don’t overcrowd the pan. Cook in batches if needed. This helps the chicken brown instead of steam. - Add a splash of broth. If the chicken seems dry, add a little chicken broth while cooking. Pair your chicken fajitas with these tasty sides: - Mexican rice. It adds a nice, filling touch. - Refried beans. They give a creamy texture and flavor. - Guacamole. This creamy dip adds richness to the meal. For extra flavor, consider these enhancers: - Squeeze fresh lime juice. It brightens the dish and adds a zesty kick. - Top with sliced avocado. This adds creaminess and balances the spices. - Drizzle with hot sauce. It brings heat and excitement to each bite. Explore the [Full Recipe] for detailed steps on creating this quick dinner. {{image_4}} You can change up the protein in your fajitas. Try shrimp or beef for a new twist. You can even use tofu or tempeh for a plant-based option. Each protein brings a different flavor, so have fun with it. For seasoning, you can mix things up too. Use taco seasoning for a spicier kick. You might enjoy adding lime zest for a fresh taste. Try using garlic powder or onion powder for extra flavor. Each option can make your dish unique. If you want to keep it low-carb, use lettuce wraps instead of tortillas. It gives you a crunchy bite and cuts down on carbs. You can also find low-carb tortillas at the store. For gluten-free options, use corn tortillas. They taste great and work well with the filling. If you're dairy-free, skip the sour cream and use avocado instead. It adds creaminess and flavor without the dairy. To keep your chicken fajitas fresh, store them in an airtight container. Make sure to separate the chicken from the tortillas and toppings. This helps keep everything tasty. You can refrigerate them for up to three days. If you want to save them longer, freeze the chicken and veggies in a freezer-safe bag. They can last for up to three months in the freezer. When you’re ready to eat, thaw them in the fridge overnight. To reheat, use a skillet over medium heat. This method keeps the chicken juicy and the veggies crisp. You can also microwave them, but be careful not to overcook. The expected shelf life for your chicken fajitas is about three days in the fridge. In the freezer, they last about three months. Always check for signs of spoilage before eating. If you see any off smells, discoloration, or mold, it’s best to toss the leftovers. Keeping track of freshness helps you enjoy your meal safely. What is the best way to marinate chicken for fajitas? To marinate chicken for fajitas, mix olive oil, lime juice, and spices. Use chili powder, cumin, and smoked paprika for a great flavor. Combine these in a bowl, add the chicken, and coat it well. Let it marinate for at least 15 minutes. Longer marinating, up to 2 hours, gives better taste. Can I prepare chicken fajitas ahead of time? Yes, you can prepare chicken fajitas ahead of time. Marinate the chicken and store it in the fridge. You can also slice the vegetables early. Just keep them in a sealed container. When you're ready, cook everything up quickly. This makes weeknight meals super easy! What toppings are best for chicken fajitas? Great toppings for chicken fajitas include fresh cilantro, sour cream, and salsa. You can also add sliced avocado, shredded cheese, or jalapeños for extra flavor. These toppings add color and taste, making your fajitas even better. What to do if the chicken is tough or dry? If your chicken is tough or dry, try cooking it at a lower heat next time. Overcooking can dry it out. Also, make sure to marinate the chicken well. This helps keep it juicy. If it happens, serve with a sauce or salsa to add moisture. How to avoid soggy tortillas? To avoid soggy tortillas, warm them briefly in a pan. This keeps them soft but not wet. You can also heat them in the oven wrapped in foil. Serve the hot filling right away to keep your tortillas crisp. How to add more spice to the dish? To add more spice, include extra chili powder or a pinch of cayenne pepper. You can also add sliced jalapeños to the mix. If you want heat at the table, serve hot sauce on the side. Adjust spice levels to suit your taste. Chicken fajitas are a tasty and fun meal to make. You learned about the right ingredients, how to cook them, and tips for perfect fajitas. Whether you want to change the protein or try new spices, options are endless. Store leftovers well to enjoy later. Keep these tips in mind for your next cooking adventure. Enjoy your delicious fajitas with family and friends!](https://joymealplan.com/wp-content/uploads/2025/06/5a93604c-472d-424a-a3e8-bce972c2f096-768x768.webp)


. Enjoy your cooking! Start by washing your vegetables well. Fresh veggies make the dish pop! Dice the mixed peppers into small cubes. Cut the carrot into thin strips, or julienne it. Trim the sugar snap peas and separate the broccoli into small florets. The key is to keep all the pieces similar in size, so they cook evenly. For this recipe, use cooked jasmine rice. Day-old rice works best because it's less sticky. If you need to cook rice, rinse it under cold water until the water runs clear. This step helps remove excess starch. Then, cook it according to package instructions. Once done, let it cool before using. Heat two tablespoons of vegetable oil in a large pan or wok over medium-high heat. Add three minced garlic cloves and one teaspoon of grated ginger. Stir for about 30 seconds until fragrant. Next, toss in the broccoli and stir-fry for two minutes. Now, add the julienned carrots, sugar snap peas, and diced peppers. Stir-fry these for another three to four minutes until they're tender but still crisp. Push the veggies to one side of the pan. Add the cooked rice to the other side. Drizzle two tablespoons of soy sauce and one tablespoon of sesame oil over the rice. Use a spatula to break up any clumps and mix everything well. Finally, add sliced green onions and season with salt and pepper to taste. Cook for two more minutes to let the flavors blend. Serve hot, garnished with sesame seeds and fresh cilantro leaves. For the full recipe, check out the detailed instructions! To make fluffy rice, start with cold, day-old rice. Freshly cooked rice is too moist. Spread it out on a plate to cool and dry. This helps separate the grains. When cooking, use a bit less water than usual. This prevents soggy rice. For the best results, choose jasmine or basmati rice. They have a nice texture and flavor. Avoid sticky rice types for this dish. When you pick vegetables, look for bright colors and firm textures. Fresh veggies taste better and add crunch. Avoid any that look wilted or have brown spots. Store your vegetables in the fridge, but keep them dry. Use airtight bags to prevent moisture. This helps keep them fresh longer. Use them within a week for the best flavor. To get great flavor in your fried rice, use high heat. A hot pan sears the veggies and rice, adding depth. Start with garlic and ginger for aroma. Use soy sauce for a salty kick, but don’t overdo it. You can also add sesame oil for a nutty taste. Mix in the veggies at the right time. This keeps them crisp and colorful. For more ideas, try adding some chili flakes for heat or a splash of lime for brightness. For the full recipe, check out the Rainbow Veggie Fried Rice. {{image_4}} You can easily add protein to your vegetable fried rice. Tofu is a great choice for a plant-based meal. Use firm tofu for the best texture. Just cube the tofu and sauté it until it's golden. If you prefer meat, chicken is also a fantastic option. Use diced chicken breast and cook it until it’s no longer pink. Both options boost the meal’s nutrition and flavor. To keep your dish vegan, skip the chicken and use soy sauce that is gluten-free. Coconut aminos can also be a tasty substitute. For a gluten-free fried rice, make sure to check all sauce labels. You can enjoy this meal without compromising on taste or dietary needs. You can change the flavor of your fried rice easily. To make it spicy, add chili paste or red pepper flakes. For a sweeter taste, try adding a bit of pineapple or a drizzle of sweet soy sauce. Experiment with different herbs like basil or cilantro. Each variant can turn this simple dish into something new and exciting. Feel free to explore these variations to make your vegetable fried rice unique. For the full recipe, check out the Rainbow Veggie Fried Rice. Storing leftover vegetable fried rice is simple. First, let it cool. Place it in an airtight container. You can keep it in the fridge for up to three days. Make sure it’s sealed well to keep out moisture and odors. If you have a lot, divide it into smaller portions. This makes it easy to reheat later. To reheat your fried rice, use a skillet or a microwave. If you use a skillet, add a splash of water. This helps steam the rice and keeps it from drying out. Heat over medium heat for about five minutes. Stir often to warm it evenly. In the microwave, cover the rice with a damp paper towel. Heat for one to two minutes, checking every 30 seconds. You can freeze vegetable fried rice too. Place it in a freezer-safe container. Make sure to leave some space at the top. Rice expands when frozen. It can last up to three months in the freezer. To thaw, move it to the fridge overnight. You can also reheat it straight from the freezer. Just add a few extra minutes to your cooking time. This way, you’ll enjoy that great taste again! The best rice for fried rice is jasmine rice. It has a nice texture and flavor. Day-old rice works best because it dries out a bit. This helps keep the rice fluffy. You can also use long-grain rice if you prefer. Just make sure it's cooked and cooled before frying. Yes, you can use frozen vegetables. They are a quick and easy option. Just make sure to thaw and drain them first. This helps prevent excess water from making your fried rice soggy. Frozen mixes often have a nice variety, too. To make it healthier, add more veggies like spinach or peas. You can also reduce the oil used in cooking. Using low-sodium soy sauce cuts down on salt. Another option is to swap some rice for cauliflower rice. This adds fiber and lowers carbs. Vegetable fried rice has roots in China. It started as a way to use leftover rice and vegetables. Different cultures adapted the dish over time. You can find many versions worldwide, each with unique flavors and ingredients. Yes, you can prepare vegetable fried rice in advance. Cook the rice and veggies, then store them separately. You can mix them just before serving. This keeps everything fresh. It also makes it easy to reheat later. Check out the Full Recipe for more details! Vegetable fried rice offers a tasty, simple meal. We covered essential ingredients, types of rice, and optional flavors. You learned how to prepare veggies, cook rice, and mix everything for the best taste. Remember to store leftovers well and try different proteins or flavors for variety. Whether you prefer tofu, chicken, or vegan options, there’s a fried rice for you. Try these tips to elevate your dish and enjoy!](https://joymealplan.com/wp-content/uploads/2025/06/1a929e2b-4b2d-416b-b92a-3d8add5a3088-768x768.webp)

