Spinach Ricotta Stuffed Shells Delicious and Easy Recipe

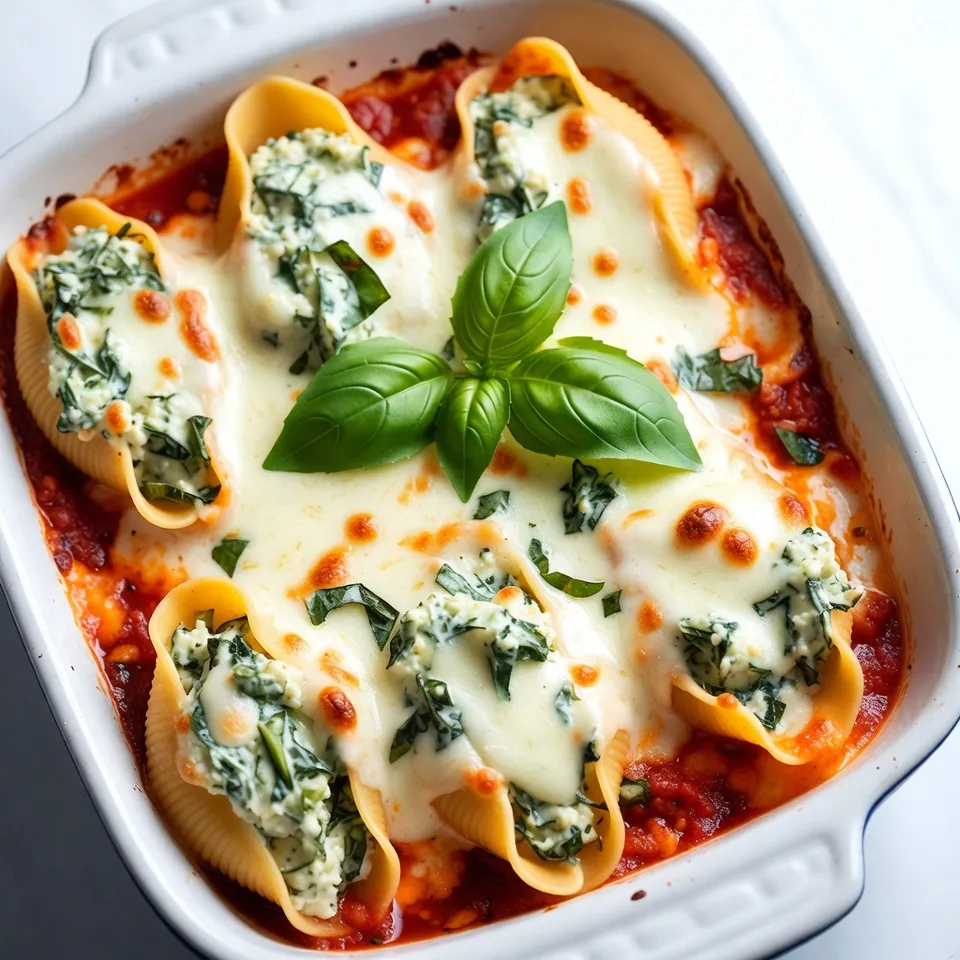
Looking for a comforting meal that’s both delicious and easy to make? Spinach Ricotta Stuffed Shells are the answer! This dish combines creamy ricotta, fresh spinach, and flavorful cheeses all wrapped in tender jumbo pasta shells. In just a few simple steps, you can create a dish that warms the heart and fills the belly. Let’s dive into this mouthwatering recipe that will become a family favorite!
Why I Love This Recipe
- Comforting and Cheesy: This dish is the ultimate comfort food, with its creamy ricotta and gooey mozzarella melting together to create a delightful texture.
- Healthy Greens: Packed with fresh spinach, this recipe adds a nutritious element, making it a delicious way to enjoy your veggies.
- Easy to Prepare: With simple ingredients and straightforward steps, this recipe is perfect for both novice and experienced cooks.
- Perfect for Meal Prep: These stuffed shells can be made ahead of time and stored, making them a convenient option for busy weeknight dinners.
Ingredients
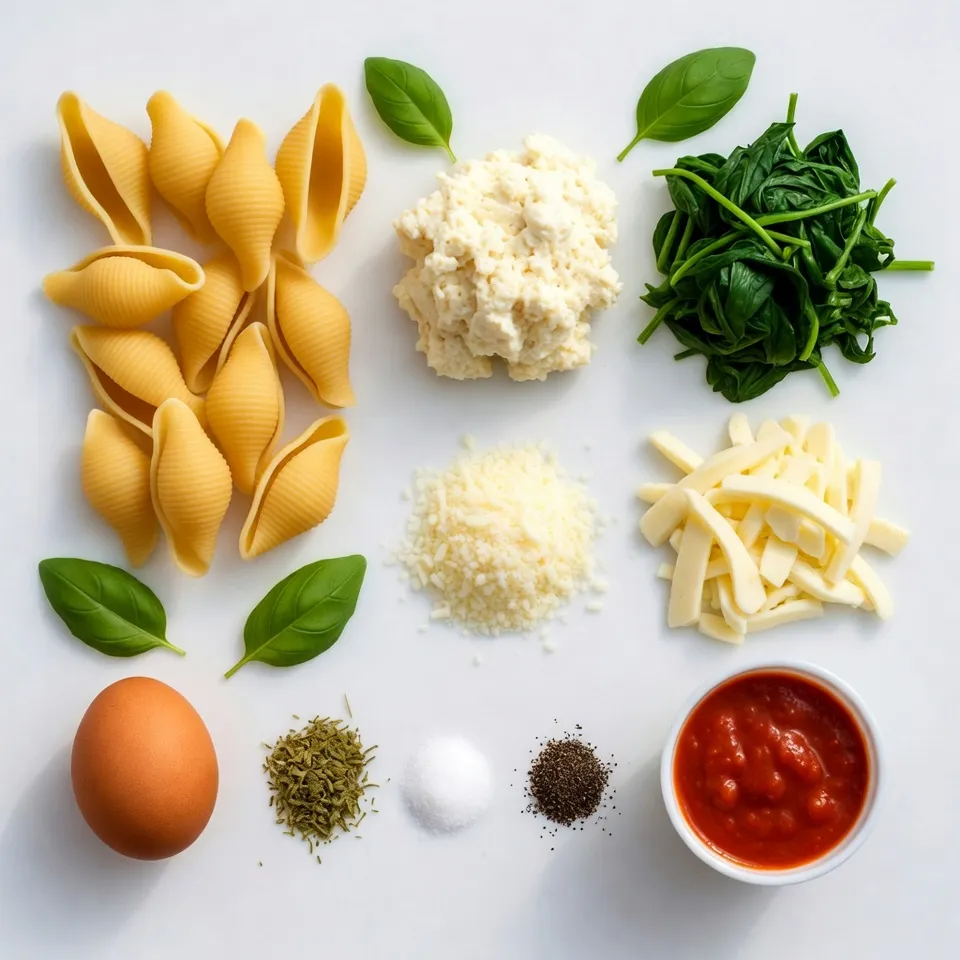
Here’s what you need to make Spinach Ricotta Stuffed Shells. Gather these simple items:
– 20 jumbo pasta shells
– 2 cups ricotta cheese
– 1 cup fresh spinach, chopped
– 1 cup shredded mozzarella cheese (plus more for topping)
– 1/2 cup grated Parmesan cheese
– 1 large egg, beaten
– 2 cloves garlic, minced
– 1 teaspoon dried oregano
– 1 teaspoon salt
– 1/2 teaspoon black pepper
– 2 cups marinara sauce
– Fresh basil leaves for garnish
Each ingredient plays a key role. The jumbo shells hold the creamy filling. Ricotta cheese gives a smooth texture. Fresh spinach adds a healthy touch. Mozzarella and Parmesan bring rich flavors. The egg helps bind everything together. Garlic, oregano, salt, and pepper add tasty notes. Marinara sauce ties the dish together with its tangy goodness. Finally, fresh basil gives a bright finish.
Make sure to have all these ingredients ready. This will help you cook smoothly and enjoy the process!

Step-by-Step Instructions
Preparing the Pasta
– Cooking the jumbo shells: Start by boiling water in a large pot. Add the jumbo pasta shells and cook according to the package. Aim for al dente. This keeps them firm when you fill them.
– Draining and cooling: Once the shells are cooked, drain them carefully. Rinse them under cold water to stop the cooking. Set them aside to cool for easier handling.
Making the Filling
– Combining ricotta, spinach, and cheeses: In a big bowl, mix the ricotta cheese with chopped spinach. Add half of the shredded mozzarella and grated Parmesan cheese.
– Adding seasonings and egg: Now, add the beaten egg, minced garlic, oregano, salt, and black pepper. Stir well until the mixture is creamy and smooth.
Filling the Shells
– Techniques for filling the shells: Take a cooked shell and fill it with the spinach and ricotta mix. Use a spoon or your fingers to pack it in.
– Tips for using a piping bag: For cleaner filling, use a piping bag. Scoop the filling inside the bag and snip the end. This makes it easy to fill the shells without making a mess.
Assembling the Dish
– Spreading marinara sauce: Grab a 9×13 inch baking dish. Spread a thin layer of marinara sauce on the bottom. This keeps the shells moist while baking.
– Arranging shells in the baking dish: Place each filled shell seam side up in the dish. Make sure they fit snugly but aren’t overcrowded.
– Adding remaining sauce and cheese: Pour the rest of the marinara sauce over the shells. Then, sprinkle the remaining mozzarella cheese on top. This gives a nice cheesy crust.
Baking the Stuffed Shells
– Preheating the oven: Preheat your oven to 375°F (190°C). This step is key for even baking.
– Covering and baking details: Cover the dish with aluminum foil. Bake for 25 minutes. After that, remove the foil and bake for another 10-15 minutes. Look for bubbling and a golden top.
Serving the Dish
– Cooling before serving: Let the dish cool for a few minutes after baking. This makes it easier to serve.
– Garnishing with basil: Top each serving with fresh basil leaves. This adds a lovely aroma and a burst of flavor. Enjoy your delicious Spinach Ricotta Stuffed Shells!
Tips & Tricks
Perfecting the Filling
To make the filling shine, start with fresh ingredients. Use good ricotta cheese. It adds creaminess and flavor. Adjust flavors by tasting as you mix. Want it zestier? Add more garlic or some lemon zest. If you enjoy a bit of heat, a pinch of red pepper flakes works well. For a smoother texture, blend the filling briefly. This method helps mix the cheese and spinach evenly.
Cooking Tips
For the best pasta texture, cook the jumbo shells until al dente. This means they should be firm to the bite. Drain them carefully, avoiding any tears. Rinse the shells under cold water to stop the cooking. This step also makes them easier to handle. When baking, cover the dish with foil for the first 25 minutes. This traps steam and keeps the shells moist. Remove the foil to let the cheese bubble and brown nicely.
Serving Suggestions
Pair the stuffed shells with a fresh salad. A simple green salad with a light vinaigrette works great. Garlic bread also complements this dish well. For a bit of color, add roasted vegetables on the side. If you’re feeling adventurous, sprinkle some crushed nuts on top for crunch. Enjoy your meal with a glass of crisp white wine for a lovely touch!
Pro Tips
- Use Fresh Spinach: Fresh spinach adds a vibrant flavor and better texture compared to frozen spinach. Make sure to rinse and chop it just before using for the best results.
- Customize Your Cheese: Feel free to mix in different cheeses like feta or goat cheese for a unique flavor twist. Just keep the overall quantity the same.
- Prepare Ahead: You can prepare the stuffed shells a day in advance and keep them in the refrigerator. Just cover them with foil and bake them when you’re ready to serve.
- Experiment with Sauces: While marinara is classic, try using pesto or Alfredo sauce for a different flavor profile. Each will give your dish a unique spin!

Variations
Ingredient Swaps
You can change the cheese in stuffed shells. Try using goat cheese or feta for a tangy taste. For a richer flavor, you could use cream cheese. Adding protein can boost nutrition. Cooked chicken, turkey, or sausage mix well with the filling. You can also add veggies like mushrooms, zucchini, or bell peppers for extra color and taste.
Different Sauces
While marinara sauce is a classic choice, you can explore other options. A roasted red pepper sauce adds a nice twist. You might also enjoy a pesto sauce for a fresh flavor. For a creamy option, consider a white sauce made from butter, flour, and milk. This adds a rich texture and delicious taste to your dish.
Dietary Modifications
If you need gluten-free options, look for gluten-free pasta shells. Many brands offer great alternatives that hold up well. For vegan substitutions, use plant-based ricotta made from nuts or tofu. Replace the egg with flaxseed meal or applesauce to help bind the filling. These swaps keep your stuffed shells tasty and inclusive for all diets.
Storage Info
Refrigerating Leftovers
Store your leftover spinach ricotta stuffed shells in an airtight container. Place a layer of plastic wrap on the surface to keep moisture in. They will stay fresh for 3 to 5 days in the fridge. When you want to eat them, check for any signs of spoilage before heating.
Freezing Instructions
To freeze, let the stuffed shells cool completely. Arrange them in a single layer on a baking sheet, then freeze until solid. Once frozen, transfer them into freezer bags or a container. You can store them for up to 3 months. Label the bags with the date for easy tracking.
Reheating Tips
The best way to reheat stuffed shells is in the oven. Preheat your oven to 350°F (175°C). Place the shells in a baking dish and cover with foil. Bake for 20-25 minutes. You can also microwave them if you’re short on time. Just place them in a microwave-safe dish, cover it, and heat for 2-3 minutes. Check the temperature to ensure they are hot throughout.
FAQs
How long do Spinach Ricotta Stuffed Shells last in the fridge?
Spinach Ricotta Stuffed Shells last about 3 to 5 days in the fridge. Make sure to store them in an airtight container. The shells may become softer over time, but they still taste great!
Can I use different types of cheese?
Yes, you can use different cheeses. Try using feta for a tangy twist or cheddar for a richer flavor. Mixing cheeses can add depth to your dish. Just keep the balance of creamy and salty in mind.
Can this recipe be made ahead of time?
Absolutely! You can prepare the shells a day ahead. Just fill them and store them in the fridge. When you’re ready, pour sauce over them and bake. This makes meal prep a breeze!
What should I serve with Spinach Ricotta Stuffed Shells?
These stuffed shells pair well with a fresh salad or garlic bread. A crisp green salad adds a nice crunch. Garlic bread brings a warm, buttery touch to the meal. Both choices complement the creamy filling.
How can I make this dish healthier?
To make it healthier, try these tips:
– Use whole wheat pasta shells for more fiber.
– Add extra veggies like mushrooms or zucchini to the filling.
– Use low-fat ricotta and mozzarella to cut calories.
These changes keep the dish tasty while boosting nutrition!
You now have a simple guide for making Spinach Ricotta Stuffed Shells. You learned about the key ingredients and step-by-step instructions to create this dish. We discussed tips for filling and baking, along with serving suggestions. Variations let you customize flavors as you like. Plus, remember the storage advice for leftovers.
This dish is not only tasty but also flexible for your needs. Enjoy making it your own and sharing it with other

Cheesy Spinach Ricotta Delight
Ingredients
- 20 pieces jumbo pasta shells
- 2 cups ricotta cheese
- 1 cup fresh spinach, chopped
- 1 cup shredded mozzarella cheese (plus more for topping)
- 0.5 cup grated Parmesan cheese
- 1 large egg, beaten
- 2 cloves garlic, minced
- 1 teaspoon dried oregano
- 1 teaspoon salt
- 0.5 teaspoon black pepper
- 2 cups marinara sauce
- to taste leaves fresh basil for garnish
Instructions
- Begin by cooking the jumbo pasta shells according to the package instructions, aiming for al dente. Once cooked, drain and set aside to cool slightly to allow for easy handling.
- In a large mixing bowl, combine the ricotta cheese, chopped spinach, half of the shredded mozzarella, grated Parmesan, beaten egg, minced garlic, oregano, salt, and black pepper. Stir thoroughly until the mixture is well combined and creamy.
- Preheat your oven to 375°F (190°C). Take each cooked shell and generously fill it with the spinach and ricotta mixture. You can use a spoon for this, or for more precision, a piping bag works wonderfully.
- In a 9x13 inch baking dish, begin by spreading a thin layer of marinara sauce evenly across the bottom. Carefully arrange the stuffed shells, seam side up, in the dish. Once all the shells are in place, pour the remaining marinara sauce over and sprinkle the rest of the mozzarella cheese on top for a cheesy finish.
- Cover the dish with aluminum foil to trap steam, and bake in your preheated oven for 25 minutes. After this initial baking, remove the foil and continue to bake for an additional 10-15 minutes, or until the cheese is bubbling and golden brown.
- Once baked, allow the dish to cool for a few minutes. Before serving, garnish each serving with fresh basil leaves for an aromatic touch. Serve hot and enjoy the gooey deliciousness!


. To get the best texture, use day-old rice. Fresh rice has too much moisture. When you use day-old rice, it dries out and forms separate grains. This helps create that perfect fried rice texture. You can also spread fresh rice on a tray and chill it for an hour to dry before cooking. Prepare your ingredients ahead of time. Chop the chicken and vegetables before you start cooking. This makes cooking faster and easier. You can also use frozen mixed vegetables to save time. They cook quickly and add color to your dish. Don’t overcrowd the pan. If you add too much rice or chicken at once, it will steam instead of fry. This makes your fried rice soggy. Also, avoid cooking on too low of heat. High heat helps to sear the ingredients and gives that nice flavor. Lastly, don’t forget to taste your dish before serving! Adjust the salt and soy sauce as needed to enhance the flavors. {{image_4}} You can easily make fried rice without meat. Just swap the chicken with tofu or tempeh. Use the same amount, diced small. For a vegan twist, replace the eggs with silken tofu. This creates a soft texture that works well. You can also add more veggies, like bell peppers or zucchini. They add great flavor and color. If you want to change things up, try shrimp or beef. Cook them in the same way as the chicken. You can also use leftover cooked meats. Just chop them small and add them at the end. Don’t forget to add your favorite veggies. Broccoli, snap peas, or mushrooms will bring new tastes. If you like heat, add chili paste or sriracha to your dish. Just a spoonful will spice things up. You can also mix in fresh chilies when you sauté the garlic. If you want a milder heat, try crushed red pepper flakes. They add flavor without being too hot. Enjoy experimenting with these spicy options! To store leftover chicken fried rice, let it cool first. Place it in an airtight container. Make sure the lid fits tightly to keep air out. This helps it stay fresh. Store it in the fridge for up to three days. You can also place a piece of plastic wrap over the rice before sealing the container. This extra layer helps keep moisture in. If you want to keep it longer, freezing is a great option. Divide the chicken fried rice into smaller portions. Use freezer-safe bags or containers for this. Remove as much air as you can to prevent freezer burn. Label the bags with the date. Chicken fried rice can last in the freezer for up to three months. When you are ready to eat, just thaw it in the fridge overnight. To reheat chicken fried rice, use a skillet for the best taste. Heat a little oil in the pan over medium heat. Add the rice and stir it often. This helps it heat evenly. It should take about 5-7 minutes. You can also use a microwave if you are in a hurry. Place the rice in a microwave-safe bowl. Add a splash of water to keep it moist. Cover with a lid or wrap. Heat for 2-3 minutes, stopping to stir halfway. Enjoy your meal, and don't forget to check out the Full Recipe for more delicious tips! Yes, you can make fried rice without eggs. Just skip the eggs in the recipe. Use more veggies or tofu instead. This keeps the dish tasty and filling without the eggs. Jasmine rice is the best choice for fried rice. It's soft yet slightly sticky. Day-old rice works best because it’s drier. Fresh rice may get mushy when cooked. You can store chicken fried rice in the fridge for up to three days. Make sure to keep it in an airtight container. This helps keep it fresh and safe to eat. Yes, you can use cooked or leftover chicken. This saves time and adds flavor. Just chop it into bite-sized pieces before mixing it into your fried rice. You can add soy sauce, oyster sauce, or teriyaki sauce. Each sauce adds a unique taste. Try adding a splash of sesame oil for a nutty flavor. Adjust the amount to your liking for the best results. For the full recipe, check out the details above. In this post, we've explored the key ingredients and steps for Easy Chicken Fried Rice. I shared tips to enhance texture, save time, and avoid common mistakes. We discussed fun variations and how to store your dish effectively. Remember, this dish is simple and can easily fit your tastes. Customize it the way you like. With these tips, you can create a tasty meal while enjoying your cooking journey. Now, get started and make your own fried rice masterpiece!](https://joymealplan.com/wp-content/uploads/2025/06/b80d90ba-a0f5-4453-8c89-c3fa48509676-768x768.webp)


![- 1 pound baby carrots (or 4 medium-sized regular carrots, sliced into uniform sticks or rounds) - 2 tablespoons unsalted butter - 3 tablespoons pure maple syrup - 1 tablespoon packed brown sugar - 1 teaspoon ground cinnamon - Salt and freshly cracked black pepper to taste - Fresh parsley, finely chopped, for garnish Each serving of maple glazed carrots has about 120 calories. You get roughly 30 grams of carbohydrates, with 15 grams of sugar. The dish has 4 grams of fat and 3 grams of fiber. These sweet carrots pack lots of flavor without too many calories, making them a great side. You might want to switch up ingredients for different diets. For a vegan option, use plant-based butter. If you want to lower sugar, try agave syrup or honey. Each choice can change the taste, but they all work well. To start, wash your carrots well. If you have baby carrots, just rinse them under cold water. For regular carrots, peel them first. Slice them into uniform sticks or rounds. This helps them cook evenly. Aim for pieces about the same size. This step is key for a great dish. Now, let’s cook! Heat a large skillet over medium heat. Add the unsalted butter and let it melt completely. Swirl the pan gently to coat the bottom. Once the butter is bubbly, add your prepared carrots. Sauté them for about 5 minutes. Stir occasionally to get even cooking. You want the carrots to start softening but not fully cooked yet. Next, sprinkle brown sugar and ground cinnamon over the carrots. Mix everything well so each carrot gets coated. This adds a sweet and warm flavor. Now, drizzle the pure maple syrup over the carrots. Cook for another 5-7 minutes, stirring often. This allows the glaze to thicken and the carrots to become tender. When your carrots are tender, season them with salt and black pepper to taste. Give everything one last gentle toss to combine. Carefully remove the skillet from the heat. Transfer the glazed carrots to a serving dish. Make sure to drizzle any leftover syrup from the skillet over the top. To add a finishing touch, garnish with finely chopped fresh parsley. This not only adds color but also a fresh taste. Serve your sweet maple glazed carrots warm. They look great on the plate and taste even better. You can find the complete recipe in the [Full Recipe]. To enhance the sweetness and aroma of your maple glazed carrots, always use pure maple syrup. This syrup has a rich taste that makes your dish shine. Combine it with a bit of brown sugar and cinnamon. This mix adds depth and warmth to the carrots. You can also try adding a pinch of nutmeg for extra flavor. This small tweak can make a big difference. For best results, use a large, heavy skillet. A cast-iron or non-stick pan works well. These types of pans heat evenly and help the carrots cook perfectly. If you have a sauté pan with high sides, that’s great too. This design keeps the glaze in the pan and helps it thicken faster. Maple glazed carrots pair well with many meals. They are a perfect side for roasted chicken or pork. You can also serve them with grilled fish for a fresh taste. If you want a vegetarian option, try them with quinoa or lentils. They add a sweet touch that balances savory dishes. For a festive look, serve them alongside other colorful veggies. For the full recipe, check out the Sweet Maple Glazed Carrots recipe above! {{image_4}} You can make your maple glazed carrots even better by adding other veggies. Try using baby potatoes, parsnips, or sweet potatoes. Cut them into similar sizes as the carrots for even cooking. This mix adds more color and flavor to your dish. When you add more vegetables, adjust the cooking time to ensure everything cooks well. Want to change the flavor? You can add herbs or spices to make your dish unique. Try adding fresh thyme or rosemary for an earthy taste. A pinch of nutmeg can also give a warm hint. If you like heat, sprinkle in some red pepper flakes. Mix and match these additions to find what you enjoy most. If you want to try different sweeteners, you have options! Honey works well and gives a floral note. Brown sugar adds a deeper flavor. Agave syrup is also a great choice for a lighter sweetness. Each sweetener will change the taste, so feel free to experiment with what you have on hand. For the full recipe, check the earlier section. To keep your maple glazed carrots fresh, store them in an airtight container. This helps prevent moisture loss and keeps them tasty. Place the cooled carrots in the container and seal tightly. You can keep them in the fridge for up to four days. If you want to enjoy them later, consider the next steps. When you are ready to eat the leftovers, you want to reheat them gently. The best way is to use a skillet. Heat the skillet over low heat. Add a splash of water or broth to help steam the carrots. Stir them often until they are warmed through. This method helps keep the carrots soft and the glaze flavorful. Avoid using a microwave, as it can make them mushy. If you want to store your maple glazed carrots for a long time, freezing is a good option. First, let them cool completely. Then, place the carrots in a freezer-safe bag or container. Remove as much air as possible to prevent freezer burn. They can last up to three months in the freezer. To use them, thaw in the fridge overnight before reheating. To make maple glazed carrots vegan, swap the butter for a plant-based oil or vegan butter. You can use coconut oil for a hint of tropical flavor. This keeps the dish rich and tasty while staying true to vegan standards. Remember to check the maple syrup as well; most brands are naturally vegan. Yes, you can use frozen carrots. They are convenient and can save time. However, frozen carrots may have a different texture than fresh ones. Thaw them first and drain excess water. Sauté them for a bit longer to ensure they cook through. Fresh carrots bring more crunch and flavor, but frozen can still work well in a pinch. To ensure your glazed carrots are tender, cook them over medium heat. Start with 5 minutes of sautéing before adding the glaze. After adding the maple syrup, cook for another 5-7 minutes. Stir often to coat them evenly. The key is to keep an eye on them and test for tenderness with a fork. Aim for a soft texture without losing their shape. This post covered how to make delicious maple glazed carrots. We discussed the key ingredients and their nutritional value. You learned tips for cooking and how to enhance flavors. I also shared ideas for variations and how to store your leftovers properly. Making these carrots is easy and fun. With simple swaps, you can adjust for dietary needs. Enjoy this dish as a side or experiment with different flavors. Happy cooking!](https://joymealplan.com/wp-content/uploads/2025/06/e145556d-f1e0-4204-89d9-54022a16ffd1-768x768.webp)
