Spinach Stuffed Chicken Breast Flavorful and Easy Dish

Are you ready to impress your family with a dish that’s both flavorful and easy? Spinach Stuffed Chicken Breast is a delightfully creamy, cheesy meal that’s perfect for any weeknight dinner. With just a handful of fresh ingredients and simple steps, you can create a dish that looks and tastes gourmet. Let’s dive into how you can make this delicious recipe and elevate your cooking game!
Why I Love This Recipe
- Delicious Flavor Combination: The blend of creamy cheeses and fresh spinach creates a rich and satisfying filling that elevates the chicken to a whole new level.
- Healthy and Nutritious: This dish is packed with nutrients from the spinach and provides a good balance of protein and healthy fats, making it a wholesome choice for dinner.
- Easy to Prepare: With straightforward steps, this recipe is perfect for both novice cooks and seasoned chefs, allowing anyone to impress at the dinner table.
- Versatile Serving Options: Pair it with a variety of sides, from salads to roasted vegetables, making it adaptable for any occasion or preference.
Ingredients
List of Ingredients
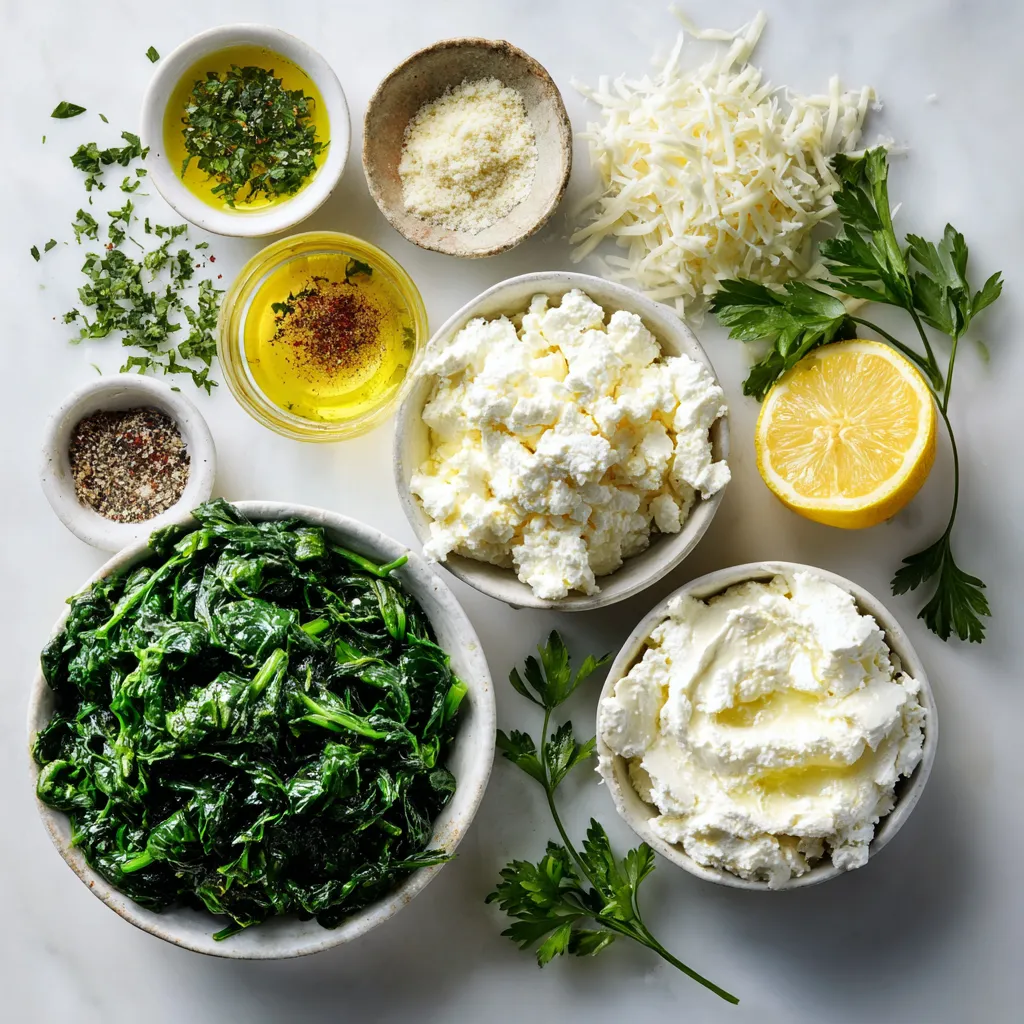
– 4 boneless, skinless chicken breasts
– 2 cups fresh spinach, finely chopped
– 4 oz cream cheese, softened
– 1/2 cup feta cheese, crumbled
– 1/2 cup shredded mozzarella cheese
– 2 cloves garlic, minced
– 1/2 teaspoon onion powder
– 1/4 teaspoon black pepper
– 1/4 teaspoon salt
– 1 tablespoon olive oil
– 1 lemon, juiced
– Fresh parsley, chopped for garnish
To make this dish, you need fresh and tasty ingredients. First, let’s talk about the chicken. You want boneless, skinless chicken breasts for easy cooking and a nice flavor. Fresh spinach adds a healthy touch. Cream cheese helps bind the filling and gives it a smooth texture. Crumbled feta cheese adds a salty kick, while mozzarella brings a lovely meltiness.
Garlic gives the dish a nice aroma. Onion powder, black pepper, and salt bring out all the flavors. Olive oil is key for sautéing the garlic and spinach. Fresh lemon juice brightens the dish and adds a zesty flair. Lastly, fresh parsley makes for a lovely garnish.
Ingredient Substitutions
– Alternatives for cream cheese: You can use ricotta or Greek yogurt if you want a lower-fat option.
– Gluten-free options: This recipe is naturally gluten-free, so no changes are needed.
– Dairy-free cheese substitutes: Look for dairy-free cream cheese or nut-based cheeses for a great taste.
These substitutions let you adjust the recipe to fit your needs. Whether it’s for health, taste, or allergies, you can still enjoy this dish!

Step-by-Step Instructions
Preparation Steps
1. Preheating the oven
Start by preheating your oven to 375°F (190°C). This step is key for even cooking.
2. Sautéing garlic and spinach
In a skillet, heat 1 tablespoon of olive oil over medium heat. Add 2 cloves of minced garlic and sauté for about 1 minute. You want the garlic to smell great, but not brown. Next, add 2 cups of finely chopped fresh spinach. Stir it often until the spinach wilts, which should take 2-3 minutes. Once done, remove it from heat and let it cool.
Stuffing the Chicken
1. Creating pockets in the chicken breasts
Take 4 boneless, skinless chicken breasts. Use a sharp knife to slice horizontally into each breast. Be careful not to cut all the way through. You want to create a pocket for the filling.
2. Filling with spinach and cheese mixture
In a bowl, mix the sautéed spinach, 4 oz of softened cream cheese, 1/2 cup of crumbled feta cheese, and 1/2 cup of shredded mozzarella cheese. Add 1/2 teaspoon of onion powder, 1/4 teaspoon of black pepper, and 1/4 teaspoon of salt. Stir until everything blends well. Stuff each chicken breast pocket with this creamy mixture. If needed, use toothpicks to keep them closed.
Cooking Steps
1. Baking times and temperature details
Place the stuffed chicken breasts in a baking dish. Squeeze the juice of 1 lemon over the tops for extra flavor. Bake in the preheated oven for 25-30 minutes. Your chicken should reach an internal temperature of 165°F (75°C).
2. Resting period before serving
After baking, let the chicken rest for 5 minutes. This helps keep the juices inside. Before slicing, remove any toothpicks. Enjoy your meal!
Tips & Tricks
Enhancing Flavor
To make your spinach stuffed chicken even tastier, add spices or herbs. Fresh herbs like basil or thyme bring a bright flavor. You can also use dried herbs if fresh ones are not available. Try adding a pinch of red pepper flakes for a slight kick.
For juicier chicken, make sure not to overcook it. Use a meat thermometer to check for doneness. The chicken should reach 165°F (75°C). Also, letting it rest for five minutes before slicing keeps it moist.
Cooking Methods
If you want to switch things up, try grilling or air frying your stuffed chicken. Grilling gives a nice smoky flavor, while air frying makes it crispy and quick.
When baking, keep your oven at 375°F (190°C). This temperature cooks the chicken evenly and ensures the filling warms through.
Presentation Suggestions
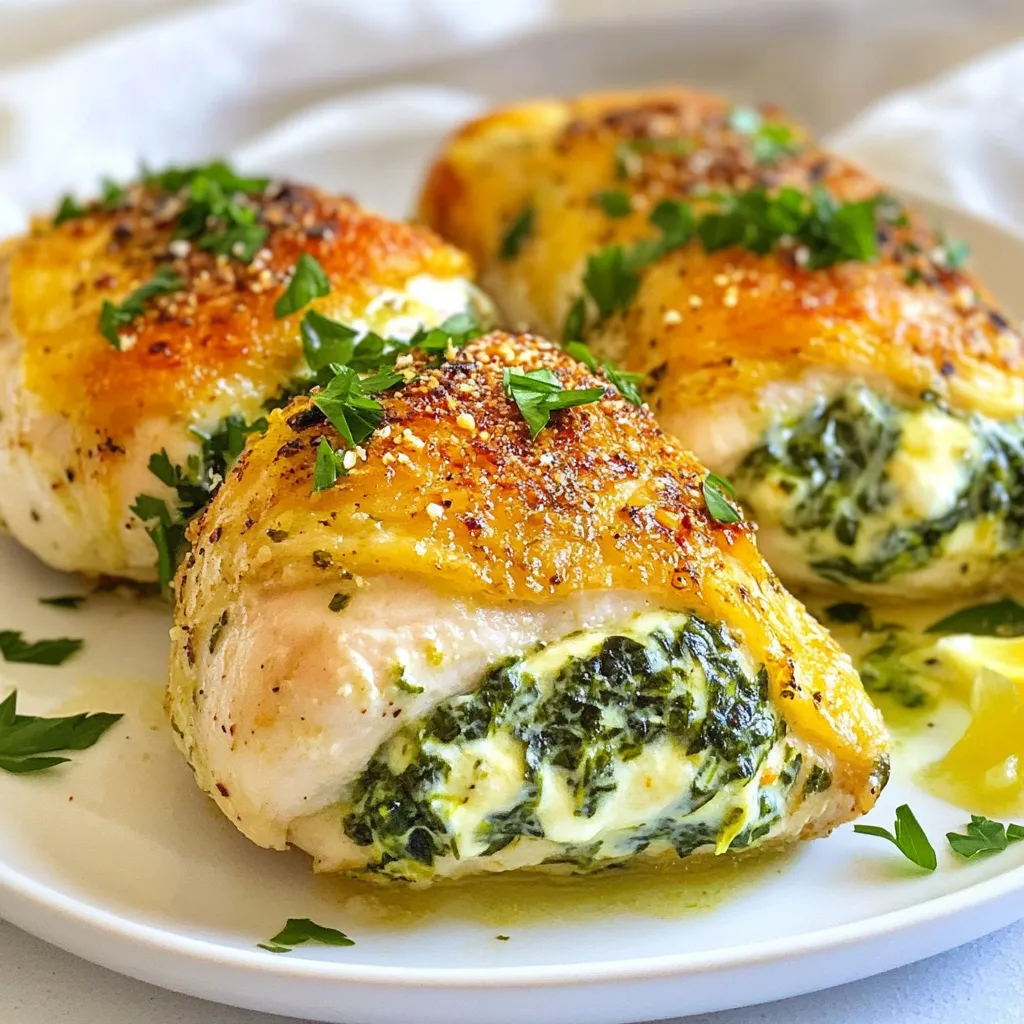
Plating is key to a great meal! Place the stuffed chicken on a clean plate. You can slice it to show the colorful filling inside.
For garnishing, sprinkle fresh parsley over the top. Lemon slices add a pop of color and a touch of brightness. You can arrange them around the chicken for a beautiful look.
Pro Tips
- Prevent Dry Chicken: To keep the chicken moist, avoid overcooking. Use a meat thermometer to check for an internal temperature of 165°F (75°C).
- Flavor Boost: Marinate the chicken breasts in lemon juice and olive oil for at least 30 minutes before stuffing for extra flavor.
- Cheese Variations: Feel free to mix and match cheeses. Adding a bit of parmesan or gouda can elevate the flavor profile.
- Perfectly Sautéed Spinach: Make sure to remove excess moisture from the sautéed spinach before mixing with the cheeses to prevent a watery filling.

Variations
Recipe Modifications
For a vegetarian option, swap out the chicken for large portobello mushrooms. Remove the stems and gills, then stuff them with the spinach and cheese mixture. Bake them until tender.
You can also try other tasty fillings. Sun-dried tomatoes add a sweet and tangy flavor. Chopped artichokes make for a nice twist. Mushrooms can add a savory touch. Mix and match these to find your favorite combo!
Serving Suggestions
Pair your spinach stuffed chicken with a fresh salad. A light arugula salad with lemon dressing works great. Roasted vegetables also make a good side. Think carrots, zucchini, or bell peppers.
For sauces, I recommend a tangy lemon sauce. You can also use a creamy garlic sauce. These will enhance the dish and add extra flavor.
Seasonal Variations
In spring, add seasonal veggies like asparagus or peas to the filling. This fresh twist brightens up the dish.
For holidays, make a festive version. Mix in cranberries for a sweet touch. Add some herbs like thyme or rosemary for a holiday feel. These variations make the dish special for any season.
Storage Info
Storing Leftovers
To keep your spinach stuffed chicken breast fresh, place it in an airtight container. Store it in the fridge. It stays good for up to four days. If you want to keep it longer, consider freezing it.
Reheating Tips
When reheating, use the oven to keep it juicy. Set your oven to 350°F (175°C). Place the chicken in a baking dish and cover it with foil. Heat for about 15-20 minutes. You can also use a microwave, but it may dry out. For freezer storage, wrap each piece tightly in plastic wrap, then foil. This keeps the chicken safe for up to three months.
Meal Prep Ideas
You can prepare the filling in advance. Store it in the fridge for up to two days. This makes your cooking time shorter later. If you want to freeze, fill the chicken breasts and wrap them well. Freeze them before baking. This way, you can enjoy a tasty meal anytime!
FAQs
How do I know when chicken is cooked through?
To know when chicken is done, use a meat thermometer. The chicken should reach an internal temperature of 165°F (75°C). This ensures it is safe to eat. Insert the thermometer into the thickest part of the chicken breast. Make sure it does not touch bone. If you don’t have a thermometer, cut the chicken open. The juices should run clear, not pink. This gives you a good sign it is fully cooked.
Can I make Spinach Stuffed Chicken in advance?
Yes, you can prepare this dish ahead of time. You can stuff the chicken breasts and store them in the fridge for up to 24 hours. This helps the flavors blend well. Just cover them tightly with plastic wrap or foil. When ready to cook, take them out and let them sit for about 15 minutes at room temperature. This helps them cook evenly.
What can I serve with Spinach Stuffed Chicken?
You have many great options for sides. Here are a few ideas:
– Roasted vegetables, like carrots and bell peppers
– A fresh green salad with a light vinaigrette
– Garlic mashed potatoes for a comforting touch
– Quinoa or rice for a hearty addition
– Steamed broccoli for a healthy crunch
These sides complement the flavors of the chicken well. Enjoy your meal!
This blog post has guided you through making delicious Spinach Stuffed Chicken. We detailed every ingredient, including alternatives, and provided clear steps for cooking and serving. Remember, creativity enhances your dish, so feel free to try new flavors or add sides.
With proper storage, you can enjoy leftovers and even prep meals in advance. Use the tips and variations for a unique touch every time. Enjoy making this tasty dis

Spinach & Cream Cheese Stuffed Chicken Breast
Ingredients
- 4 pieces boneless, skinless chicken breasts
- 2 cups fresh spinach, finely chopped
- 4 oz cream cheese, softened to room temperature
- 1 2 cups feta cheese, crumbled
- 1 2 cups shredded mozzarella cheese
- 2 cloves garlic, minced
- 0.5 teaspoon onion powder
- 0.25 teaspoon black pepper
- 0.25 teaspoon salt
- 1 tablespoon olive oil
- 1 lemon juiced
- to taste none fresh parsley, chopped, for garnish
Instructions
- Preheat your oven to 375°F (190°C), ensuring it reaches temperature before placing the chicken inside.
- In a skillet, warm the olive oil over medium heat. Once hot, add the minced garlic and sauté for about 1 minute, or until it becomes fragrant but not browned.
- Introduce the chopped spinach to the skillet, stirring occasionally. Cook until the spinach is wilted, which should take around 2-3 minutes. Remove from heat and set aside to cool slightly.
- In a mixing bowl, thoroughly combine the softened cream cheese, crumbled feta cheese, shredded mozzarella cheese, sautéed spinach, onion powder, black pepper, and salt. Mix well until the filling is smooth and all ingredients are evenly distributed.
- Carefully create a pocket in each chicken breast: take a sharp knife and slice horizontally along one side of the breast, making sure not to cut completely through to maintain the structure.
- Fill each chicken pocket generously with the spinach and cheese mixture. If necessary, secure the openings with toothpicks to prevent the filling from spilling out during cooking.
- Arrange the stuffed chicken breasts in a baking dish. Squeeze fresh lemon juice over the tops of each breast for added flavor and moisture.
- Bake the chicken in the preheated oven for 25-30 minutes, or until the chicken is cooked through and has reached an internal temperature of 165°F (75°C).
- After baking, allow the chicken to rest for 5 minutes. Carefully remove any toothpicks before slicing to serve.


![- 1 lb ground beef - 1 can (28 oz) crushed tomatoes - 4 cups beef broth The main ingredients make this lasagna soup hearty and filling. Ground beef gives it a rich flavor. The crushed tomatoes add a sweet and tangy taste. Beef broth helps to create a savory base. This combo makes every spoonful comforting. - 1 cup ricotta cheese - 1 cup shredded mozzarella cheese - 1/2 cup grated Parmesan cheese Cheese plays a big role in this dish. Ricotta cheese brings creaminess. It melts beautifully and adds depth. The mozzarella cheese makes each bowl cheesy and gooey. Finally, Parmesan cheese gives a salty kick. Together, these cheeses create a lovely layering of texture and taste. - 2 cloves garlic, minced - 1 medium onion, finely chopped - 1 teaspoon dried basil - 1 teaspoon dried oregano Seasonings and aromatics are key to flavor. Fresh garlic and onion add wonderful aroma while cooking. Dried basil and oregano give a classic Italian taste. These simple ingredients transform the soup from basic to fantastic. Don't skimp on these; they make a big difference! For the full recipe, check [Full Recipe]. To start, I heat a splash of olive oil in a large pot over medium heat. Next, I add the chopped onion and sauté it for about 3-4 minutes. I want the onion to be soft and a bit clear. Then, I toss in the minced garlic. I stir it for about 30 seconds to let the aroma bloom. After that, I add 1 pound of ground beef to the pot. I break it into smaller pieces as it cooks. I cook until the beef is browned. If there is too much fat, I carefully drain it. Now comes the exciting part. I stir in 28 ounces of crushed tomatoes and 4 cups of beef broth. Then, I sprinkle in 1 teaspoon of dried basil, 1 teaspoon of dried oregano, and optional crushed red pepper flakes for heat. I season it with salt and black pepper. I increase the heat to bring the soup to a rolling boil. Once the soup boils, I lower the heat. I add 8 broken lasagna noodles into the pot. I let the soup simmer for about 10-12 minutes. I stir it occasionally, so the noodles do not stick. I want them to be al dente, just firm enough to bite into. For the complete recipe, check out the Full Recipe. To make your lasagna soup shine, use fresh herbs for garnish. Fresh basil adds a bright taste. It lifts the flavor and looks great too. You can even chop some and stir them in right before serving. For heat, balance the spices. Use crushed red pepper flakes for a kick. Adjust the amount to your taste. Start small, then add more if you like spice. Keep the noodles from becoming mushy by stirring them often. Once you add the broken noodles, pay attention! They should cook for about 10 to 12 minutes. If you want a thicker soup, mix in a little extra ricotta. It makes the soup creamy. You can also add more crushed tomatoes to thicken it up. Just remember to adjust the seasoning. Serve the soup in rustic bowls for a cozy look. A drizzle of olive oil on top adds a nice shine. It also enhances the flavor. Pair the soup with crusty bread for dipping. This makes each bite more satisfying. You can even sprinkle some extra cheese on top for a gourmet touch. {{image_4}} You can easily make this soup vegetarian. Instead of ground beef, use mushrooms or lentils. Mushrooms add a nice texture and flavor. Lentils are hearty and full of protein. Both options keep the soup filling and tasty. You will still enjoy the rich flavors of the sauce. If you need a gluten-free option, swap regular pasta for gluten-free pasta. Many stores carry great gluten-free noodles now. They cook up just as well as regular pasta. Just follow the package instructions for best results. This way, everyone can enjoy the soup without worry. Feel free to add more veggies to your soup! Spinach is a great choice; it wilts nicely and adds nutrients. Zucchini can also be a fun addition. You can chop it up and throw it in during the last few minutes of cooking. This boosts the flavor and makes the soup even heartier. Check out the Full Recipe for more ideas on how to customize your lasagna soup! To store your Easy Lasagna Soup, let it cool first. Then, pour the soup into an airtight container. Make sure to seal it well. Place it in the fridge. It will stay fresh for about 3 to 4 days. When you're ready to eat, just reheat it on the stove or in the microwave. Stir occasionally to heat evenly. If you want to save some for later, freezing is a great option. Pour the cooled soup into freezer-safe containers. Leave some space at the top, as the soup will expand when frozen. You can freeze the soup for up to 3 months. To reheat, thaw it in the fridge overnight. Heat it on the stove until warm, stirring often. You can add a little extra broth if it seems too thick. For the best taste, try to eat your soup within a week of making it. After that, the flavors may not be as fresh. Always check for signs of spoilage before eating. If it smells off or looks strange, it’s best to throw it out. Enjoy your Easy Lasagna Soup while it’s at its best! To make Easy Lasagna Soup, follow these simple steps: 1. Heat olive oil in a large pot. 2. Sauté chopped onion until it's soft. 3. Add minced garlic and ground beef. Cook until the beef is brown. 4. Stir in crushed tomatoes, beef broth, and spices. 5. Bring the soup to a boil, then add broken lasagna noodles. 6. Simmer for about 10-12 minutes until noodles are al dente. This soup is easy and quick. You can enjoy a warm bowl in just 30 minutes. For the full recipe, check out the [Full Recipe]. Yes, you can mix and match cheeses! Here are some tasty options: - Use cottage cheese instead of ricotta for a different texture. - Swap mozzarella for provolone for a sharper taste. - Try adding goat cheese for a tangy flavor. Feel free to experiment with your favorite cheeses. It’s a fun way to make the soup unique! Lasagna soup can be healthy if you watch your portions. It has protein from the beef and calcium from the cheese. Here are some tips to keep it nutritious: - Use lean ground beef or turkey to cut down on fat. - Add extra veggies like spinach or bell peppers for more nutrients. - Control your cheese portions to lower the calorie count. This soup can fit well in a balanced diet if you enjoy it in moderation. Absolutely! Making lasagna soup ahead of time is easy. Here are some tips: - Prepare the soup base and store it in the fridge. Add noodles when you heat it up. - You can freeze the soup too. Just leave out the noodles, as they get mushy when frozen. - To reheat, warm it on the stove over low heat. Stir often to keep it from sticking. Making it ahead saves time and fills your home with a lovely aroma! This blog post covers how to make easy lasagna soup, starting with key ingredients like ground beef, tomatoes, and cheese. I shared step-by-step instructions to guide you through cooking the base and building the soup. Helpful tips teach you how to enhance flavor and texture. For those with dietary needs, I included variations and storage info for leftovers. Lasagna soup is a flexible and fun dish. Enjoy tailoring it to your taste, and impress your family tonight.](https://joymealplan.com/wp-content/uploads/2025/06/4153c456-5d21-4a28-8392-80b5992a6e3c-768x768.webp)


![To make a tasty tomato basil soup, gather these ingredients: - 2 tablespoons extra virgin olive oil - 1 medium yellow onion, finely diced - 3 cloves garlic, minced - 2 cans (14 oz each) diced tomatoes in juice - 2 cups low-sodium vegetable broth - 1 teaspoon granulated sugar - 1 teaspoon dried oregano - Salt and freshly ground black pepper, to taste - 1 cup fresh basil leaves, roughly chopped - 1/2 cup heavy cream (optional for added creaminess) - Crusty bread or homemade croutons, for serving You can change up the flavor of your soup by adding: - A pinch of red pepper flakes for heat - Fresh lemon juice for brightness - A sprinkle of Parmesan cheese for richness - Other herbs like thyme or parsley Fresh basil and tomatoes make a big difference. Here’s how to choose the best: - Basil: Look for bright green leaves. They should be firm, not wilted. Smell the leaves; they should have a strong, sweet aroma. - Tomatoes: Choose ripe tomatoes with no bruises. They should feel heavy and firm. The color should be bright and even, depending on the type. Using high-quality ingredients will enhance the soup's flavor. Enjoy the vibrant taste of fresh basil and tomatoes in your cooking! For the full recipe, check out the [Full Recipe]. First, gather all your ingredients. You will need olive oil, onion, garlic, diced tomatoes, vegetable broth, and spices. Also, have fresh basil and cream ready if you want a richer soup. Start by chopping the onion and mincing the garlic. Dice them small for even cooking. This helps build the soup's flavor from the start. Measure out your diced tomatoes and vegetable broth, so you have them ready. In a large saucepan, heat the olive oil on medium heat. Once hot, add the diced onion. Cook it for about five minutes until it turns soft and clear. Then, add the minced garlic. Stir it for one minute. Be careful not to let it burn. Next, pour in the diced tomatoes and vegetable broth. Stir well to mix everything. Add the sugar, oregano, salt, and pepper. Let the soup come to a gentle boil. Then, reduce the heat to low. Let it simmer for 20 minutes. This helps the flavors mix together nicely. After simmering, take the saucepan off the heat. Let it cool for a few minutes. For a smooth soup, use an immersion blender to blend the soup until it's silky. If you don’t have one, transfer it in batches to a blender. Blend until smooth. Once blended, return the soup to the saucepan. Stir in the chopped basil and cream if you want it creamy. Heat it gently on low for about five minutes. This will let the basil's flavor shine through. Taste your soup before serving. Adjust the salt, pepper, or sugar to your liking. Serve it warm with bread or croutons for a tasty meal. Enjoy your delicious tomato basil soup! For a complete recipe, check the Full Recipe. To make your tomato basil soup extra tasty, focus on fresh herbs. Fresh basil adds a bright touch. You can also use other herbs, like thyme or parsley, for a twist. Seasoning is key! Start with salt and pepper to bring out the flavors. A dash of sugar balances the acidity of the tomatoes. Don’t forget to taste as you go. One common mistake is overcooking the garlic. If it burns, it can turn bitter. Add it just before the tomatoes for the best flavor. Another mistake is skipping the simmering step. This helps the flavors blend well. A quick boil won't do the trick. Lastly, don’t forget to blend the soup well. A chunky texture can be nice, but a smooth soup feels luxurious. Keep your heat at medium for sautéing the onions. This allows them to soften without burning. When it’s time to simmer, lower the heat. A gentle simmer for 20 minutes works best. If you want a silky texture, blend the soup until smooth. A few minutes of gentle heating after blending helps the basil infuse nicely. For the full recipe, check the complete guide above. Enjoy your cooking! {{image_4}} To make a creamy version of tomato basil soup, add heavy cream. This gives the soup a rich and smooth texture. Follow the original recipe and simply stir in 1/2 cup of heavy cream after blending the soup. Heat it gently over low heat for a few minutes. The cream balances the acidity from the tomatoes and adds depth. You can also use coconut cream for a dairy-free option. If you like a chunkier soup, add fresh veggies. Dice up some zucchini, bell peppers, or carrots. Sauté these with the onion at the start. This adds more color and nutrients to your dish. Keep the diced tomatoes, but don’t blend the soup completely. Just stir in the chopped fresh basil at the end for extra flavor. This version is hearty and satisfying. To make a vegan version, skip the heavy cream and use coconut milk instead. It gives a creamy texture and a hint of sweetness. Use vegetable broth and fresh basil as usual. This version keeps the dish plant-based and delicious. You’ll still enjoy all the flavors without animal products. For a kick, add crushed red pepper flakes when cooking. These variations show just how versatile tomato basil soup can be. Each version brings its own twist while keeping that classic flavor. For the full recipe, check out the complete guide. To store your tomato basil soup, let it cool first. Pour it into an airtight container. You can keep it in the fridge for 3 to 4 days. Make sure the lid seals tightly to keep it fresh. If you want to save it longer, freezing is a great option. For freezing, use freezer-safe containers. Leave some space at the top, as the soup will expand when it freezes. You can store it in the freezer for up to 3 months. Label the container with the date, so you know when you made it. It helps to freeze it in portion sizes for easy use later. When you're ready to eat, thaw the soup in the fridge overnight. To reheat, pour it into a pot over low heat. Stir often to prevent sticking. If you want a creamier texture, add a splash of cream while heating. You can also use a microwave, but stir halfway through to heat evenly. Enjoy your delicious soup! You can serve many tasty sides with Tomato Basil Soup. Here are some great options: - Crusty bread - Grilled cheese sandwiches - Homemade croutons - A fresh salad These choices add texture and flavor. For a fun twist, try a cheesy garlic bread. It pairs well with the soup's warmth. Tomato Basil Soup lasts about 3 to 5 days in the fridge. Store it in an airtight container to keep it fresh. To enjoy it longer, you can freeze it. Yes, you can make Tomato Basil Soup in advance. It tastes even better the next day! Just cook the soup, let it cool, and store it in the fridge. You can also freeze it for later use. When ready to serve, simply reheat it on the stove or in the microwave. For a full recipe, check out the Hearty Tomato Basil Delight. Making Tomato Basil Soup is simple and rewarding. We covered the key ingredients, preparation steps, and cooking tips. You can choose fresh basil and ripe tomatoes for the best taste. Variations like creamy or vegan options add more fun. Remember to store leftovers properly to keep them fresh. By avoiding common mistakes, you can create a perfect soup each time. I hope these insights inspire you to enjoy this classic dish all year round.](https://joymealplan.com/wp-content/uploads/2025/06/73c8b43a-025c-4169-ae99-725afa6fdd07-768x768.webp)
