Strawberry Basil Bruschetta Fresh and Flavorful Treat

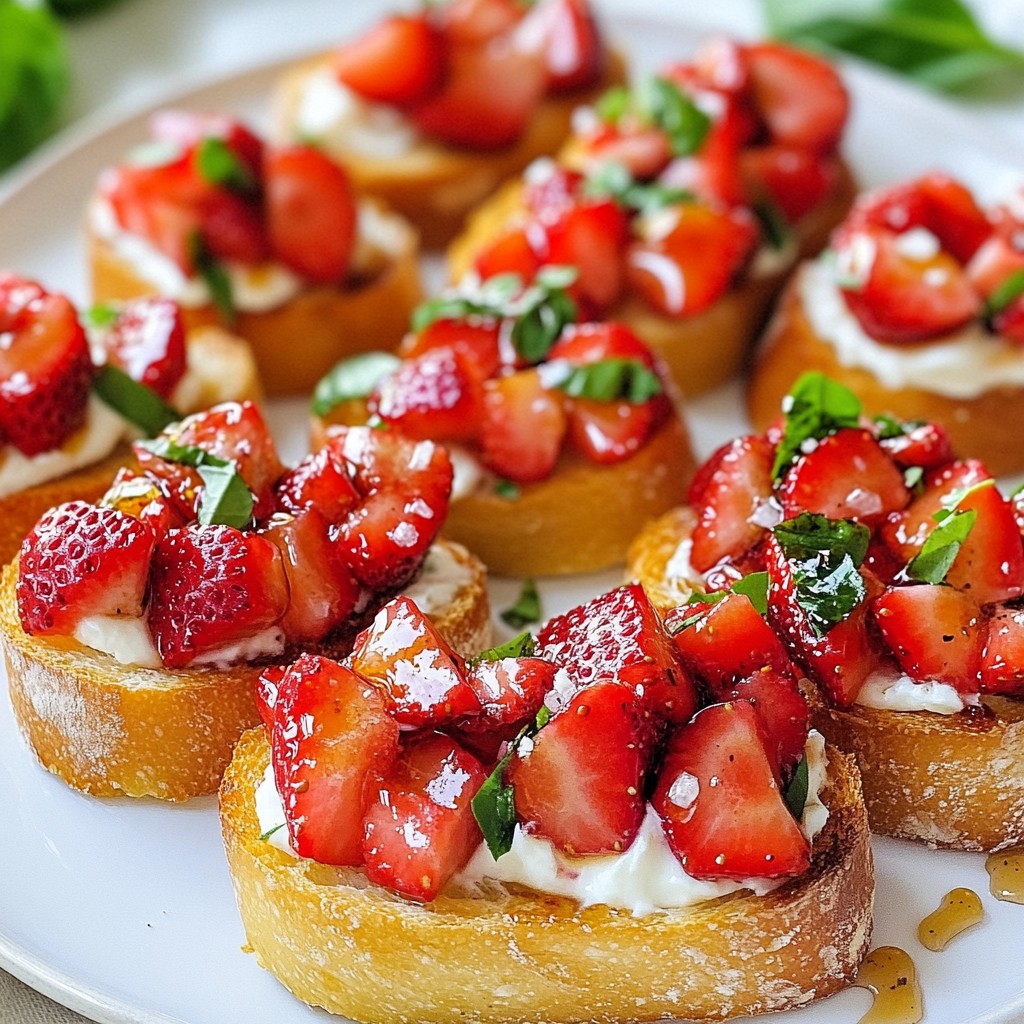
If you’re looking for a fresh and tasty snack, Strawberry Basil Bruschetta is the way to go! This delightful treat brings together the sweetness of strawberries and the aromatic touch of basil. It’s easy to prepare and perfect for any gathering or quiet night in. Join me as we explore simple steps, tips, and fun variations to elevate this classic dish. Let’s dive into a flavor adventure that’s sure to impress!
Why I Love This Recipe
- Fresh Flavors: This bruschetta combines the sweetness of strawberries with the aromatic notes of basil, creating a refreshing bite that’s perfect for summer gatherings.
- Easy to Prepare: With minimal ingredients and quick steps, this recipe is perfect for both novice cooks and seasoned chefs looking for a simple yet impressive appetizer.
- Versatile Topping: The strawberry-basil mixture can be customized with additional ingredients like nuts or different cheeses, allowing for personal creativity in every serving.
- Perfect for Entertaining: This dish is not only visually stunning but also delicious, making it an ideal choice for parties, picnics, or casual get-togethers.
Ingredients
List of Ingredients Required
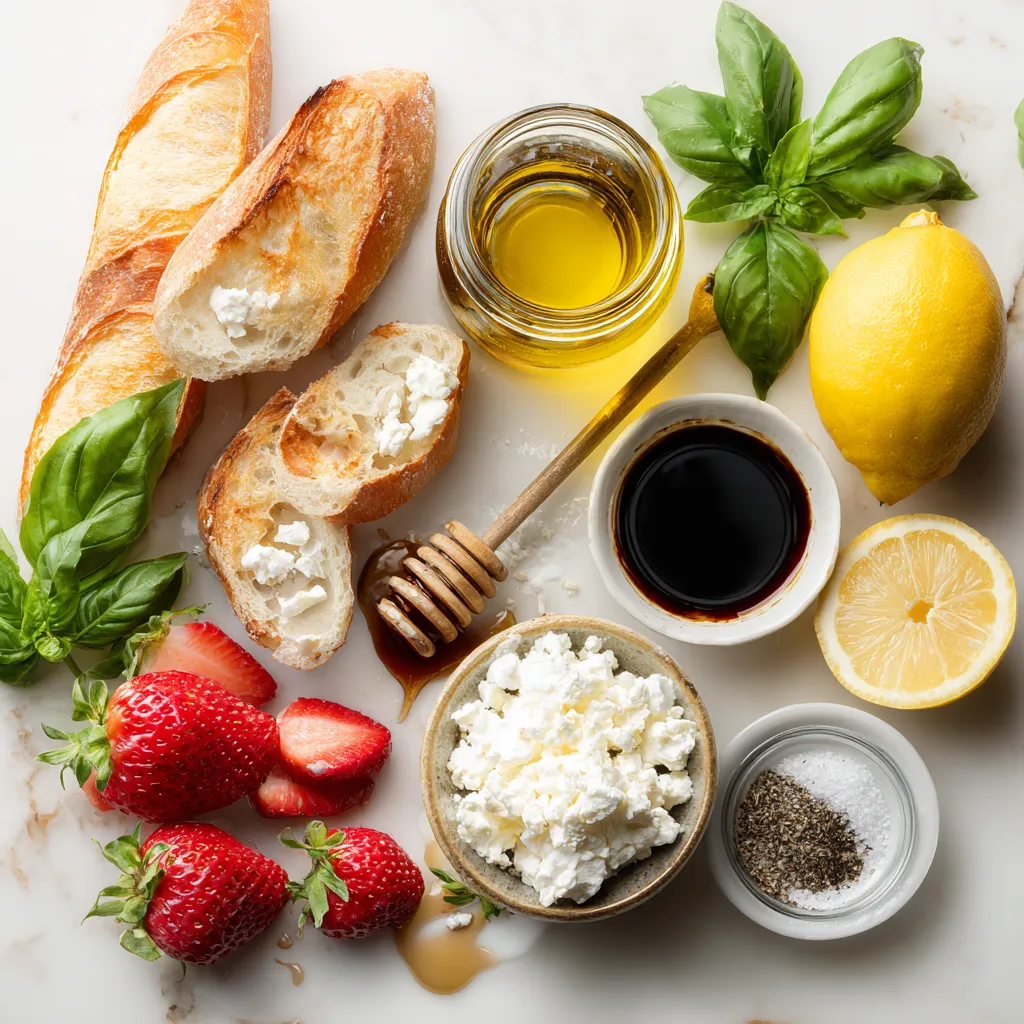
To make Strawberry Basil Bruschetta, gather these simple ingredients:
– 1 baguette, sliced into 1/2-inch thick pieces
– 1 cup fresh strawberries, hulled and diced
– 1/4 cup fresh basil leaves, finely chopped
– 1 tablespoon balsamic glaze
– 1 tablespoon honey
– 1 teaspoon freshly squeezed lemon juice
– 1/4 cup creamy goat cheese, crumbled
– Salt and freshly ground black pepper to taste
– Extra virgin olive oil for drizzling
These ingredients come together to create a fresh and tasty treat.
Substitutions for Key Ingredients
If you want to switch things up, here are some substitutions:
– Baguette: Use any crusty bread, like ciabatta or sourdough.
– Strawberries: Swap strawberries for diced peaches or ripe tomatoes for a different flavor.
– Basil: Fresh mint or cilantro can add a unique twist.
– Goat Cheese: Feta cheese or ricotta can replace goat cheese for a different taste.
– Balsamic Glaze: Try a simple balsamic vinegar for a more tangy bite.
These swaps can make the recipe fit your taste or what you have on hand.
Dietary Considerations
This bruschetta can fit various diets:
– Vegetarian: All the ingredients are vegetarian-friendly.
– Gluten-Free: Use gluten-free bread as a base.
– Nut-Free: This recipe contains no nuts, making it safe for nut allergies.
– Low-Sugar: Skip the honey or use a sugar-free syrup for a lower sugar option.
Always check labels for any hidden allergens. This recipe is fun, fresh, and adaptable to many diets!

Step-by-Step Instructions
Prepping the Baguette
First, preheat your oven to 400°F (200°C). This makes the bread crispy and warm. Slice your baguette into pieces that are 1/2-inch thick. Lay the slices on a baking sheet. With a brush, lightly coat the tops with extra virgin olive oil. This step adds flavor and helps them crisp. Toast them in the oven for 5 to 7 minutes. Watch closely so they don’t burn. You want them golden brown and slightly crispy.
Preparing the Strawberry Basil Topping
While your bread toasts, it’s time to make the topping. In a medium bowl, add 1 cup of diced strawberries. Make sure they are hulled and cut into small pieces. Then, chop 1/4 cup of fresh basil leaves finely. Add these to the bowl. Next, pour in 1 tablespoon of balsamic glaze, 1 tablespoon of honey, and 1 teaspoon of lemon juice. Season with a pinch of salt and black pepper. Mix gently to combine all the flavors. Be careful not to crush the strawberries. You want them whole for that lovely texture.
Assembling the Bruschetta
Now it’s time to put everything together. Once the baguette slices are toasted, let them cool for a minute. Then, take a spoon and scoop the strawberry-basil mixture onto each slice. Make sure each piece has a generous amount of topping. For the final touch, sprinkle crumbled goat cheese on top. This adds creaminess that pairs well with the fresh toppings. Drizzle a bit more balsamic glaze and some olive oil over them. Serve your bruschetta right away, so the bread is warm and inviting. Enjoy every bite of this fresh and flavorful treat!
Tips & Tricks
Best Practices for Toasting Bread
Toasting bread is key for this dish. Start with a fresh baguette. Cut it into 1/2-inch thick slices. Lay them flat on a baking sheet. Brush each slice with extra virgin olive oil. This helps them become golden and crunchy. Bake at 400°F (200°C) for 5-7 minutes. Watch closely so they don’t burn. They should be crisp and slightly brown. This step makes each bite delightful.
Ensuring Flavor Balance
Balancing flavors is vital for Strawberry Basil Bruschetta. Use ripe strawberries for sweetness. Fresh basil adds a lovely herbal note. For a zing, include lemon juice. It brightens the whole dish. The balsamic glaze brings rich depth. Honey adds a touch of sweetness. Season with salt and pepper to taste. Mix gently to keep strawberry pieces intact. This way, every bite sings with flavor.
Presentation Tips for Serving
Great presentation makes your bruschetta pop! Use a nice platter to showcase your work. Arrange the toasted bread neatly. Spoon the strawberry mixture generously on top. Don’t skimp on the goat cheese; it adds creaminess. Finish with a drizzle of balsamic glaze. A few fresh basil leaves on top add color. Serve immediately while warm. This makes your dish look appealing and inviting.
Pro Tips
- Use Fresh Ingredients: The quality of your strawberries and basil will greatly impact the flavor of the bruschetta. Opt for ripe, seasonal strawberries and vibrant basil for the best taste.
- Toast the Bread Just Right: Keep an eye on the baguette slices while toasting. You want them golden and crispy, not burnt. If you prefer a softer texture, consider lightly grilling them instead.
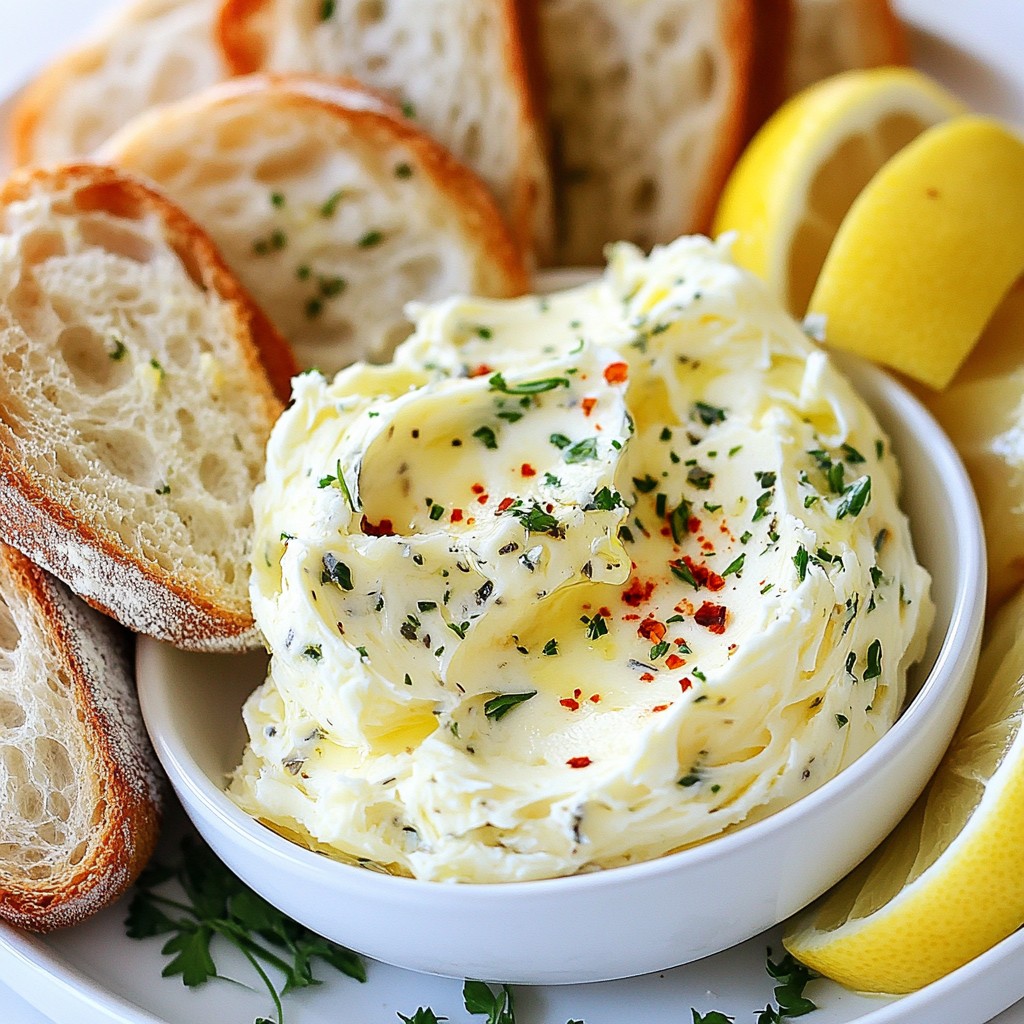
- Experiment with Toppings: Feel free to customize the bruschetta by adding other toppings, such as sliced almonds or a sprinkle of chili flakes, for an added crunch or spice.
- Serve Immediately: Bruschetta is best enjoyed fresh. Serve it right after assembling to ensure the bread stays crispy and the toppings remain vibrant and flavorful.

Variations
Alternative Toppings
You can switch up the toppings on your bruschetta. Try using diced peaches or tomatoes. You can also use mint leaves instead of basil. Mix in some feta cheese for a salty twist. Add a bit of chili for heat. These changes can make the dish new and exciting!
Gluten-Free Options
If you need a gluten-free choice, use gluten-free bread. This works well with the same toppings. You can also use cucumber slices as a base. They provide a nice crunch and freshness. Just make sure to slice them thick enough to hold the toppings.
Sweet vs Savory Versions
You can create sweet or savory bruschetta. For sweet, add honey and sliced strawberries. Top with ricotta for creaminess. For a savory version, use diced tomatoes and basil. Drizzle with olive oil and balsamic. Both styles are tasty and add variety to your meals!
Storage Info
How to Store Leftover Bruschetta
To keep your leftover bruschetta fresh, store it in an airtight container. Avoid stacking the toasted bread with the toppings. This way, the bread stays crisp and the toppings stay fresh. If you place them together, the bread can become soggy. You can enjoy the leftover bruschetta within two days for the best taste.
Best Way to Reheat Toasted Bread
To reheat the toasted bread, preheat your oven to 350°F (175°C). Place the bread slices on a baking sheet. Heat them for about 5 minutes until they are warm and crispy again. This method revives the crunch you want without drying them out. Avoid using the microwave, as it can make the bread chewy.
Recommended Duration for Ingredients
For the best flavor, use fresh strawberries and basil within three days. Store strawberries in the fridge, but do not wash them until you’re ready to use them. The balsamic glaze and honey can last for months in your pantry. Goat cheese should be used within a week after opening for the best taste. Always check for freshness before using any ingredient.
FAQs
What else can I use instead of goat cheese?
You can use several tasty options instead of goat cheese. Cream cheese offers a rich, smooth taste. Ricotta cheese gives a light and creamy texture. Feta cheese adds a salty kick. If you want a vegan choice, try cashew cream or almond cheese. Each of these will change the flavor a bit, but they all work well.
Can I make this recipe ahead of time?
Yes, you can prepare this recipe ahead of time. You can make the strawberry-basil topping a few hours before serving. Just mix the strawberries and basil with the other ingredients. Store it in the fridge to keep it fresh. Toast your baguette slices right before serving. This helps keep the bread crispy. If you toast them early, they might become soft.
What are the best side dishes to pair with Strawberry Basil Bruschetta?
Strawberry Basil Bruschetta pairs well with many side dishes. A simple mixed green salad adds freshness. A light pasta salad can also be a great choice. Try serving it with a cheese platter for variety. Fresh fruit, like melon or blueberries, complements the bruschetta too. You can also offer a refreshing drink, like lemonade or iced tea, to complete the meal.
This article covered how to make tasty Strawberry Basil Bruschetta. You learned about ingredients, substitutes, and dietary needs. I shared clear steps to prep and assemble the dish. Tips for toasting and balancing flavors helped enhance your meal.
You also explored fun variations and storage methods. With all these details, you can now create this snack with ease. Have fun trying different toppings and enjoy your cookin

Strawberry Basil Bruschetta
Ingredients
- 1 baguette sliced into 1/2-inch thick pieces
- 1 cup fresh strawberries, hulled and diced into small pieces
- 1 4 cup fresh basil leaves, finely chopped
- 1 tablespoon balsamic glaze
- 1 tablespoon honey
- 1 teaspoon freshly squeezed lemon juice
- 1 4 cup creamy goat cheese, crumbled
- to taste Salt and freshly ground black pepper
- for drizzling extra virgin olive oil
Instructions
- Begin by preheating your oven to 400°F (200°C).
- Take your slices of baguette and place them in a single layer on a baking sheet. Lightly brush the tops of each slice with extra virgin olive oil to ensure a crispy texture.
- Toast the baguette slices in the preheated oven for 5-7 minutes, or until they are golden brown and slightly crisp. Keep an eye on them to prevent burning!
- While the bread is toasting, prepare the delicious strawberry-basil topping. In a medium-sized mixing bowl, gently combine the diced strawberries, chopped basil, balsamic glaze, honey, lemon juice, and a pinch of salt and freshly ground black pepper. Toss everything together gently to ensure the ingredients are well mixed without smashing the strawberries.
- Once the baguette slices are toasted, remove them from the oven and allow them to cool for a minute or two.
- For assembly, generously spoon the strawberry-basil mixture onto each toasted baguette slice, ensuring a delightful amount of topping on each one.
- Finish by sprinkling the crumbled goat cheese over the bruschetta, allowing its creamy texture to complement the fresh toppings.
- For the final touch, drizzle with a bit more balsamic glaze and an extra touch of olive oil to enhance the flavors and richness.
- Serve the bruschetta immediately while the bread remains warm and the toppings are fresh, inviting everyone to indulge in this vibrant starter!


. {{image_4}} Vegetarian Mini Quiche Cups For a tasty vegetarian option, use only veggies. You can add spinach, mushrooms, and bell peppers. Mix in some cheese for creaminess. This keeps the dish light yet filling. You can also use fresh herbs like basil or oregano for extra flavor. Try to use seasonal veggies for the best taste. Meat Lovers' Option If you love meat, this option is for you. Use diced ham, crispy bacon, or cooked sausage. Combine these with your favorite cheese and veggies. This mix gives a hearty bite to each quiche cup. You will enjoy the rich, savory flavors in every bite. Gluten-Free Crust Alternatives If you need a gluten-free crust, use almond flour or cornmeal. You can also find ready-made gluten-free pie crusts at the store. Another idea is to make a crustless quiche. Just pour the filling into greased muffin tins. This way, you skip the crust but keep all the flavor. Dairy-Free Ingredient Swaps For a dairy-free version, use plant-based milk like almond or soy. Swap regular cheese for dairy-free cheese options. Nutritional yeast can add a cheesy flavor without dairy. Try these swaps to enjoy mini quiche cups without dairy. It keeps the recipe tasty and friendly for all diets. For the full recipe, check out the details in the previous section. To keep your mini quiche cups fresh, proper storage is key. - Refrigerating Leftovers: Place any leftover mini quiche cups in an airtight container. They will stay fresh for up to 3 days in the fridge. Just make sure they cool down before sealing. You can also wrap them tightly in plastic wrap for extra protection. - Freezing for Long-Term Storage: If you want to save them longer, freezing works well. First, let the quiche cups cool completely. Then, place them on a baking sheet and freeze until solid. After that, transfer them to a freezer-safe bag or container. They can last up to 2 months in the freezer. Remember to label the container with the date you made them. When you're ready to enjoy your mini quiche cups again, follow these tips for the best results. - Best Methods for Serving Again: The oven is the best way to reheat quiche cups. Preheat your oven to 350°F (175°C). Place the cups on a baking sheet and heat for about 10-15 minutes. This method keeps the crust crisp and the filling warm. - Retaining Flavor and Texture: Avoid using a microwave if you can. Microwaving can make the crust soggy and the filling rubbery. If you must use a microwave, heat them in short bursts of 30 seconds. Check often to ensure they don’t overcook. Following these tips will help you enjoy your mini quiche cups just like fresh! For the full recipe, check the [Full Recipe]. Bake Mini Quiche Cups for 18 to 20 minutes at 375°F (190°C). The tops should turn golden brown. You want the centers set but still moist. Keep an eye on them in the last few minutes. Each oven heats a bit differently. Yes, you can make Mini Quiche Cups ahead of time. Prepare them and store in the fridge for up to two days. You can also freeze them for up to a month. Just be sure to cool them completely before storing. To reheat, place them in the oven at 350°F (175°C) until warm. Great ingredients include: - 6 large eggs - 1 cup milk (whole or 2%) - 1 cup shredded cheese (like cheddar or mozzarella) - 1 cup diced vegetables (bell peppers, spinach, or mushrooms) - 1/2 cup cooked ham or crispy bacon (optional) - Garlic powder and onion powder for flavor These create a tasty base for your quiche cups. You can mix and match fillings easily. Try different cheeses or veggies. For a spicy kick, add jalapeños. If you love herbs, include fresh basil or thyme. Think about seasonal produce too. This makes your quiche cups unique and fun. Mini quiche cups are fun and easy to make. You can mix eggs, dairy, cheese, meats, and veggies to create tasty treats. Remember to preheat your oven and choose the right crust. I shared tips on filling them just right and baking them perfectly. Explore variations like vegetarian or gluten-free options, and learn how to store leftovers. With these steps and ideas, you have all you need for quiche success. Enjoy making your own mini quiche cups! They’ll be a hit with everyone.](https://joymealplan.com/wp-content/uploads/2025/06/d5cf7460-7b4e-43b3-accb-372b25b26cc9-768x768.webp)
![- 1 pound sirloin steak, cut into bite-sized cubes - 4 tablespoons unsalted butter - 4 cloves garlic, minced - Fresh herbs: rosemary and thyme - Salt and pepper for seasoning - Olive oil and soy sauce To make easy garlic butter steak bites, you need fresh and simple ingredients. The star of this dish is the sirloin steak. It’s tender and juicy, perfect for bite-sized pieces. The butter, garlic, and herbs create a rich sauce. You can taste the freshness in every bite. Using unsalted butter allows you to control the salt. Fresh rosemary and thyme add a nice touch of flavor. They give the steak bites a lovely aroma. Don’t forget to season well with salt and pepper. This step is key for great taste. - Fresh parsley, finely chopped Garnishing with parsley adds color and a hint of freshness. It makes your dish look more appealing. Plus, it gives a slight herbal taste that complements the steak. You can also use other herbs if you prefer. Thyme or chives can work well too. For the full recipe, check the details below. Enjoy cooking these steak bites! To start, heat the olive oil in a large skillet. Use medium-high heat until it shimmers slightly. This heat is key for a great sear. High heat helps lock in the juices and gives a nice crust. Next, season the steak cubes well. Use salt and freshly cracked black pepper. Make sure each piece is coated evenly. This step adds flavor and makes your bites tasty. Place the seasoned steak in the hot skillet in a single layer. Avoid overcrowding the pan. Let the steak sear undisturbed for about 2-3 minutes. This develops a rich, brown crust. Flip the cubes carefully using tongs or a spatula. Cook for another 2-3 minutes for medium-rare. Feel free to adjust the time for your desired doneness. Once done, remove the steak and set it aside. In the same skillet, lower the heat to medium. Add the butter and let it melt fully. Once melted, stir in the minced garlic, chopped rosemary, and thyme. Sauté for 1-2 minutes until fragrant. Be careful not to let the garlic burn. Now, return the seared steak bites to the skillet. Pour in the soy sauce and toss everything together. Make sure the steak is well-coated in the rich garlic butter sauce. Cook for another minute to heat through. This step blends the flavors beautifully. For the complete process, check the [Full Recipe]. To get steak bites just right, adjust the cooking time. For rare steak, aim for about 2 minutes per side. Medium-rare needs about 3 minutes per side. For medium, increase the time to 4 minutes. Always check the internal temperature. - Rare: 125°F (51°C) - Medium-rare: 135°F (57°C) - Medium: 145°F (63°C) Using a meat thermometer helps you avoid overcooking. If you want your steak well-done, cook it for about 5 minutes per side. Remember, everyone has different tastes. You can boost flavor with fresh herbs. Try using basil, oregano, or parsley. Each adds a unique twist. Fresh herbs bring bright tastes to the dish. You can also add a splash of vinegar or citrus. A bit of lemon juice or balsamic vinegar adds a nice zing. This lifts the flavors and makes the dish pop. For a different taste, think about garlic butter sauce variations. You can use shallots or different types of onions. Feel free to experiment and find what you like best. Check the [Full Recipe] for more details! {{image_4}} You can switch things up by using chicken or shrimp. They cook quickly, just like steak. For chicken, cut it into bite-sized pieces. Use boneless, skinless thighs or breasts for the best flavor and tenderness. Cook the chicken until golden and fully cooked, about 5-7 minutes. For shrimp, use large, peeled shrimp. They only need about 3-4 minutes to cook. Add them to the skillet after the garlic butter melts. Toss them until they turn pink and opaque. Adjust your cooking times based on the protein you choose. Remember, the key is to not overcook. If you need gluten-free options, swap soy sauce with tamari or coconut aminos. Both options provide savory flavor without gluten. You can also use homemade sauces with gluten-free ingredients. For low-carb adaptations, skip the soy sauce and focus on the garlic butter. Add more herbs for flavor. You can also serve these bites with low-carb veggies like zucchini noodles or cauliflower rice. These changes keep your meal tasty and fit your diet. To store your garlic butter steak bites, follow these steps: - Let the steak bites cool to room temperature. - Place them in an airtight container. - Keep them in the fridge for up to three days. This method helps keep the steak juicy and flavorful. Use glass or plastic containers with tight lids. They help prevent moisture loss and odors from mixing. When it comes to reheating, you want to avoid overcooking the steak. Here’s how to do it right: - Use a microwave on low power for a quick reheat. - Heat in 30-second intervals, checking often. - For better results, use a stovetop. - Heat a non-stick skillet over low heat. - Add a splash of water or broth to steam the bites. - Stir gently until warmed through. This method keeps your steak bites tender and tasty. To check if steak bites are done, look for a nice brown color. They should feel firm but slightly springy when pressed. A meat thermometer can help too. For medium-rare, aim for 130°F to 135°F. For medium, target 140°F to 145°F. If you like them well done, go for 160°F. This way, you can get your perfect level of doneness every time. Yes, you can make these steak bites ahead of time! Cook the steak bites and let them cool. Store them in an airtight container in the fridge for up to three days. For best taste, reheat them in a skillet. This keeps the flavors fresh and the texture intact. Garlic butter steak bites pair well with many sides. Here are some tasty options: - Roasted vegetables - Mashed potatoes - Rice pilaf - A fresh green salad - Garlic bread These sides balance the rich taste of the steak bites and create a full meal experience. Absolutely! This recipe is great for meal prep. You can portion out the steak bites into meal containers. Add your favorite sides for a balanced meal. Just make sure to store them in the fridge. When you are ready to eat, reheat them as needed. Enjoy a quick, tasty meal all week long! This blog post shared a simple, tasty recipe for garlic butter steak bites. We covered the essential ingredients, step-by-step cooking instructions, and tips for perfect doneness. I also discussed variations using different proteins and dietary adjustments, plus how to store leftovers effectively. Cooking steak bites can be fun and satisfying. With the right techniques, you can impress any guest. Enjoy making these delicious bites, and feel free to experiment with flavors and sides!](https://joymealplan.com/wp-content/uploads/2025/07/6c147bbf-aecd-4f40-83f0-60b5a859338f-768x768.webp)
