Sweet Chili Garlic Ramen Flavorful Quick Recipe

Ready to take your instant ramen to the next level? This Sweet Chili Garlic Ramen recipe packs a punch with its bold flavors and quick prep time. With just a few simple ingredients, you can whip up a delicious meal that will impress your taste buds and your friends. Whether you’re a busy student or a tired parent, this dish is your new go-to for a satisfying dinner. Let’s dive into the recipe!
Ingredients
To make the sweet chili garlic ramen, gather these items:
– 2 packets of instant ramen noodles
– 4 tablespoons sweet chili sauce
– 2 tablespoons soy sauce
– 3 cloves garlic, minced
– 1 teaspoon freshly grated ginger
– 2 cups vegetable broth
– 1 cup mixed vegetables (like carrots, bell peppers, and snow peas)
– 1 green onion, thinly sliced (for garnish)
– 1 tablespoon sesame oil
– 1 teaspoon sesame seeds (for garnish)
– Optional: 2 soft-boiled eggs
These ingredients come together to create a quick and tasty meal. Instant ramen noodles give a fast base, while sweet chili sauce adds a nice kick. The garlic and ginger bring depth to the flavor. Mixed vegetables provide crunch and color. Using vegetable broth makes it rich and tasty. The sesame oil gives a nutty aroma, and sesame seeds add a nice touch. You can also top your bowl with soft-boiled eggs for extra creaminess. This dish is simple yet packed with flavors that will impress anyone!
Step-by-Step Instructions
Cooking the Ramen
1. Start by boiling a large pot of water.
2. Add 2 packets of instant ramen noodles.
3. Cook the noodles per the package instructions, about 3-5 minutes.
4. Once cooked, drain the noodles and set them aside.
Preparing the Broth
1. In a large saucepan, heat 1 tablespoon of sesame oil over medium heat.
2. Add 3 cloves of minced garlic and 1 teaspoon of grated ginger.
3. Sauté for about 1 minute, until fragrant but not brown.
4. Pour in 2 cups of vegetable broth.
5. Bring the mixture to a gentle simmer to blend the flavors.
Combining Ingredients
1. Stir in 4 tablespoons of sweet chili sauce and 2 tablespoons of soy sauce.
2. Mix well to ensure everything combines evenly.
3. Add 1 cup of mixed vegetables, such as carrots and bell peppers.
4. Cook the vegetables for 3-4 minutes until vibrant and tender.
5. Finally, gently add the cooked ramen noodles to the broth.
6. Stir to combine and heat everything through for another 2 minutes.
Tips & Tricks
Perfecting the Flavor
To make your sweet chili garlic ramen shine, adjust the sauce. Start with the right amounts of sweet chili sauce and soy sauce. You can add more sweet chili sauce for sweetness or more soy sauce for saltiness. Tasting as you go helps find the perfect balance. Use fresh garlic and ginger for the best flavor. Fresh ingredients make the dish pop.
Presentation Tips
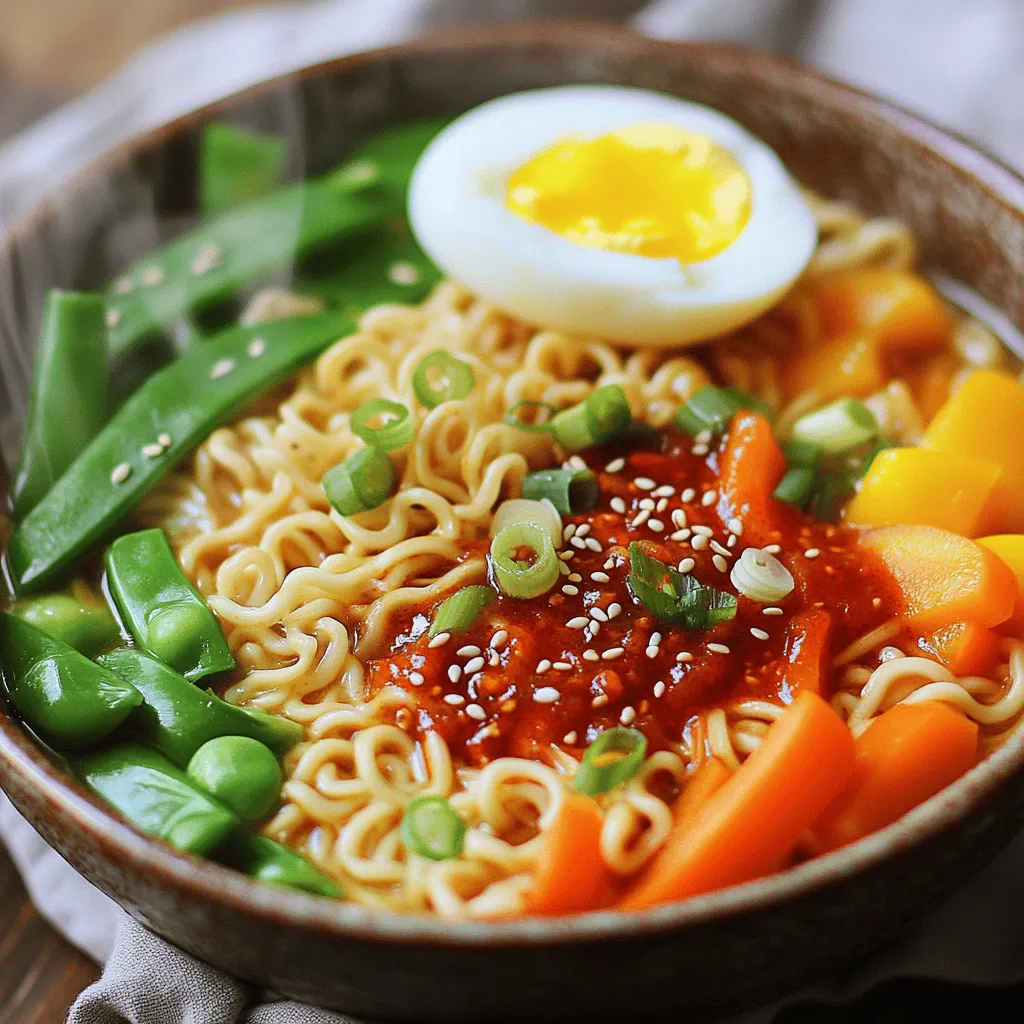
Make your ramen look great! Place the noodles in the center of a bowl. Arrange colorful vegetables around the noodles. Add a soft-boiled egg on top. Cut it in half to let the yolk flow. Sprinkle sesame seeds and sliced green onions for a nice touch. Good presentation makes your meal more inviting.
Timing Recommendations
Cooking the noodles right is key. Boil them for 3-5 minutes, then drain. For vegetables, cook them for about 3-4 minutes to keep them bright and crunchy. If you’re adding soft-boiled eggs, cook them for 6-7 minutes. Cool them in ice water to stop cooking. This makes them creamy and perfect for your ramen.

Variations
Vegetarian and Vegan Options
You can easily make this ramen vegetarian or vegan. Here are some simple swaps:
– Use vegetable broth instead of chicken broth.
– Replace soft-boiled eggs with tofu or avocado for creaminess.
– Add more vegetables like mushrooms, zucchini, or spinach for extra flavor.
Spicy Add-Ons
If you like heat, try adding these:
– Drizzle chili oil over the top for a kick.
– Slice fresh jalapeños and toss them in for a spicy crunch.
– Add sriracha or crushed red pepper flakes to the broth for more warmth.
Protein Additions
Want to boost the protein? Here are some tasty options:
– Add grilled chicken or shrimp for a hearty meal.
– Use beef slices for a rich flavor.
– For a plant-based protein, tofu or tempeh works great, too.
Feel free to mix and match these ideas to make your perfect bowl of ramen!
Storage Info
Storing Leftovers
To keep your ramen fresh, store it in an airtight container. Make sure the noodles and broth are separate if possible. This helps maintain texture. You can refrigerate your ramen for up to three days. When you store the veggies, they stay crisp and colorful. If they sit too long, they can get mushy.
Reheating Instructions
When it’s time to eat your leftovers, use a pot on low heat. Add a splash of water or broth to help rehydrate the noodles. Stir gently to warm everything without breaking the noodles. You can also use the microwave. Heat in short bursts, stirring in between. This way, your ramen stays tasty and warm.
Freezing Guidelines
If you want to save your ramen for later, you can freeze it. Only freeze the broth and noodles, not the veggies. Place the broth in a freezer-safe bag, and squeeze out the air. For noodles, use a separate container. When you want to eat your frozen ramen, thaw it overnight in the fridge. Then, heat it up and add fresh veggies for the best taste.
FAQs
Common Questions about Sweet Chili Garlic Ramen
What can I use instead of sweet chili sauce?
You can use a mix of honey and sriracha. This blend gives sweetness and spice. Another option is a simple mix of ketchup and hot sauce. Both options work well in ramen.
How do I make my ramen spicier?
Add more sriracha or chili oil to the broth. You can also mix in red pepper flakes. Fresh sliced jalapeños can give you that extra kick. Just remember to adjust to your taste!
Can I prepare this recipe ahead of time?
Yes, you can cook the broth and veggies ahead. Store them in the fridge for up to three days. Cook the noodles fresh when you are ready to eat. This keeps them from getting mushy.
What are the health benefits of ramen?
Ramen can be part of a healthy diet. Use whole grain noodles for more fiber. Adding mixed vegetables boosts vitamins and minerals. Soft-boiled eggs add protein and healthy fats. Enjoying ramen in moderation can be tasty and nutritious!
This recipe for Sweet Chili Garlic Ramen is simple and fun to make. We’ve covered all the steps, from boiling noodles to crafting a tasty broth. You can adjust flavors and add your favorite proteins or veggies. Remember to store any leftovers well, so they stay tasty for later. Trying different variations can keep this dish fresh and exciting. Enjoy your cooking, and share your ramen creations with friends and family!


![- 300g fettuccine or tagliatelle - 300g mushrooms (button or cremini), thinly sliced - 1 cup heavy cream - 1 cup vegetable broth - 4 cloves garlic, finely minced - 2 tablespoons extra virgin olive oil - 1 tablespoon unsalted butter - 1 teaspoon dried thyme - Salt and black pepper to taste - Grated Parmesan cheese (optional, for serving) - Fresh parsley, finely chopped (for garnish) When I make creamy garlic mushroom pasta, I always start with fresh ingredients. The fettuccine or tagliatelle gives a nice bite. I like using button or cremini mushrooms for their rich flavor. Heavy cream adds that luscious texture, while vegetable broth keeps it light and tasty. For seasonings, I finely mince garlic. I use just the right amount of extra virgin olive oil and unsalted butter for a rich base. Dried thyme adds a nice herbal note, and salt and black pepper bring the dish to life. If you want to elevate your meal, consider garnishing with grated Parmesan cheese. Fresh parsley not only adds a pop of color but also freshness. This combination makes the dish not only easy but also full of flavor. For the full recipe, check out Creamy Garlic Mushroom Pasta Delight. To start, bring a large pot of salted water to a rolling boil. Salt adds flavor, so don't skip it! Add 300g of fettuccine or tagliatelle. Cook according to package instructions until al dente. This usually takes about 8-10 minutes. You want the pasta firm but not hard. Once it's ready, drain the pasta. Make sure to reserve 1 cup of the cooking water. This water is full of starch, which helps thicken your sauce later. Next, we move to the mushrooms. In a large skillet, heat 2 tablespoons of extra virgin olive oil and 1 tablespoon of unsalted butter over medium heat. Wait until the oil shimmers and the butter melts. Then, add 300g of thinly sliced mushrooms. You can use button or cremini mushrooms for this dish. Sauté them for about 5-7 minutes. Stir occasionally, so they cook evenly. You want them to be golden brown and tender. Now comes the magic! Add 4 finely minced garlic cloves and 1 teaspoon of dried thyme to the skillet. Sprinkle in some salt and black pepper for taste. Sauté for another 1-2 minutes, but be careful not to burn the garlic. Next, pour in 1 cup of vegetable broth. Bring this mixture to a gentle simmer. Slowly stir in 1 cup of heavy cream. Mix well until all the ingredients blend together. Let this simmer for about 5 minutes. The sauce will thicken slightly, creating a rich flavor. Finally, add the drained pasta into the skillet. Use tongs or a spatula to toss the pasta in the creamy mushroom sauce. If you find the sauce is too thick, gradually add some of the reserved pasta water. This will help you reach the perfect consistency. Taste your dish and adjust with more salt and black pepper if needed. Now, your creamy garlic mushroom pasta is ready to serve! For the full recipe, check out the complete instructions. To keep your sauce from curdling, avoid boiling it. Use low heat when adding cream. Stir frequently to combine all the flavors without any lumps. For a smooth texture, whisk the cream before adding it to the pan. This will help it blend well with the broth. When choosing mushrooms, button and cremini are great options. They add depth and umami to the dish. Feel free to mix them for more flavor. For seasoning, add salt and pepper as you sauté. You can also try adding a pinch of nutmeg for warmth and richness. Serve the pasta in wide bowls. This makes the dish look fancy and inviting. Top with fresh parsley for color. Add a sprinkle of grated Parmesan for extra flavor. A drizzle of olive oil can enhance the look and taste, making your meal feel special. This will impress anyone who sees your dish! For the full recipe, check the [Full Recipe]. {{image_4}} You can easily enhance your creamy garlic mushroom pasta by adding proteins. If you like chicken, cook diced pieces in the skillet. They will add a nice flavor and texture. Just make sure to cook the chicken fully before adding the mushrooms. If you prefer seafood, shrimp works great too. Cook them until they turn pink, then mix them into the sauce. Both options give a hearty twist to the dish. If you want a vegetarian option, consider legumes like chickpeas or lentils. They add protein and fiber. Tofu is another great choice. Just sauté it until crispy, then toss it in with the pasta. While fettuccine or tagliatelle is classic, you can try other pasta shapes. Penne or fusilli offers fun textures. The sauce clings to the nooks and crannies, making every bite flavorful. For those who need gluten-free options, many brands offer great gluten-free pasta now. Corn or rice-based pasta works well. They may change the taste slightly, but the dish still shines. To elevate the flavor, think about adding white wine. Just pour a splash into the skillet after sautéing the mushrooms. Let it simmer down to enhance the sauce. Lemon juice also brightens the dish. A squeeze at the end adds a fresh zing. You can experiment with different herbs too. Basil or oregano can give a new twist. Don’t be afraid to play around with spices for a unique taste. For the full recipe, check out the Creamy Garlic Mushroom Pasta Delight . To keep your creamy garlic mushroom pasta fresh, store leftovers in the fridge. Use an airtight container to prevent drying out. For long-term storage, you can freeze it in a freezer-safe container. Make sure to label it with the date. This helps you track how long it has been stored. When reheating, avoid the microwave as it can make the pasta soggy. Instead, use a skillet over low heat. Add a splash of vegetable broth or water to help rehydrate the sauce. Stir gently to warm it up. This method keeps the creamy texture intact. Be careful not to overcook; heat just until warm. In the fridge, your creamy garlic mushroom pasta lasts about 3 to 5 days. If frozen, it can stay good for up to 2 months. Always check for signs of spoilage. If you see mold or an off smell, it’s best to throw it away. Safe storage ensures you enjoy this dish at its best. Yes, you can make creamy garlic mushroom pasta vegan. For the cream, use coconut milk or cashew cream. These options give a rich texture. Instead of butter, try vegan margarine or olive oil. Both work well and keep the flavor. I love using button and cremini mushrooms. Button mushrooms are mild and soft. Cremini mushrooms have a deeper, earthier flavor. You can also try shiitake or portobello mushrooms for a bolder taste. Each type adds a different twist. To add heat, use red pepper flakes or crushed chili peppers. You can also add a dash of hot sauce. Mixing in some black pepper gives a nice kick too. Adjust the spice based on your taste. Creamy garlic mushroom pasta is simple yet delicious. You learned about the key ingredients, cooking steps, and useful tips. I shared variations and storage advice, so your meal lasts longer. Remember, you can customize this dish to fit your tastes and needs. Whether you want it vegan or spicier, the options are endless. Enjoy your cooking journey and serve a dish everyone will love!](https://joymealplan.com/wp-content/uploads/2025/06/13e3dff8-112f-438a-8538-46fdbb61cecc-768x768.webp)

. To cook shrimp just right, start with fresh shrimp. Look for shrimp that smell like the ocean, not fishy. When you heat your skillet, make sure it’s hot before adding the shrimp. This helps create a nice sear. Cook the shrimp in a single layer. This way, they cook evenly. Flip them when they turn pink, and they will be ready in about 2-3 minutes per side. Overcooking shrimp makes them tough, so watch closely! To make your shrimp scampi burst with flavor, use quality ingredients. Fresh garlic creates a rich taste. You can also add lemon zest for a bright kick. Try adding capers or sun-dried tomatoes for a twist. Herbs like parsley and basil add freshness. If you like heat, adjust red pepper flakes to your taste. You can also finish with a squeeze of fresh lemon juice for a zesty touch. Timing is key for a great shrimp scampi dish. Start by boiling the pasta first. While it cooks, prepare your shrimp and sauce. This keeps everything fresh and hot. Drain the pasta once it’s al dente, and don’t forget to save some pasta water. This water helps the sauce stick to the pasta. Combine everything right away for the best flavor. Serve your dish immediately to enjoy the vibrant tastes. For more ideas, check the Full Recipe. {{image_4}} You can add fresh vegetables to your shrimp scampi. This adds flavor and color. Try using bell peppers, zucchini, or spinach. They cook quickly and blend well with shrimp. Simply sauté them with garlic before adding shrimp. This way, you get a healthy twist on the classic dish. If you want a gluten-free option, you have choices. Look for gluten-free pasta made from rice or quinoa. These options taste great and hold the sauce well. You can also use spiralized vegetables, like zucchini or carrots. They are fun to eat and low in carbs. Both options keep the dish light and flavorful. Do you like heat? You can easily spice up your shrimp scampi. Add more red pepper flakes for extra kick. You could also include diced jalapeños or a dash of hot sauce. Mix in some cayenne pepper for another layer of flavor. Just remember to adjust to your taste. Enjoy the heat while keeping the dish balanced. These variations let you customize your shrimp scampi. They make it fun and unique every time you cook. For the full recipe, check out the details above! Store any leftover shrimp scampi in an airtight container. Place it in the fridge. It stays fresh for 2-3 days. Make sure it cools down before sealing. This keeps the flavors intact. When you reheat shrimp scampi, use low heat. A skillet works best. Add a splash of broth or water to keep it moist. Stir often to heat evenly. You can also use the microwave. Heat in short bursts to avoid overcooking the shrimp. You can freeze shrimp scampi too! Just place it in a freezer-safe container. Use it within three months for best flavor. Thaw it overnight in the fridge before reheating. Avoid freezing it with pasta; they don't hold up well. Instead, cook fresh pasta when you're ready to eat. For the full recipe, check the earlier section. Making Easy Shrimp Scampi takes about 20 minutes. You need 10 minutes to prep and 10 minutes to cook. This fast dish fits well into any busy schedule. You can enjoy a tasty meal in no time. Yes, you can use frozen shrimp. Just remember to thaw them first. Place the shrimp in the fridge overnight or run them under cold water. Using frozen shrimp may add a few extra minutes to your cook time. Shrimp Scampi pairs well with many sides. Here are some great options: - Garlic bread for dipping in the sauce - A fresh green salad for a light touch - Steamed vegetables for extra color and flavor - A glass of white wine to enhance the meal Yes, you can safely reheat shrimp leftovers. Just make sure to heat them gently. Use low heat on the stove or in the microwave. This helps keep the shrimp tender and tasty. Be careful not to overcook them, as they can become tough. This blog post covered easy shrimp scampi from start to finish. We looked at key ingredients, substitutions, and tools. You learned step-by-step cooking instructions and helpful tips to elevate your dish. Variations give you room to tailor it to your taste, while storage tips ensure nothing goes to waste. As you make your shrimp scampi, remember these insights to create a delicious meal every time. Enjoy your cooking adventure!](https://joymealplan.com/wp-content/uploads/2025/06/da480725-ca76-4dc0-87ac-7692f8ecae54-768x768.webp)
![- 1 lb boneless, skinless chicken thighs - 2 tablespoons olive oil - 3 cloves garlic, minced - 2 teaspoons ground cumin - 2 teaspoons ground paprika - 1 teaspoon ground turmeric - 1 teaspoon ground cinnamon - 1 teaspoon cayenne pepper (adjust according to spice preference) - Salt and pepper to taste - 1 cup cooked quinoa or couscous (your choice) - 1 cup cherry tomatoes, halved - 1 cucumber, diced into bite-sized pieces - 1/2 red onion, thinly sliced - 1 cup mixed greens or baby spinach - 1/4 cup plain Greek yogurt - 2 tablespoons tahini - Juice of 1 fresh lemon - Fresh parsley, chopped, for garnish For these Chicken Shawarma Bowls, chicken thighs shine as the star. They stay juicy and tender, making each bite a delight. Olive oil and spices create a fantastic marinade. The blend of garlic, cumin, and paprika gives a warm, rich flavor. The cayenne adds a kick, but you can adjust it to suit your taste. Fresh toppings like cherry tomatoes and cucumber bring crunch. Mixed greens or baby spinach add a lovely green touch. Topping it all off with Greek yogurt and tahini creates a creamy finish. This mix of flavors makes each bowl special. - Additional vegetables - Different types of grains or bases - Garnishes for enhanced flavor While the main ingredients are fantastic, you can personalize your bowls. Add extra vegetables like bell peppers or carrots for more color and texture. You can switch grains too—try brown rice or farro for a unique twist. Garnishes like chopped nuts or seeds give a nice crunch. Fresh herbs, like mint or dill, can brighten the dish. Feel free to experiment based on what you love or have at home. These options add fun and flavor to your meal. For the complete recipe, check out the Full Recipe. To start, you need to prepare the marinade. In a large bowl, mix together the olive oil, minced garlic, cumin, paprika, turmeric, cinnamon, cayenne pepper, salt, and pepper. Whisk until everything combines well. This creates a tasty blend that makes your chicken shine. Next, it’s time to coat the chicken. Add the boneless, skinless chicken thighs to your bowl. Make sure each piece is covered in the marinade. For the best flavor, let it sit for at least 30 minutes. If you have more time, refrigerate it overnight. Now, let’s cook the chicken. You can grill it or pan-sear it. Preheat your grill pan or skillet over medium-high heat. When it’s hot, place the marinated chicken thighs in the pan. Cook each side for about 6-7 minutes. You want the chicken fully cooked with a nice char. After cooking, take the chicken off the heat. Let it rest for a few minutes before slicing it into bite-sized pieces. This helps keep it juicy. It’s time to build your bowls. Start with a base of quinoa or couscous in a large serving bowl. Next, add a layer of mixed greens or baby spinach. After that, pile on the diced cucumber, halved cherry tomatoes, and sliced red onion. This makes for a colorful and fresh salad. Now, carefully arrange the sliced chicken on top. For a lovely finish, mix Greek yogurt, tahini, and lemon juice in a small bowl. Drizzle this over the chicken and salad. Finally, sprinkle chopped fresh parsley on top. This adds color and boosts the flavor. For a great presentation, serve the bowls with extra lemon wedges on the side. A colorful bowl can also make the dish pop! For the full recipe, check out the main article. To get the best flavor from your chicken shawarma, marinate the chicken well. I recommend using the marinade for at least 30 minutes. If you have time, let it sit overnight. This gives the spices time to work their magic. Use a mix of cumin, paprika, turmeric, and cinnamon for depth. The cayenne pepper adds a kick, so adjust it to your taste. When cooking, keep the chicken juicy. I suggest using a grill pan or skillet. Preheat it over medium-high heat. Cook each side for 6-7 minutes. Check that the chicken is fully cooked. It should be charred and have nice grill marks. Let the chicken rest before slicing. This helps keep it moist and flavorful. If you want to switch up the dressing, try alternatives to Greek yogurt and tahini. You can use sour cream or hummus for a creamy base. For a lighter option, mix plain yogurt with lemon juice. This will brighten the flavors. Feel free to adjust the spices in the dressing too. Adding a pinch of smoked paprika or a dash of garlic powder can enhance the taste. Experiment with different herbs like dill or mint for unique flavors. Pair your chicken shawarma bowls with refreshing drinks. I recommend serving it with a cool lemonade or mint tea. These drinks balance the spices well. For side dishes, consider serving warm pita bread or a light salad. A simple cucumber and tomato salad can add freshness. You can also add roasted vegetables for a hearty touch. Enjoy your colorful and tasty meal! {{image_4}} If you want a vegetarian or vegan twist, you can easily swap out the chicken. Here are some great substitutes: - Chickpeas: Use canned or cooked chickpeas. They add protein and texture. - Tofu: Firm tofu works well. Marinate it just like the chicken. - Seitan: This wheat-based protein is chewy and absorbs flavors nicely. For toppings, consider: - Roasted vegetables: Try zucchini, bell peppers, or eggplant. - Avocado: Creamy avocado adds richness. - Feta cheese: If you're not vegan, crumbled feta adds a nice tang. You can change the flavors of your chicken shawarma bowls by using different spices and herbs. Here are some ideas: - Coriander: Adds a fresh, citrusy taste. - Allspice: Gives a warm, aromatic flavor. - Mint: Fresh mint can brighten up the dish. You can also explore regional variations. For example, if you want a Mediterranean twist, add: - Olives: They bring a salty punch. - Pine nuts: These add crunch and a nutty flavor. Feel free to mix and match flavors. Your chicken shawarma bowls can be as unique as your taste! For the full recipe, check out the [Full Recipe]. To keep your chicken shawarma bowls fresh, you need proper storage. First, let the bowls cool down to room temperature. Next, place the leftovers in airtight containers. This helps keep moisture in and air out. You can store them in the fridge for up to three days. If you notice any off smells or changes in color, it’s best to toss them. Freezing is a great way to save your chicken shawarma bowls for later. To freeze, separate the chicken from the other ingredients. This prevents sogginess when thawing. Wrap the chicken tightly in plastic wrap and place it in a freezer bag. For the veggies and grains, use freezer-safe containers. You can freeze these for up to three months. When you're ready to eat, thaw the chicken in the fridge overnight. Reheat it on the stove or in the microwave. Then, enjoy a tasty meal that feels fresh! If you need the full recipe again, just check back. The best way to marinate chicken is to coat it evenly in the marinade. Use a bowl for mixing. My favorite marinade combines olive oil, garlic, and spices. For chicken shawarma, let it sit for at least 30 minutes. If you have time, refrigerate it overnight. This lets the flavors soak in deeply. Yes, you can make chicken shawarma bowls ahead of time. Prepare the chicken and marinate it in advance. You can also cook the chicken and store it in the fridge. Keep the toppings separate until you are ready to serve. This keeps everything fresh and tasty. You can assemble the bowls quickly when it's time to eat. To make the recipe spicier, add more cayenne pepper or chili powder. You can also use fresh chili peppers for a kick. If you prefer a milder flavor, reduce the cayenne or skip it altogether. You can add more yogurt or tahini to balance the heat. Adjust the spices to fit your taste! You’ve learned how to make delicious chicken shawarma bowls that please everyone. We covered the essential ingredients, from chicken thighs to tasty toppings. I shared tips for marinating and cooking the chicken to keep it juicy. Don’t forget the fun variations and meal prep ideas! Experimenting with flavors makes this dish even better. Enjoy your cooking journey, and explore new ways to make it your own!](https://joymealplan.com/wp-content/uploads/2025/07/e03f62b6-42d7-4413-8d7f-397ee404e053-768x768.webp)