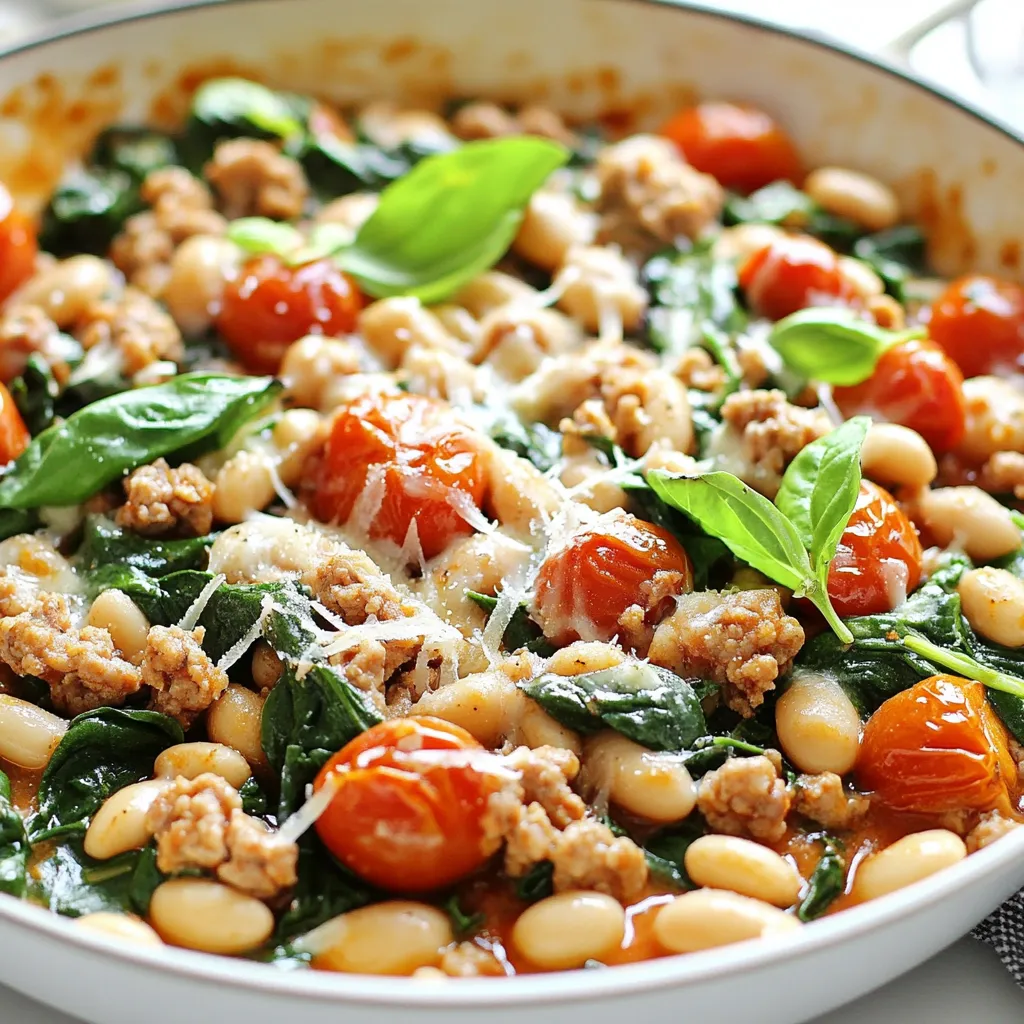
Looking for a quick, tasty dinner? Try my Tuscan White Bean Turkey Skillet! This dish combines ground turkey, creamy white beans, and vibrant veggies for a meal that’s both hearty and healthy. With just one pan, you’ll enjoy easy cleanup and a burst of Italian flavor. Let’s dive in and see how to make this simple yet satisfying dinner in no time!
Why I Love This Recipe
- Quick and Easy: This recipe is perfect for busy weeknights, taking only 30 minutes from start to finish.
- Healthy Ingredients: Packed with lean turkey, white beans, and fresh spinach, this dish is both nutritious and satisfying.
- Flavorful and Comforting: The combination of herbs and spices creates a warm, comforting dish that’s full of flavor.
- Versatile Serving Options: Enjoy it as is, or serve it with crusty bread or quinoa to make it a heartier meal.
Ingredients
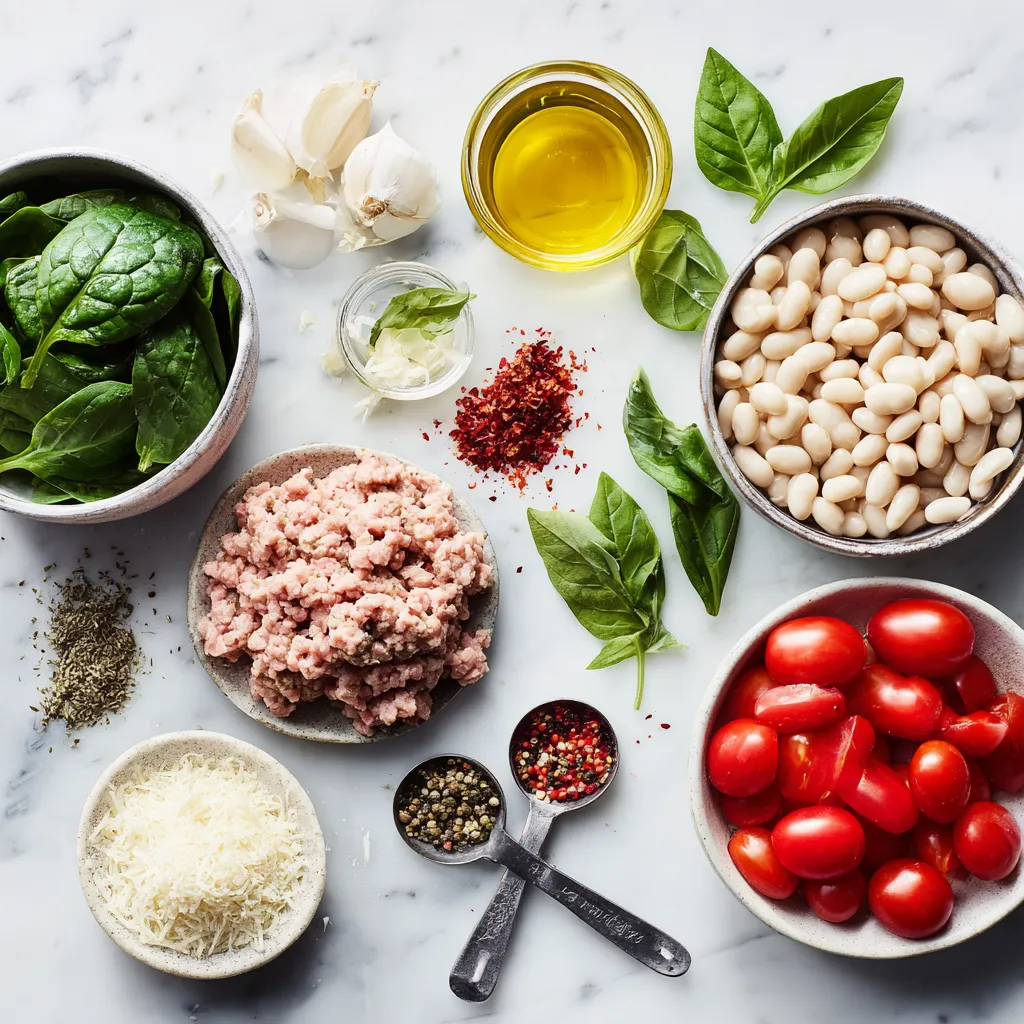
Main Ingredients
– 1 lb ground turkey
– 1 can (15 oz) white beans (cannellini or great northern), drained and rinsed
– 1 tablespoon extra virgin olive oil
Vegetables
– 1 medium onion, finely diced
– 3 cloves garlic, minced
– 1 cup cherry tomatoes, halved
– 1 cup fresh spinach, tightly packed
Seasonings
– 1 teaspoon dried oregano
– 1 teaspoon dried thyme
– 1/2 teaspoon red pepper flakes (adjust to taste)
– Salt and freshly cracked black pepper to taste
For my Tuscan White Bean Turkey Skillet, I focus on fresh, simple ingredients. The ground turkey is lean and cooks quickly, making it a great base. I love using white beans like cannellini or great northern. They add creaminess and protein. Olive oil gives the dish a rich flavor and helps cook the veggies.
For veggies, I choose an onion and garlic for depth. Cherry tomatoes add a pop of sweetness, while fresh spinach brings color and nutrients.
The seasonings are key. Dried oregano and thyme give an aromatic touch. Red pepper flakes add a bit of heat, which you can adjust based on your taste. Salt and black pepper enhance all the flavors.
Using these ingredients, I create a dish that is not only healthy but also full of flavor. Each bite makes me feel like I’m dining in a cozy Tuscan kitchen.
Step-by-Step Instructions
Preparing the Skillet
– Heat 1 tablespoon of olive oil in a large skillet over medium heat. Wait until the oil shimmers.
– Add 1 medium onion, finely diced. Sauté for 4-5 minutes. Stir occasionally until softened.
Cooking the Turkey
– Add 3 cloves of minced garlic to the skillet. Sauté for 1 minute to release the aroma.
– Introduce 1 pound of ground turkey. Use a spoon to break it apart. Cook for 5-7 minutes. Stir until the turkey is browned.
Incorporating Vegetables and Seasonings
– Season the turkey with 1 teaspoon of dried oregano, 1 teaspoon of dried thyme, and 1/2 teaspoon of red pepper flakes. Add salt and black pepper to taste. Stir the mixture well.
– Add 1 cup of halved cherry tomatoes. Cook for 3-4 minutes until they soften.
– Fold in 1 can of drained white beans and 1 cup of tightly packed spinach. Stir until the spinach wilts, about 2-3 minutes.
Tips & Tricks
Perfecting the Texture
To make sure the turkey is fully cooked, use a meat thermometer. The turkey should reach 165°F. This guarantees safety and a juicy bite. If you like more flavor, adjust the seasoning to suit your taste. A little extra salt or pepper can go a long way. You can also add more red pepper flakes for a spicier kick.
Enhancing Flavor
For a richer taste, consider adding grated Parmesan cheese. It melts beautifully over the hot dish and adds a nice creaminess. Serve the skillet with crusty bread or over quinoa. Both options soak up the sauce well and make the meal heartier.
Making It One-Pan Friendly
Clean up is easy when you use a large skillet. It gives you more space to stir and cook without spills. After cooking, let the skillet soak in warm, soapy water. This helps remove any stuck bits easily. Using a larger pan also allows for even cooking of all ingredients, making your meal perfect every time.
Pro Tips
- Use Fresh Herbs: Incorporating fresh basil or parsley as a garnish adds a burst of flavor and color to your dish.
- Adjusting Spice Levels: If you prefer a milder dish, reduce the amount of red pepper flakes or leave them out entirely.
- Cook the Turkey Thoroughly: Ensure the ground turkey is fully cooked to an internal temperature of 165°F (74°C) for safe eating.
- Meal Prep Friendly: This dish can be made ahead of time and stored in the refrigerator for up to 3 days, making it perfect for meal prep.
Variations
Protein Alternatives
You can switch ground turkey for ground chicken or beef. These meats add flavor and protein. Ground chicken gives a light taste. Beef adds a richer flavor. Try both to see which you like best. For a vegetarian option, use lentils. Lentils cook fast and soak up flavors. They give a nice texture and protein too.
Vegetable Substitutions
Feel free to add bell peppers or zucchini to the skillet. These veggies bring a nice crunch and color. You can also use seasonal vegetables, like squash in the fall or asparagus in spring. This keeps the dish fresh and fun. Mix and match to find your favorite combo!
Spice Adjustments
Want some heat? Add red pepper flakes to kick up the spice. Adjust to your taste; start small and add more if needed. You can also try different herbs like basil or parsley. Fresh herbs brighten the dish. Experiment with the spices you love for a unique twist!
Storage Info
Refrigeration
To store leftovers, place them in an airtight container. This keeps the dish fresh and safe. You can store it in the fridge for up to three days. Make sure to cool it down before sealing. This helps avoid moisture build-up.
Freezing
To freeze the skillet dish, let it cool completely. Then, transfer it to a freezer-safe container. You can also use freezer bags for easier storage. Be sure to remove as much air as possible. This prevents freezer burn. When you’re ready to eat, thaw it in the fridge overnight. Reheat in a skillet on low heat until warm. Stir occasionally to keep it from sticking.
Serving Tips After Storage
Before serving, you can refresh the dish. Add a splash of water or broth while reheating. This helps restore moisture. Stir in some fresh spinach or herbs for extra flavor. This keeps the texture inviting and the taste bright. Enjoy your meal just like when you first made it!
FAQs
How long does it take to make Tuscan White Bean Turkey Skillet?
It takes about 30 minutes to make this dish. The prep time is roughly 10 minutes. Cooking time is around 20 minutes. With quick steps, you can have a tasty meal ready in no time.
Can I make this recipe ahead of time?
Yes, you can prepare this dish ahead of time. Cook the turkey, beans, and veggies, then cool them down. Store the mix in the fridge for up to three days. Reheat it on the stove before serving. This makes meal prep easy and fast.
What sides pair well with this dish?
Several sides go well with this skillet. Here are a few ideas:
– Crusty bread for dipping
– A fresh green salad
– Quinoa for added protein
– Steamed vegetables for extra nutrients
These sides complement the flavors and make your meal more filling.
This Tuscan White Bean Turkey Skillet is easy to make and very tasty. We covered key ingredients, from ground turkey to spinach and spices. I shared step-by-step cooking tips to achieve the best flavor. You can also customize the dish with different proteins and veggies. Storing leftovers is simple, too, ensuring you enjoy it later. Overall, this dish is healthy and satisfying, perfect for busy weeknights. Try it out and enjoy delicious meals with minimal effor


