
Indulge guilt-free with my Vegan Chocolate Mousse! Rich, creamy, and full of flavor, this treat delights your sweet tooth while keeping things plant-based. With just a few simple ingredients like silken tofu and dairy-free chocolate chips, you’ll create a dessert that impresses everyone. Ready to learn how to whip up this easy and decadent mousse? Let’s dive in and enjoy every velvety bite together!
Ingredients
Main Ingredients
– 1 cup silken tofu
– 1 cup dark dairy-free chocolate chips
– 1/4 cup pure maple syrup
– 1 teaspoon pure vanilla extract
– 1/4 teaspoon sea salt
The main ingredients create the base for a rich and creamy mousse. I use silken tofu for its smooth texture. It blends well and adds a protein boost. Dark dairy-free chocolate chips provide deep chocolate flavor. Pure maple syrup adds natural sweetness, and vanilla extract enhances the taste. A pinch of sea salt rounds out the flavors beautifully.
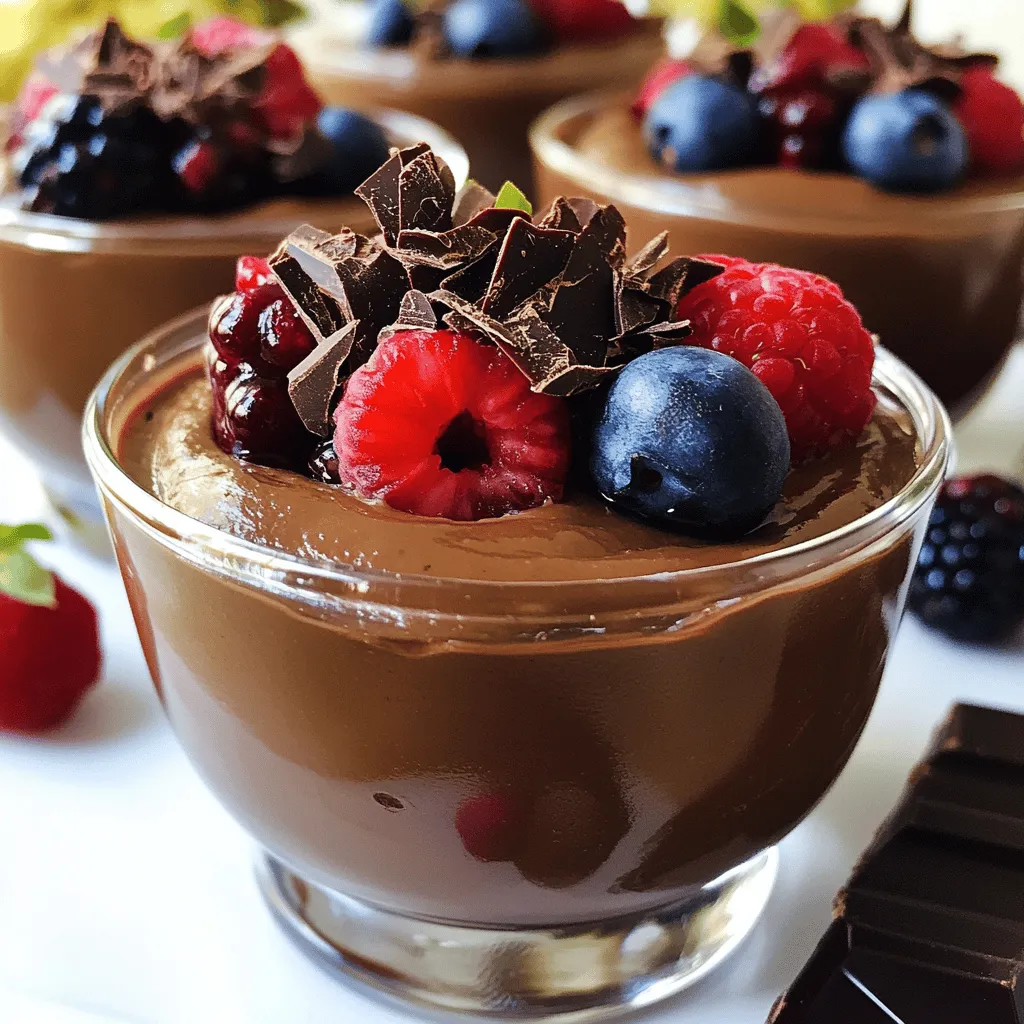
Garnishing Ingredients
– Fresh berries (raspberries, strawberries, or blueberries)
– Shaved dark chocolate
Garnishing ingredients make this mousse visually appealing and add fresh flavors. Fresh berries offer a bright contrast to the rich chocolate. Shaved dark chocolate adds an elegant touch. These toppings not only look great but also enhance the taste. They turn a simple dessert into a gourmet experience.
Step-by-Step Instructions
Prepare the Chocolate
Double Boiler Method
To melt the chocolate, use a double boiler. Fill a pot with water and bring it to a simmer. Place a heatproof bowl on top, making sure it does not touch the water. Add the dark chocolate chips to the bowl. Stir often until the chocolate is completely melted and smooth.
Microwave Method
For a quicker option, use the microwave. Put the chocolate chips in a microwave-safe bowl. Heat them in 30-second bursts, stirring each time. Stop when the chocolate is fully melted and smooth.
Blend the Mousse
Combine the Ingredients
Next, add the melted chocolate to your blender. Include the drained silken tofu, maple syrup, vanilla extract, and sea salt.
Achieve the Perfect Texture
Secure the lid and blend on high. Stop to scrape down the sides. Blend until you get a rich, creamy texture with no lumps. It should feel velvety and indulgent.
Taste and Adjust
Sweetness Adjustment Tips
After blending, taste your mousse. If you want it sweeter, add a little more maple syrup. Blend again briefly to mix in the extra sweetness.
Portion and Chill
Serving Methods
Carefully spoon the mousse into individual bowls. Use a spatula to smooth the tops. This makes them look nice and tidy.
Importance of Chilling
Now, place the bowls in the fridge. Let them chill for at least 30 minutes. Chilling helps the mousse firm up, enhancing the flavors and texture.
Tips & Tricks
Achieving the Right Texture
To get that perfect texture in your vegan chocolate mousse, blending is key. Use a high-speed blender for the best results. This tool helps mix the ingredients smoothly. Here are some tips:
– Blend slowly at first: Start on a low setting to combine the ingredients. Gradually increase the speed to avoid splatters.
– Scrape the sides: Pause while blending to scrape down the sides. This ensures all ingredients mix well. The goal is a smooth, creamy texture without lumps.
Common pitfalls to avoid include over-blending, which can make the mousse too airy. Also, under-blending can leave chunks of tofu. Both can ruin the experience of eating this treat.
Sweetness Preferences
Sweetness is personal. I often use maple syrup in this recipe, but you can change it up. If you prefer a different flavor, try agave nectar or date syrup. Both work well for sweetness.
To adjust the sweetness, taste the mousse after blending. If it needs more sweetness, add a bit more maple syrup. Blend it in briefly to mix. You can also add cocoa powder for a richer chocolate flavor. Just remember to blend well to keep that smooth texture.Enjoy creating your mousse!
Variations
Flavor Enhancements
You can make your vegan chocolate mousse even more exciting with some simple additions.
– Adding espresso or coffee: A touch of espresso powder or brewed coffee gives the mousse a deeper flavor. It enhances the chocolate and adds a rich, bold note. Just mix in one teaspoon of espresso powder when you blend your ingredients. If you prefer brewed coffee, use two tablespoons.
– Infusing with citrus zest: A bit of zest can brighten the mousse. Try adding zest from an orange or lemon. This adds a fresh twist. Just one teaspoon of zest can make a big difference. Mix it in with the other ingredients for a lovely flavor boost.
Serving Suggestions
How you serve your mousse can make it even more special.
– Alternative toppings and pairings: Fresh berries are classic, but you can try other toppings too. Chopped nuts or coconut whipped cream add nice textures. You might also drizzle some extra melted chocolate on top for a sweet touch.
– Creative serving vessels: Presentation matters! Use small jars, cups, or even shot glasses. They look cute and let each guest enjoy their own portion. You can also layer the mousse with fruit or granola in a clear glass for a fun visual treat.
Storage Info
Refrigeration
To store any extra mousse, place it in an airtight container. This keeps it fresh and tasty. Make sure to cover the container well to avoid any odors from the fridge. The mousse can last up to five days in the fridge. Enjoy it as an easy dessert or a quick snack.
Freezing
If you want to save the mousse for later, you can freeze it. Scoop the mousse into a freezer-safe container, leaving some space at the top. This allows for expansion as it freezes. Seal the lid tightly. The mousse can stay frozen for about two months.
When you’re ready to eat it, take the mousse out and place it in the fridge overnight to thaw. If you need it faster, you can thaw it at room temperature for about an hour. Just remember to stir it gently before serving to get back that creamy texture.
FAQs
What can I substitute for silken tofu?
You can use mashed avocado or coconut cream. Both options give a creamy texture. They also help keep the mousse rich and smooth. If you need a nut-free option, avocado is best. Coconut cream adds a nice flavor, but it can be a bit heavier.
Is this mousse nut-free?
Yes, this mousse is nut-free. It uses silken tofu and dairy-free chocolate. This makes it safe for those with nut allergies. Always check labels on chocolate to ensure it’s nut-free, just in case.
How long does the mousse last in the fridge?
The mousse can last about four to five days in the fridge. Store it in an airtight container to keep it fresh. If you see any change in smell or texture, it’s best to toss it.
Can I make this ahead of time?
Yes, you can make this mousse ahead of time. It’s perfect for parties or special meals. Just make sure to chill it for at least 30 minutes before serving.
Is it possible to make this recipe without a blender?
You can make the mousse without a blender, but it’s more work. You can use a whisk or a fork to mix the ingredients. It will take longer to get a smooth texture this way. If you choose this method, ensure the chocolate is cool before mixing.
This blog post covered how to make a tasty chocolate mousse using simple ingredients, like silken tofu and dark dairy-free chocolate chips. You learned step-by-step instructions to prepare and blend the mousse, plus tips for achieving the best texture. We explored flavor variations and how to store leftovers.
In the end, this dessert is easy to make and fun to customize. Enjoy creating it your way!


