Vegan Sweet Potato Curry Flavorful and Easy Recipe

Are you ready to spice up your dinners? This Vegan Sweet Potato Curry is both flavorful and easy to make! Packed with creamy coconut milk, sweet potatoes, and a blend of spices, this dish warms your heart and body. Plus, it’s healthy and satisfying. Follow my simple steps, and you’ll have a tasty meal that’s great for sharing or leftovers. Let’s dive into this delicious recipe!
Ingredients
List of main ingredients
– 2 large sweet potatoes, peeled and cut into 1-inch cubes
– 1 can (14 oz) full-fat coconut milk
– 1 medium onion, finely chopped
– 3 cloves garlic, minced
– 1 tablespoon fresh ginger, grated
– 1 red bell pepper, diced
– 1 cup kale, chopped (can substitute with spinach)
– 1 can (14 oz) chickpeas, drained and rinsed
– 2 tablespoons curry powder
– 1 teaspoon ground cumin
– Salt and freshly cracked black pepper, to taste
– 2 tablespoons vegetable oil (such as canola or olive oil)
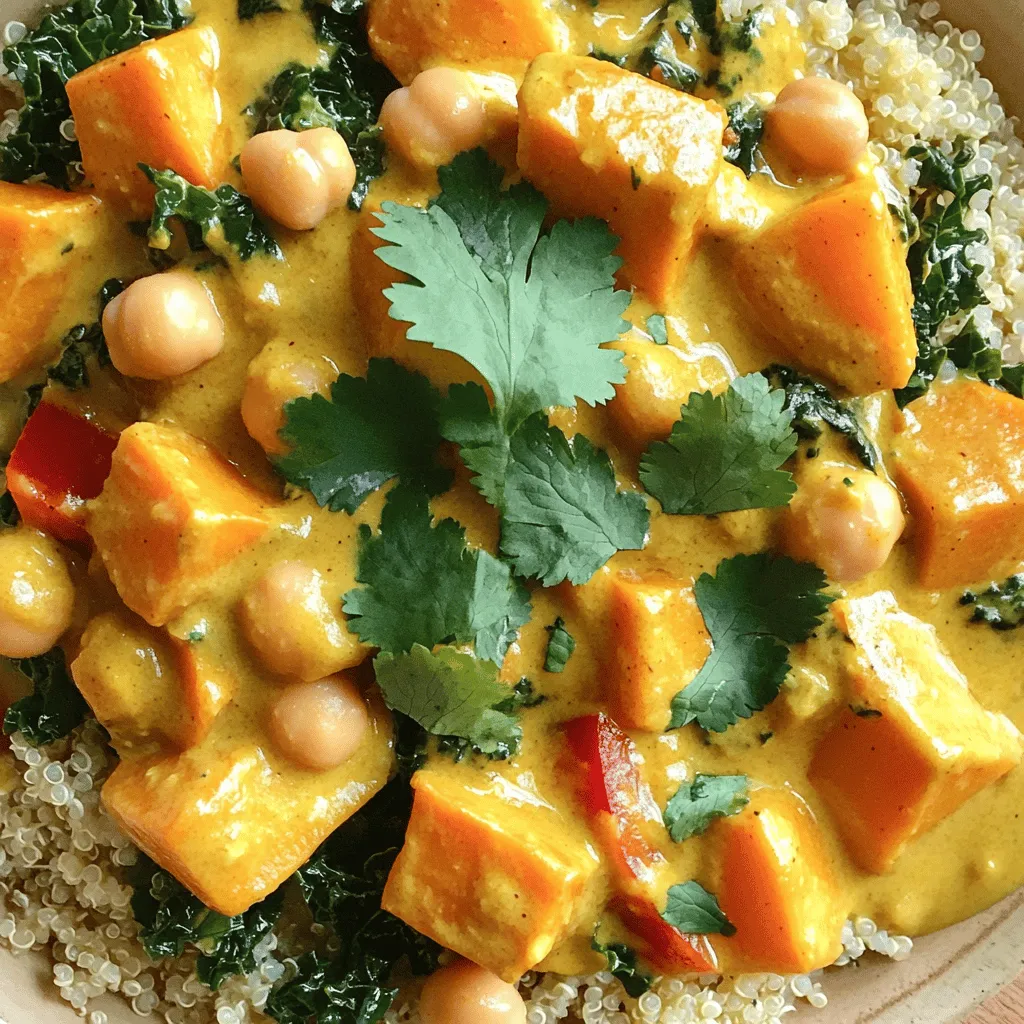
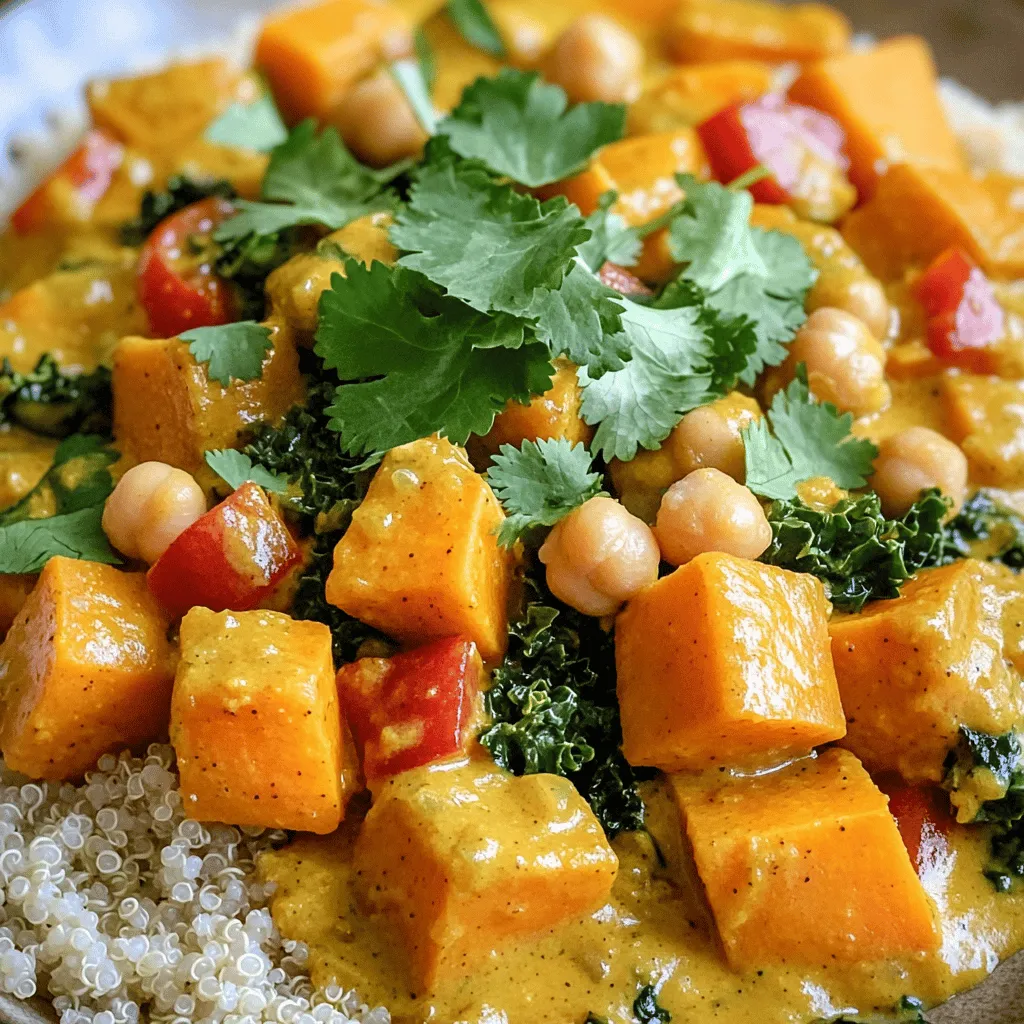
Sweet potatoes are the star of this dish. They add creaminess and natural sweetness. Coconut milk makes the curry rich and smooth. Onion and garlic bring depth to the flavor. Spices like curry powder and cumin add warmth and aroma.
Optional garnish and serving suggestions
– Fresh cilantro leaves, for garnish
– Cooked quinoa or rice, for serving
Garnish with fresh cilantro for a burst of color and taste. Serve the curry over cooked quinoa or rice for a complete meal. This adds texture and makes it more filling.
Step-by-Step Instructions
Cooking the base
1. Start by heating the vegetable oil in a large pot over medium heat. Wait until it shimmers.
2. Add the finely chopped onion. Cook and stir for about five minutes. The onion should become soft and clear.
3. Next, add the minced garlic and grated ginger. Stir for one minute. You will smell their lovely scent.
4. Now, toss in the diced red bell pepper. Cook for another three to four minutes. The pepper should be tender.
Building the flavors
1. Sprinkle the curry powder and ground cumin into the pot. Stir well to coat the veggies. This step makes the spices bloom and taste bright.
2. Add the sweet potato cubes and pour in the coconut milk. Mix everything together. Bring the pot to a gentle simmer.
3. Cover the pot and let it cook for about 15 to 20 minutes. The sweet potatoes should be soft enough to pierce with a fork.
Final touches
1. Once the sweet potatoes are cooked, add the drained chickpeas and chopped kale. Stir gently until the greens wilt. This should take about five minutes.
2. Taste your curry. Now is the time to add salt and freshly cracked black pepper. Adjust seasoning to your liking.
3. To serve, spoon the curry over cooked quinoa or rice. Garnish with fresh cilantro leaves for a colorful finish.
Tips & Tricks
Cooking tips for perfect texture
To make sweet potatoes fork-tender, cut them into 1-inch cubes. This size helps them cook evenly. When you simmer the curry, aim for about 15 to 20 minutes. Stir occasionally to keep everything well mixed. If you want your sweet potatoes softer, add a few extra minutes.
Flavor enhancement suggestions
To boost the flavor, consider adding spices like coriander or turmeric. You can also add a dash of hot sauce for some heat. If you want your coconut milk thinner, add a splash of vegetable broth or water. For a creamier texture, use less broth. Always taste and adjust as you go. This ensures the curry fits your flavor preference.

Variations
Ingredient substitutions
You can switch up the veggies in your curry. Try adding:
– Carrots
– Cauliflower
– Zucchini
– Green beans
These vegetables add taste and color. They also boost nutrition.
For legumes, chickpeas are great, but you can also use:
– Black beans
– Lentils
– Edamame
Each option brings its own flavor and texture. Feel free to mix and match based on what you have at home.
Dietary adaptations
This recipe can work for different diets. To make it gluten-free, ensure that your spices and coconut milk are certified gluten-free. Most are, but it’s smart to check.
If you want a low-carb option, skip the quinoa or rice. Try serving the curry over spiralized veggies or cauliflower rice. This keeps it light but still filling.
Using these variations, you can make this vegan sweet potato curry fit your taste and diet.
Storage Info
How to store leftovers
Store any leftover vegan sweet potato curry in a sealed container. Keep it in the fridge. It stays fresh for up to four days.
When you reheat, use a pot on medium heat. Stir it gently until warm. You can also use a microwave. Heat in short bursts and stir in between. This helps it warm evenly.
Freezing the curry
To freeze the curry, let it cool completely first. Use freezer-safe containers. Leave some space at the top, as it may expand. The curry lasts for three months in the freezer.
When you’re ready to eat, take it out and thaw it overnight in the fridge. You can also use the microwave for a quick thaw. Just be careful, as this may change the texture. Reheat it on the stove before serving.
FAQs
What are the health benefits of sweet potatoes?
Sweet potatoes are packed with nutrients. They are a great source of vitamins A and C. These vitamins help keep your skin and eyes healthy. Sweet potatoes also provide fiber. Fiber aids digestion and keeps you feeling full. They contain antioxidants, which help fight free radicals in your body. Eating sweet potatoes may boost your immune system. They are low in calories and fat. This makes them a smart choice for healthy meals.
Can I make this curry in advance?
Yes, you can make this curry ahead of time. It stores well in the fridge. Let the curry cool down first. Then, place it in an airtight container. It can last up to five days. To reheat, warm it on the stove or in the microwave. If you want to meal prep, cook a big batch. This way, you have meals ready for busy days. You can also freeze the curry. It stays good for up to three months.
What should I serve with vegan sweet potato curry?
I recommend serving this curry with cooked quinoa or rice. Both are great for soaking up the sauce. You can also add naan bread for a fun twist. A fresh salad or steamed veggies pair nicely too. For a burst of flavor, add a wedge of lime. It adds a nice zing to each bite. You could even serve it with a side of yogurt or dairy-free yogurt. This adds creaminess and balances the spices.
This blog post covered crafting a delicious vegan sweet potato curry. We discussed key ingredients like sweet potatoes, coconut milk, and spices. Then, we walked through step-by-step cooking instructions to build rich flavors. You learned tips for perfect texture and how to enhance taste. We also explored variations, adapting for diets, and best storage practices.
This wholesome dish is perfect for any meal. Try your own mix of ingredients and enjoy!


![- 1 lb large shrimp, peeled and deveined - 2 tablespoons Cajun seasoning - 2 tablespoons olive oil, divided - 8 small corn tortillas - 1 cup shredded cabbage (green or purple for color) - 1/2 cup carrots, finely grated - 1/4 cup fresh cilantro, chopped - 1/4 cup mayonnaise - 2 tablespoons fresh lime juice - Salt and pepper to taste - Lime wedges for serving What are some good protein options for tacos? You can use chicken or fish as great swaps. You can also try tofu for a plant-based option. Each brings a unique taste to the dish. Why use fresh ingredients? Fresh ingredients enhance flavor and provide better texture. They also pack more nutrients compared to processed ones. How can I change the spice level? Adjust the Cajun seasoning to suit your taste. More seasoning gives a bold flavor; less gives a milder taste. You can also add a pinch of cayenne for extra heat. For more on making these tacos, check the Full Recipe. To start, combine the shrimp with Cajun seasoning in a medium bowl. Use two tablespoons of seasoning and one tablespoon of olive oil. Toss the shrimp well. This ensures every piece is coated in flavor. Let the shrimp marinate for 15 minutes. This step is key. It allows the spices to soak in, making the shrimp taste amazing. While the shrimp marinates, it’s time for the lime slaw. In another bowl, mix shredded cabbage, grated carrots, chopped cilantro, mayonnaise, lime juice, salt, and pepper. Stir these ingredients until they blend well. Set this aside for a bit. Letting the slaw sit helps the flavors come together. For the best texture, use fresh cabbage and finely grate the carrots. Now, let’s cook the shrimp. Heat the remaining tablespoon of olive oil in a large skillet over medium-high heat. When the oil shimmers, add the marinated shrimp in a single layer. Cook for 2-3 minutes on each side. The shrimp should turn pink and opaque when done. This shows they are cooked through. At the same time, warm the corn tortillas in a separate dry skillet. Heat each tortilla for about 30 seconds on each side. You want them soft and easy to fold. This step makes a big difference in how the tacos feel when you eat them. To assemble the tacos, take a warm tortilla. Lay a few cooked shrimp on it. Then, add a generous spoonful of lime slaw on top. For an extra pop of flavor, sprinkle more cilantro. Present the tacos on a colorful platter. Arrange lime wedges around them for a bright finish. This makes for a beautiful taco setup that is sure to impress. For the full recipe, check out the details above. Enjoy your flavorful creation! To ensure your shrimp are not overcooked, cook them just until they turn pink. This usually takes about 2-3 minutes per side. Overcooked shrimp can become rubbery and tough. Always check for that bright pink color and an opaque center. Temperature control is key when pan-frying. Heat your skillet over medium-high heat, then add olive oil. Wait until the oil shimmers before adding shrimp. This helps them cook evenly and develop a nice sear. Pair your Cajun shrimp tacos with sides like black beans or rice. A fresh salsa or guacamole also adds great flavor. For drinks, consider serving cold beer or a refreshing margarita. These pair well and enhance the taco experience. For a fun twist, create a taco bar. Set out shrimp, lime slaw, and toppings. Let your guests build their own tacos. This makes for a lively meal, perfect for gatherings or family dinners. To make this dish gluten-free, use corn tortillas. They are naturally gluten-free and hold up well. Always check your Cajun seasoning to ensure it is gluten-free. For a vegan version, swap shrimp with grilled vegetables or tofu. Use a vegan mayo for the slaw. You can also add avocado for creaminess and extra flavor. This way, everyone can enjoy these tasty tacos. You can find the Full Recipe to guide you through each step. {{image_4}} To make your Cajun shrimp tacos even more exciting, you can add extra spices. Consider using smoked paprika or cayenne pepper for more heat. A dash of garlic powder or onion powder can also deepen the flavor. You can switch up the slaw, too. Instead of cabbage, try using kale or bok choy for a crunchy texture. You could even add diced apples for a sweet twist. A spoonful of pineapple could bring a tropical vibe to your slaw. Choosing the right tortilla can change your taco game. Corn tortillas are great, but flour tortillas bring a soft, chewy feel. You can even try a whole wheat tortilla for a healthier choice. For a fun twist, use lettuce wraps instead of tortillas. This option is low-carb and fresh. You might also explore taco shells made from sweet potatoes or even jicama for a unique experience. If you want to wow your guests, upscale your tacos for a party. Use large shrimp and serve them on warm taco stands. A colorful platter with garnishes makes for a stunning display. For gatherings, consider setting up a taco bar. Lay out all the toppings and let guests build their own tacos. This not only makes it fun but also allows everyone to customize their meal. To keep your Cajun shrimp tacos fresh, store each component separately. Place the shrimp in an airtight container. They will stay good for about two days in the fridge. For the lime slaw, use a different container. It also lasts up to two days. If you want to keep them longer, you can freeze the shrimp. Just make sure to use a freezer-safe bag. Squeeze out as much air as you can. The slaw, however, does not freeze well. It can become watery when thawed. When it's time to enjoy your leftovers, reheat the shrimp gently. The best method is on the stove. Heat a skillet over low heat. Add the shrimp and cook for a few minutes until warm. You can also use a microwave. Just be careful not to overcook it. For the tortillas, warm them in a dry skillet. This helps restore their texture. Heat each tortilla for about 30 seconds on each side. This way, they stay soft and ready to fold. Enjoy your tasty tacos again with that flavor explosion! How long to marinate shrimp for maximum flavor? I recommend marinating the shrimp for about 15 minutes. This time is perfect for the Cajun seasoning to soak in. If you have more time, you can go up to 30 minutes for a deeper flavor. Can I make the slaw ahead of time? Yes, you can make the slaw ahead of time. I suggest making it a few hours before serving. This way, the flavors blend well, and it saves time when you’re ready to eat. What can I use instead of mayonnaise in the slaw? If you want to skip mayonnaise, try Greek yogurt. It adds creaminess and a bit of tang. You can also use avocado for a richer flavor. How to adjust for different dietary needs? To make it gluten-free, use corn tortillas. If you want a vegan option, replace shrimp with tofu or jackfruit and use vegan mayo for the slaw. Can I grill the shrimp instead of sautéing? Yes, grilling shrimp adds a nice smoky flavor. Just make sure to skewer them to prevent slipping through the grill. Grill each side for about 2-3 minutes until they are pink. What’s the best way to keep tortillas warm while serving? Wrap the warm tortillas in a clean kitchen towel. This keeps them soft and warm for a longer time. You can also use a tortilla warmer if you have one. For the complete recipe, check out the [Full Recipe]. This blog post covers a delicious shrimp taco recipe. We explored flavorful ingredients and their benefits. You learned how to marinate shrimp and prepare tasty lime slaw. We also covered cooking techniques and tips for perfect tacos. Finally, we discussed storage, variations, and common questions. Shrimp tacos can be fun and easy. With fresh ingredients, you can impress your guests. Enjoy trying these tips and creating your version!](https://joymealplan.com/wp-content/uploads/2025/07/f189128f-a0bc-414f-80f3-5521d4a2c85e-768x768.webp)

. Enjoy preparing this delightful meal! - Heat 2 tablespoons of olive oil in a large pot over medium heat. - Once hot, add 1 medium diced onion and 2 diced carrots. Sauté for about 5-7 minutes. - The onion should turn translucent, and the carrots will soften. - Now, add 3 cloves of minced garlic to the pot. Stir for 1 minute until fragrant. - Next, add 4 cups of fresh broccoli florets and pour in 4 cups of vegetable broth. - Raise the heat to bring the mix to a boil. - Once it boils, reduce the heat and let it simmer for 10-15 minutes. - You want the broccoli to become tender and bright green. - Carefully purée the soup using an immersion blender until smooth. - If you prefer, transfer it to a countertop blender, then back to the pot. - Stir in 1 cup of heavy cream and 1 teaspoon of Dijon mustard. - Heat through without boiling. - Gradually add 2 cups of grated sharp cheddar cheese. Stir until melted and creamy. - Taste the soup and season with salt and pepper as needed. This simple method leads to a rich, creamy soup. For the full recipe, refer to the main section. To boost the flavor of your creamy broccoli cheddar soup, I recommend using simple seasonings. A pinch of garlic powder or a dash of nutmeg can add depth. You can also try a bit of cayenne pepper for heat. Balance the creaminess with the broth by adjusting the amount of heavy cream. If you want it lighter, use a bit less cream and more broth. This keeps the soup rich but not too heavy. For a smooth and creamy soup, blending is key. Use an immersion blender to puree the soup right in the pot. This saves time and keeps cleanup easy. If you use a countertop blender, work in small batches. Be careful not to overblend; a little texture can be nice. When adding cheese, do it slowly. Stir continuously to avoid lumps. This helps the cheese melt evenly into the soup. Presentation matters! Ladle the soup into warm bowls for that cozy feel. Garnish with fresh parsley and a sprinkle of cheddar cheese on top. This adds a lovely pop of color. For serving, crusty bread is a great choice. It’s perfect for dipping and enhances the meal. Check out the Full Recipe for more details on making this delicious dish! {{image_4}} You can switch the cheese in this soup. Gouda or mozzarella works well. They give a different taste and melt nicely. If you want extra flavor, try adding proteins. Cooked chicken or crispy bacon can make it heartier. Just chop them small and stir them in at the end. Making this soup gluten-free is easy. Just ensure the broth is gluten-free. For a vegan version, swap the heavy cream for coconut cream. It keeps the richness while adding a hint of sweetness. You can also use vegan cheese for melting. Low-calorie options are possible too. Replace heavy cream with light cream for fewer calories. This soup pairs well with many sides. Crusty bread is a favorite. It’s perfect for dipping into the creamy soup. You can also serve a side salad. A fresh green salad with a tangy dressing adds a nice crunch. It gives you a complete meal that feels special. Check out the full recipe for more ideas and tips. To store leftover soup, let it cool first. Pour it into airtight containers. Glass or plastic containers work well. Make sure to leave some space at the top. This allows for expansion during freezing. You can keep your soup in the fridge for up to three days. For long-term storage, freezing is a great option. Use freezer-safe containers or heavy-duty bags. Remove as much air as you can. This helps prevent freezer burn. Label the containers with the date. When you want to enjoy it again, thaw it overnight in the fridge. Reheat the soup gently on the stove. Stir often to keep it smooth. Creamy Broccoli Cheddar Soup lasts about three days in the fridge. If you freeze it, it can last up to three months. Check for any signs of spoilage. If it looks or smells off, it's best to discard it. Enjoy your delicious soup while it's fresh! For the full recipe, check out the details above. To thicken Creamy Broccoli Cheddar Soup, you can use flour or cornstarch. Start by making a roux with equal parts flour and butter. Cook it for a minute, then slowly add it to the soup while stirring. This adds a smooth texture. Alternatively, mix cornstarch with cold water to make a slurry. Stir this into the soup and heat until it thickens. Both methods work well for this creamy delight. Yes, you can use frozen broccoli in this soup. Frozen broccoli is often picked at peak freshness, making it a great option. It cooks faster than fresh broccoli, so add it during the last few minutes of cooking. This saves time while still giving you tasty results. Just remember, frozen broccoli can be softer than fresh, which may change the soup's texture slightly. To make your soup dairy-free, swap out the heavy cream and cheddar cheese. Use coconut milk or almond milk for the cream. For the cheese, try nutritional yeast or a dairy-free cheese alternative. These swaps keep the soup creamy and flavorful. You won’t miss the dairy, and you can enjoy this soup without worries. For the full recipe, check out the links provided in the article. This blog post covers a delicious creamy broccoli cheddar soup. We explored fresh ingredients, broth, and seasonings that bring rich flavor. You learned step-by-step instructions, tips for perfect texture, and creative variations. Remember, you can adjust the recipe to fit dietary needs and presentation styles. Enjoy making this soup, whether you stick to the classic or try your own spin. The warmth and taste will satisfy everyone. Happy cooking!](https://joymealplan.com/wp-content/uploads/2025/06/abcb4099-a710-4d30-8f5d-fd35193da389-768x768.webp)

