Zucchini Pizza Casserole Flavorful and Simple Dish

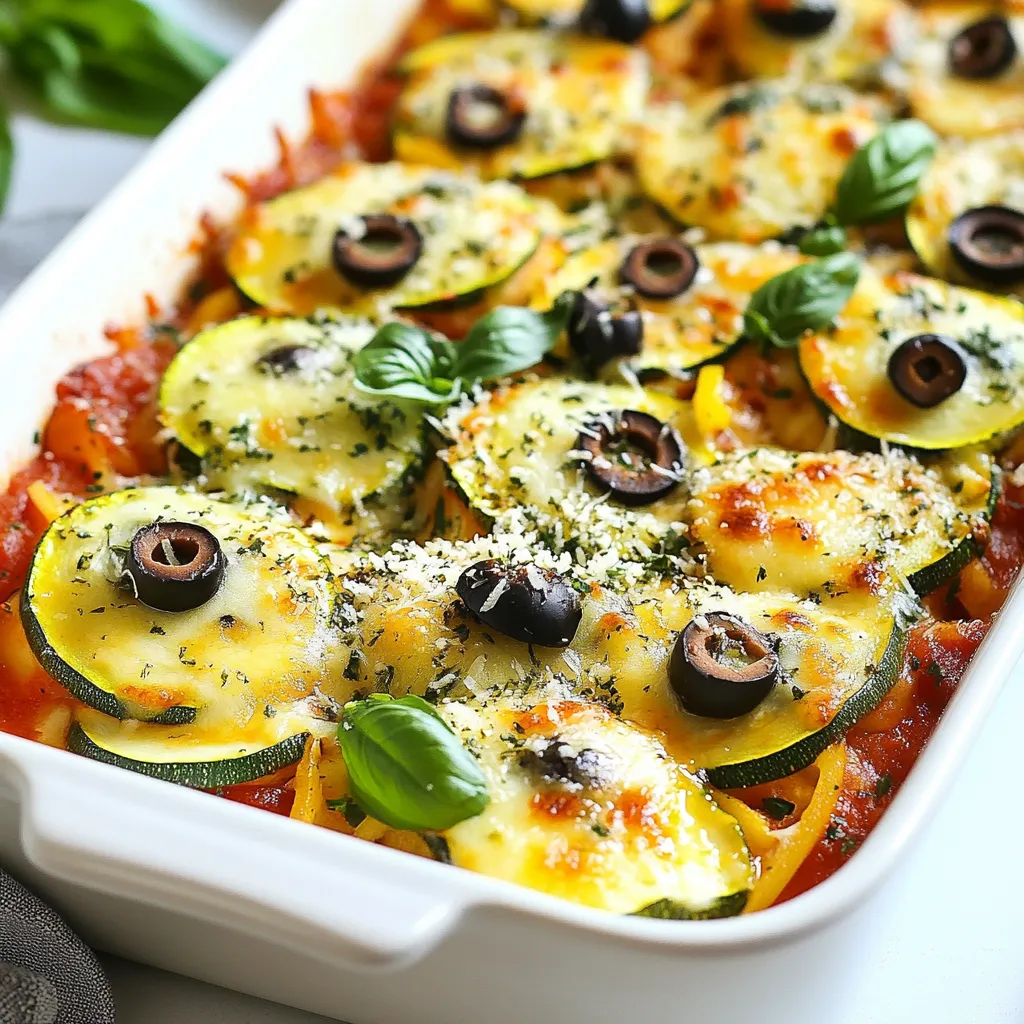
If you’re looking for a quick, tasty meal, you’ll love my Zucchini Pizza Casserole. This dish packs all the great flavors of pizza into a simple casserole that’s easy to make. It’s perfect for weeknight dinners or meal prep. With fresh zucchini, savory marinara, and gooey cheese, you’ll want seconds! Dive into this foolproof recipe that will impress your family and friends while keeping your kitchen fun and stress-free.
Why I Love This Recipe
- Easy Preparation: This casserole comes together quickly, making it perfect for busy weeknights when you want a comforting meal without a lot of fuss.
- Healthy Ingredients: Packed with fresh vegetables, this recipe is a nutritious twist on traditional pizza, allowing you to enjoy those familiar flavors guilt-free.
- Customizable: You can easily modify this recipe by adding your favorite toppings or adjusting the spice level, making it versatile for everyone’s taste.
- Delicious Leftovers: This casserole tastes even better the next day, making it a great option for meal prep or to enjoy throughout the week.
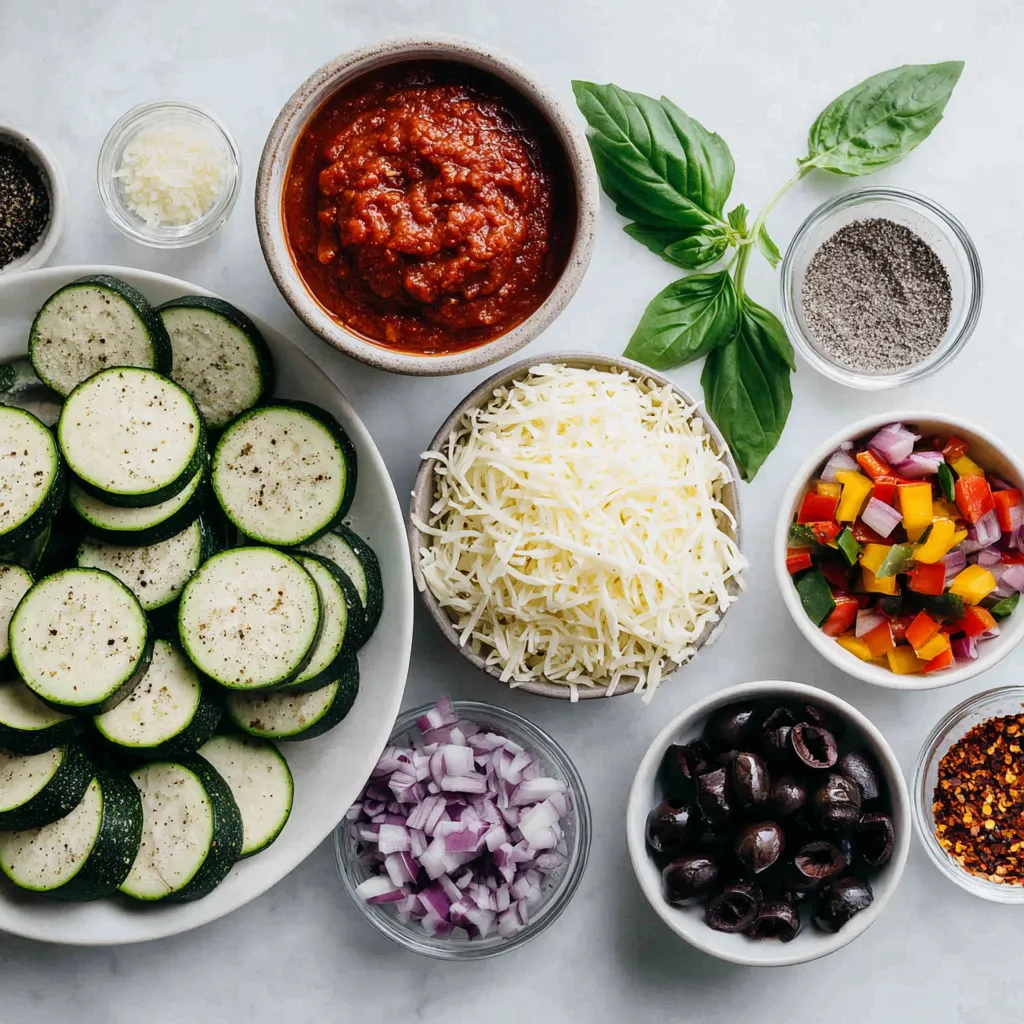
Ingredients
List of Main Ingredients
– 3 medium zucchinis, sliced into thin rounds
– 1 cup marinara sauce (your favorite brand or homemade)
– 1 cup shredded mozzarella cheese (plus extra for sprinkling)
– 1/2 cup grated Parmesan cheese
– 1 bell pepper, diced (choose any vibrant color for visual appeal)
– 1 small red onion, diced
– 1/2 cup black olives, sliced
– 3 cloves garlic, minced
To make this dish shine, the zucchini is the star. The marinara sauce adds a rich base, while the cheese varieties make it gooey and delicious. The vegetables bring in colorful textures and flavors.
Optional Ingredients
– 1/2 teaspoon red pepper flakes (optional, adjust for heat preference)
– Fresh basil leaves for garnish (optional, adds a pop of color)
These optional ingredients let you customize the dish. If you like heat, add red pepper flakes. Fresh basil brightens the flavors and makes your casserole look stunning.
Seasoning and Flavor Enhancers
– 1 teaspoon Italian seasoning
– Salt and pepper to taste
Seasoning is key to enhancing the taste. Italian seasoning gives that classic pizza flavor. Don’t forget salt and pepper to bring everything together. Taste as you go, and adjust to your liking.

Step-by-Step Instructions
Preheat the Oven
Preheating your oven is key to cooking. Set your oven to 375°F (190°C). This temperature helps the casserole cook evenly. If you skip this step, your dish may not cook right.
Sautéing the Vegetables
Start with a skillet and add a splash of olive oil. Heat it over medium. Add diced red onion and bell pepper. Cook them for about 5 minutes until soft. Then, add minced garlic and sauté for one more minute. This brings out the flavor. Just be careful not to burn the garlic.
Preparing the Zucchini Mixture
In a mixing bowl, combine sliced zucchinis with the sautéed veggies. Pour in the marinara sauce and add Italian seasoning. Add a pinch of salt and pepper too. Stir gently to coat the zucchini well. This mixture is the heart of the casserole.
Assembling the Casserole
Grab a 9×13 inch baking dish. Spread half of the zucchini mix across the bottom. This layer is important for structure. Then, sprinkle half of the shredded mozzarella cheese on top. Cheese adds a creamy texture and flavor.
Baking the Casserole
Cover your dish tightly with aluminum foil. This keeps the moisture in while baking. Place it in the oven for 30 minutes. After this, carefully remove the foil. Bake it for another 15 minutes. This step helps the cheese melt and bubble nicely.
Serving Suggestions
Once baked, take the casserole out and let it cool for 5 minutes. This helps it set. Slice it into squares or wedges for serving. If you like, add fresh basil on top. It gives a lovely aroma and a fresh look. Serve warm for the best comfort meal!
Tips & Tricks
Selecting the Best Zucchini
When choosing zucchini, look for medium-sized ones. They should feel firm in your hand. Avoid large zucchinis since they may have a watery texture and big seeds. The skin should be shiny and without blemishes. Fresh zucchini will give your casserole the best flavor.
Making it Ahead of Time
You can prepare this dish a day before. Slice the zucchini and chop the other veggies. Mix the ingredients and layer them in the baking dish. Cover it with foil and store it in the fridge. When you are ready, just bake it. This saves time on busy days and makes dinner easy.
Cheese Variations
While mozzarella is classic, you can try different cheeses. Cheddar adds a sharp taste. Feta gives a tangy flavor that works well. If you love blue cheese, sprinkle some on top for a bold kick. Mixing cheeses can create a rich and tasty dish.
Pro Tips
- Choose Firm Zucchini: Select firm zucchinis to ensure they hold their shape during baking for a better texture.
- Layer Wisely: Make sure to layer your ingredients evenly to ensure consistent cooking and flavor throughout the casserole.
- Let it Rest: Allow the casserole to rest for a few minutes after baking to help the layers set and make slicing easier.
- Experiment with Toppings: Feel free to customize with your favorite toppings like pepperoni, spinach, or different cheese varieties for a unique twist.

Variations
Vegetarian Options
You can make this dish even more colorful and tasty with extra veggies. Think about adding:
– Spinach
– Mushrooms
– Artichoke hearts
– Carrots
– Broccoli florets
These veggies not only add flavor but also boost nutrition. You can mix and match to suit your taste.
Gluten-Free Adaptation
If you need a gluten-free version, swap the regular marinara sauce for a gluten-free option. Check the label to ensure it meets your needs. You can also use gluten-free cheese brands. This way, everyone can enjoy a slice!
Protein Add-Ins
Want to make your casserole heartier? Add some protein! You can use:
– Ground turkey or chicken
– Italian sausage
– Plant-based meat crumbles
Simply cook the meat before adding it to the zucchini mix. This will give your dish extra flavor and make it more filling.
Storage Info
Refrigeration Guidelines
Store your zucchini pizza casserole in an airtight container. Make sure to cool it down first. Leftovers will stay fresh in the fridge for about 3 to 4 days. You can also cover the dish with plastic wrap or foil. This keeps it from drying out. When ready to eat, just reheat a slice or two.
Freezing Instructions
If you want to freeze the casserole, first let it cool completely. Cut it into individual portions for easier thawing. Wrap each piece tightly in plastic wrap. Then, place them in a freezer-safe bag or container. This way, it keeps for up to 2 months. When you’re ready to enjoy, thaw it in the fridge overnight before reheating.
Reheating Best Practices
To reheat, use the oven for the best texture. Preheat it to 350°F (175°C). Place the casserole in an oven-safe dish, covering it with foil to keep it moist. Heat for about 20 minutes. If you prefer, you can also use a microwave. Just heat each slice on a microwave-safe plate for about 1-2 minutes. This method is quick but may not keep the cheese as melty. Enjoy!
FAQs
How long does Zucchini Pizza Casserole last in the fridge?
Zucchini Pizza Casserole lasts about 3 to 5 days in the fridge. Store it in an airtight container. This keeps it fresh and tasty.
Can I use different types of cheese?
Yes, you can use different cheeses! Try cheddar, gouda, or feta. Each cheese gives a unique flavor. Mixing cheeses can also add depth to the dish.
What are some side dishes to serve with Zucchini Pizza Casserole?
Some great side dishes include:
– Garlic bread
– A fresh garden salad
– Steamed vegetables
These sides balance the rich flavors of the casserole.
Is it possible to make this recipe vegan?
Yes, you can make it vegan! Use vegan cheese and swap the marinara with a homemade sauce. This keeps all the flavors while making it plant-based.
What can I use instead of marinara sauce?
You can use pizza sauce, pesto, or even a homemade tomato sauce. Each option gives a new twist to your casserole’s flavor.
In this article, I covered how to make a delicious Zucchini Pizza Casserole. We explored key ingredients, including zucchini and marinara sauce, and talked about seasonings like garlic and Italian herbs. I provided step-by-step instructions, useful tips, and variations to suit all diets. Remember, cooking can be fun and creative. This recipe is flexible, so feel free to make it your own. Enjoy the process, and savor every bite of your tasty casserol

Zesty Zucchini Pizza Casserole
Ingredients
- 3 medium zucchinis, sliced into thin rounds
- 1 cup marinara sauce
- 1 cup shredded mozzarella cheese
- 0.5 cup grated Parmesan cheese
- 1 whole bell pepper, diced
- 1 small red onion, diced
- 0.5 cup black olives, sliced
- 3 cloves garlic, minced
- 1 teaspoon Italian seasoning
- 0.5 teaspoon red pepper flakes
- to taste salt and pepper
- for garnish fresh basil leaves
Instructions
- Preheat your oven to 375°F (190°C).
- In a large skillet, heat a splash of olive oil over medium heat. Add the diced red onion and bell pepper, cooking for about 5 minutes until they begin to soften. Add the minced garlic and sauté for an additional minute until fragrant.
- In a mixing bowl, combine the sliced zucchinis with the sautéed onion, bell pepper, marinara sauce, Italian seasoning, and a pinch of salt and pepper. Stir gently until the zucchini slices are well coated.
- In a 9x13 inch baking dish, evenly spread half of the zucchini mixture across the bottom.
- Sprinkle half of the shredded mozzarella cheese over the first zucchini layer.
- Top with the remaining zucchini mixture, then sprinkle the rest of the mozzarella cheese. Finish with a sprinkle of grated Parmesan and the sliced black olives. Add red pepper flakes if desired.
- Cover the baking dish tightly with aluminum foil and place it in the oven. Bake for 30 minutes.
- After 30 minutes, carefully remove the foil and continue baking for an additional 15 minutes.
- Once done, take the casserole out of the oven and let it cool for 5 minutes. Then slice into squares or wedges.
- If desired, add a sprinkle of fresh basil leaves on top before serving.


![To create a delicious Lemon Herb Grilled Salmon, you need fresh and simple ingredients. Here’s what you will gather: - 4 salmon fillets (approximately 6 ounces each) - 1/4 cup extra virgin olive oil - Zest from 1 large lemon - Juice of 2 fresh lemons - 3 cloves garlic, finely minced - 2 tablespoons fresh parsley, finely chopped - 2 tablespoons fresh dill, finely chopped - 1 tablespoon fresh thyme, finely chopped - Salt and freshly ground black pepper to taste - Lemon wedges, for garnishing These ingredients work together to bring out the bright and zesty flavor of the salmon. The fresh herbs add depth, while the lemon provides a refreshing kick. When you combine these elements, you create a dish that looks and tastes amazing. If you want to explore the complete process, check out the Full Recipe. To start, grab a medium bowl. Mix together: - 1/4 cup extra virgin olive oil - Zest from 1 large lemon - Juice from 2 fresh lemons - 3 cloves garlic, finely minced - 2 tablespoons fresh parsley, chopped - 2 tablespoons fresh dill, chopped - 1 tablespoon fresh thyme, chopped - Salt and pepper to taste Whisk all these ingredients together until they blend well. This mix will be your flavorful marinade. Now, take your salmon fillets. Place them in a resealable bag or shallow dish. Pour the marinade over the salmon. Make sure each piece is well coated. Seal the bag or cover the dish. Let it chill in the fridge for 30 minutes up to 2 hours. The longer it sits, the stronger the flavor will be. Preheat your grill to medium-high heat. If using a grill pan, set it to medium heat. Lightly coat the surface with olive oil to stop the fish from sticking. After marinating, remove the salmon from the bag. Let any extra marinade drip off. Discard the leftover marinade. Place the salmon skin-side down on the hot grill. Cook for about 5-6 minutes without touching it. Then, flip the salmon gently with a spatula. Grill for another 4-5 minutes. The fish should be opaque and flake easily with a fork. Once it’s done, let the salmon rest for a few minutes. This helps improve the flavor and texture. Serve the grilled salmon with fresh lemon wedges. Add a pop of citrus to enhance your dish. Enjoy your meal! For the complete recipe, check the [Full Recipe]. To grill salmon just right, aim for medium-high heat. This usually means around 375°F to 400°F. The salmon needs about 5-6 minutes on the first side. Flip it gently and grill for another 4-5 minutes. To check for doneness, use a fork. The fish should easily flake apart and look opaque. If it’s still shiny, it needs more time. For more flavors, try adding a pinch of smoked paprika or a dash of cayenne pepper. These spices can add a nice kick. Pair the salmon with sides like roasted veggies, quinoa, or a fresh salad. These dishes complement the salmon well and balance its rich taste. When plating the salmon, add a bright touch with fresh herbs. A sprinkle of parsley or dill makes it pop. Serve with lemon wedges for an extra zing. For drinks, a crisp white wine, like Sauvignon Blanc, pairs well. It enhances the meal and makes it feel special. For a non-alcoholic option, try sparkling water with lemon. It refreshes the palate and adds a lovely touch to your dinner. For the full recipe, check out the detailed steps above. {{image_4}} You can switch up the marinade to keep things fresh. Try using lime or orange juice instead of lemon. These fruits add a different twist to your salmon. You can also add spices like cayenne pepper for some heat. A touch of heat makes the dish more exciting. Grilling is great, but you have other choices too. Baking or broiling the salmon works well and keeps it moist. If it’s raining or too cold outside, use a stovetop grill pan. Just make sure it’s hot before adding the salmon for even cooking. You can make this dish fit your diet needs. For a gluten-free version, check that your spices are gluten-free. You can also skip dairy by using olive oil instead of butter. If you want to lower calories, use less oil in the marinade. These small changes keep the meal healthy while still tasting great. Try these variations to make lemon herb grilled salmon fit your taste and lifestyle. For the full recipe, check out the earlier sections! To keep your grilled salmon fresh, store it in the fridge. Place the salmon in an airtight container. This helps keep it from drying out. It should last for up to three days in the fridge. If you want to save it longer, freezing is a good option. Wrap the salmon tightly in plastic wrap, then put it in a freezer bag. You can freeze it for up to three months. Label the bag with the date so you know when to use it. When you reheat grilled salmon, you want to keep it moist. The best way is to use the oven. Preheat the oven to 275°F (135°C). Place the salmon on a baking sheet, cover it with foil, and heat for about 15 minutes. This method helps avoid drying out the fish. You can also use a microwave, but be careful. Heat it in short bursts of 30 seconds on low power. Check often to keep the flavor and texture. A splash of lemon juice can help refresh the taste. Grilling time depends on the thickness of the salmon. For fillets about 1 inch thick, grill for 5-6 minutes on one side. Flip and grill for another 4-5 minutes. Thicker fillets may need more time, so check for doneness. When the salmon is opaque and flakes easily, it's ready to eat. Yes, you can use frozen salmon. To cook it, thaw the salmon first. Place it in the fridge overnight or submerge it in cold water for about an hour. Once thawed, pat it dry and marinate as in the Full Recipe. This will help keep it moist while grilling. Lemon herb grilled salmon pairs well with fresh salads and veggies. Try serving it with: - Mixed green salad with a light vinaigrette - Steamed asparagus or green beans - Roasted potatoes seasoned with herbs - Quinoa or rice pilaf for a hearty side These dishes complement the fresh flavors of the salmon and make a complete meal. Grilling lemon herb salmon is simple and rewarding. You start with fresh salmon and a tasty marinade of olive oil, lemon, garlic, and herbs. Marinate for a short time to boost flavor. Grill it right and serve with sides for a complete meal. Experiment with different flavors and cooking methods to find your favorite. Always store leftovers properly to enjoy them later. With these tips, you’ll impress everyone at the table. Now, get ready to grill and enjoy this delicious dish!](https://joymealplan.com/wp-content/uploads/2025/06/94675a3f-7fd4-4f6d-bbd0-da6b916d26a4-768x768.webp)


![- 1 pound sirloin steak, cut into bite-sized cubes - 4 tablespoons unsalted butter - 4 cloves garlic, finely minced - 1 tablespoon fresh rosemary, finely chopped - 1 tablespoon fresh thyme, finely chopped - Salt and freshly ground black pepper, to taste - 1 tablespoon olive oil - ¼ teaspoon red pepper flakes (optional for heat) - Fresh parsley, finely chopped, for garnish The right ingredients make all the difference. For this dish, you want a good cut of meat. Sirloin steak works well because it’s tender and flavorful. Cut it into bite-sized cubes. This size helps them cook quickly and evenly. Butter adds richness. The unsalted kind allows you to control the salt level. Garlic gives a strong, tasty punch. Fresh herbs, like rosemary and thyme, add a nice touch. They bring out the beefy flavor. You can add red pepper flakes for a bit of heat. If you prefer a milder dish, just skip this ingredient. Fresh parsley is perfect for garnishing. It adds color and freshness to the final plate. Every ingredient plays a role. Together, they create joy in every bite. For the complete recipe, check out the Full Recipe section. Start by patting the steak cubes dry with a paper towel. This helps create a nice crust when searing. Moisture can make it hard to get that perfect sear. Next, season each steak cube with salt and freshly ground black pepper. This simple step packs in flavor. Let the seasoned steak sit for a bit. This allows the salt to work its magic. In a large skillet, heat the olive oil over medium-high heat until it shimmers. This means the oil is hot enough for searing. Carefully add the steak cubes. Make sure they are in a single layer. Sear the steak for 2-3 minutes without moving them. This helps form a beautiful crust. After that, flip the cubes and sear for another 2-3 minutes. Adjust the time if you want your steak more done. Once they’re seared to your liking, take the steak bites out and set them aside. In the same skillet, lower the heat to medium. Add the unsalted butter and minced garlic. Then toss in the chopped rosemary, thyme, and red pepper flakes if you want some heat. Stir everything together until the butter melts and the garlic smells great. This should take about a minute. Now, return the cooked steak bites to the skillet. Toss them gently in the garlic butter sauce. Cook for another 1-2 minutes. This lets all the flavors mix well together. Take the skillet off the heat. For the final touch, garnish the steak bites with freshly chopped parsley. Serve them on a colorful platter for a nice look. For fun, you can skewer the bites with toothpicks. This makes them easy to eat. Drizzle some of that garlic butter sauce on top to make them even more tasty! For the full recipe, check out the details provided earlier. Enjoy your cooking! To make the best garlic butter steak bites, start with patting the steak dry. This step is key. Dry steak creates a nice crust when you sear it. Use a paper towel to soak up any moisture. Next, adjust your cooking times based on how you like your steak. For medium-rare, sear the cubes for 2-3 minutes on each side. If you prefer your steak more done, add an extra minute or two. Remember, don’t overcrowd the pan. This helps the steak cook evenly. To boost flavor, consider adding spices and herbs. Fresh rosemary and thyme work wonders. The aroma will fill your kitchen and make the bites irresistible. You can also customize your steak bites with optional add-ins. If you like heat, sprinkle in some red pepper flakes. Want a bit of sweetness? Try adding a splash of balsamic vinegar. Each tweak can create a new taste experience. For the full recipe, click here: [Full Recipe]. {{image_4}} You can swap steak for chicken or shrimp. Chicken thighs work well because they stay juicy. Cut the pieces into bite-sized chunks. Cook for about 5-7 minutes until they are golden brown. Shrimp cooks quickly and adds a sweet taste. Use large shrimp and cook them for 2-3 minutes on each side until they turn pink. Both options absorb the garlic butter flavor nicely. For a gluten-free meal, use gluten-free soy sauce instead of regular soy sauce. Always check the label on your butter and spices. Most of them are naturally gluten-free. This keeps the dish safe for those with gluten sensitivities. Enjoy the same great taste without worry. If you want a vegetarian version, mushrooms are a great substitute. Portobello or cremini mushrooms can mimic the texture of meat. Slice them into bite-sized pieces and cook until golden. You can also use tofu for added protein. Press the tofu to remove moisture, then cut it into cubes. Sauté in the garlic butter for a tasty, plant-based dish. To keep your leftover steak bites fresh, store them in an airtight container. Make sure to cool them first. Place them in the fridge within two hours of cooking. This way, they stay safe to eat. Good storage helps keep the flavor and texture. Leftover steak bites last about three to four days in the fridge. When you're ready to enjoy your steak bites again, reheating is key. Use a skillet for the best results. Heat it over medium-low heat. Add a small amount of butter or oil to help keep them moist. Stir gently for about five minutes. This way, you keep the great taste and tender bite. Avoid using the microwave, as it can make the steak chewy. If you want to save steak bites for later, freezing is a good option. First, let them cool completely. Then, place them in a freezer-safe container. You can also use freezer bags, making sure to remove as much air as possible. They can last up to three months in the freezer. When ready to eat, thaw in the fridge overnight. Reheat them in a skillet for the best flavor. Enjoy your Garlic Butter Steak Bites with these storage tips for later meals! For the full recipe, check out the earlier section. Garlic butter steak bites pair well with many sides. Here are some great options: - Roasted vegetables: Carrots, Brussels sprouts, or asparagus are tasty choices. - Mashed potatoes: Creamy potatoes balance the rich steak flavor. - Rice: Fluffy rice soaks up the garlic butter sauce nicely. - Salad: A fresh green salad adds a crisp bite. - Garlic bread: Perfect for dipping into the garlic butter sauce. Yes, you can prep some parts ahead. Here are my tips: - Season the steak: You can season the steak cubes a few hours before cooking. This helps the flavors soak in. - Make the garlic butter sauce: Prepare the sauce in advance and store it in the fridge. Just warm it up before tossing in the steak. - Cook and store: You can cook the steak bites and store them in the fridge for up to two days. Reheat them gently before serving. If you want more heat, try these ideas: - Add more red pepper flakes: Increase the amount to your taste. - Use hot sauce: Drizzle some hot sauce over the finished dish. - Add jalapeños: Sauté sliced jalapeños with the garlic for extra spice. - Try chili powder: Sprinkle some chili powder on the steak while seasoning. These changes will add a nice kick to your garlic butter steak bites! For the full recipe, check out the [Full Recipe]. In this guide, we explored making garlic butter steak bites. We covered key ingredients, step-by-step cooking instructions, and tips for perfecting your dish. Remember to use fresh herbs for great flavor and adjust cooking times for your preference. You can also try alternatives like chicken or mushrooms. This dish is easy to store and reheat, making it perfect for any meal. Enjoy experimenting with flavors and creating a delicious steak experience!](https://joymealplan.com/wp-content/uploads/2025/06/487cc2c4-861e-43bd-80e8-4492eb920a60-768x768.webp)

